Cookie Policy

By clicking on “Accept all cookies”, you consent to the storage of cookies on your device and the associated processing of your personal data by Sushi Labs and our partners to improve website navigation, analyse website usage and conduct surveys. You can revoke your consent at any time via the “Manage cookie preferences” button.

For further information on our data processing and cookies, please visit our and our .

  • Academy
  • Blog
  • FAQ
  • Network Tutorial

    Sonic: Bridge, Swap, and LP on Sonic via Sushi
    Hemi: Bridge, Swap, and LP on Hemi via Sushi
    Rootstock: How to Bridge, Swap, and LP on Rootstock via Sushi
    Core: Bridge, Swap and LP on Core via Sushi
    Blast Tutorial: Bridge assets, Swap and LP (v3) on Blast via Sushi
    Zetachain Tutorial: Bridge assets, Swap and LP (v3) on Zetachain via Sushi
    Base Tutorial: Bridge assets, Trade and LP on Base via Sushi
    Aptos Tutorial: Bridge, Swap and LP on Aptos via Sushi
    SKALE Tutorial: Bridge, Swap, and LP on SKALE via Sushi
    Rootstock: How to Bridge, Swap, and LP on Rootstock via Sushi
    Sonic: Bridge, Swap, and LP on Sonic via Sushi
    Hemi: Bridge, Swap, and LP on Hemi via Sushi
    Rootstock: How to Bridge, Swap, and LP on Rootstock via Sushi
    Core: Bridge, Swap and LP on Core via Sushi
    Blast Tutorial: Bridge assets, Swap and LP (v3) on Blast via Sushi
    Zetachain Tutorial: Bridge assets, Swap and LP (v3) on Zetachain via Sushi
    Base Tutorial: Bridge assets, Trade and LP on Base via Sushi
    Aptos Tutorial: Bridge, Swap and LP on Aptos via Sushi
    SKALE Tutorial: Bridge, Swap, and LP on SKALE via Sushi

    In this step-by-step guide, you will learn how to bridge assets to Rootstock network, make a swap, and LP on Rootstock via Sushi v2 & v3 AMM.

    Bridge Assets From Ethereum Mainnet to Rootstock

    There are a few ways to bridge from Ethereum Mainnet to Rootstock. If you are starting from scratch, we recommend Symbiosis to get some RBTC to start. If you already have gas tokens like RBTC in your wallet, you can use the native RSK bridge with Ethereum.

    1. Visit Symbiosis website

      Go to Symbiosis
    1. Go to Swap

      Navigate to the Swap section on the Symbiosis website.
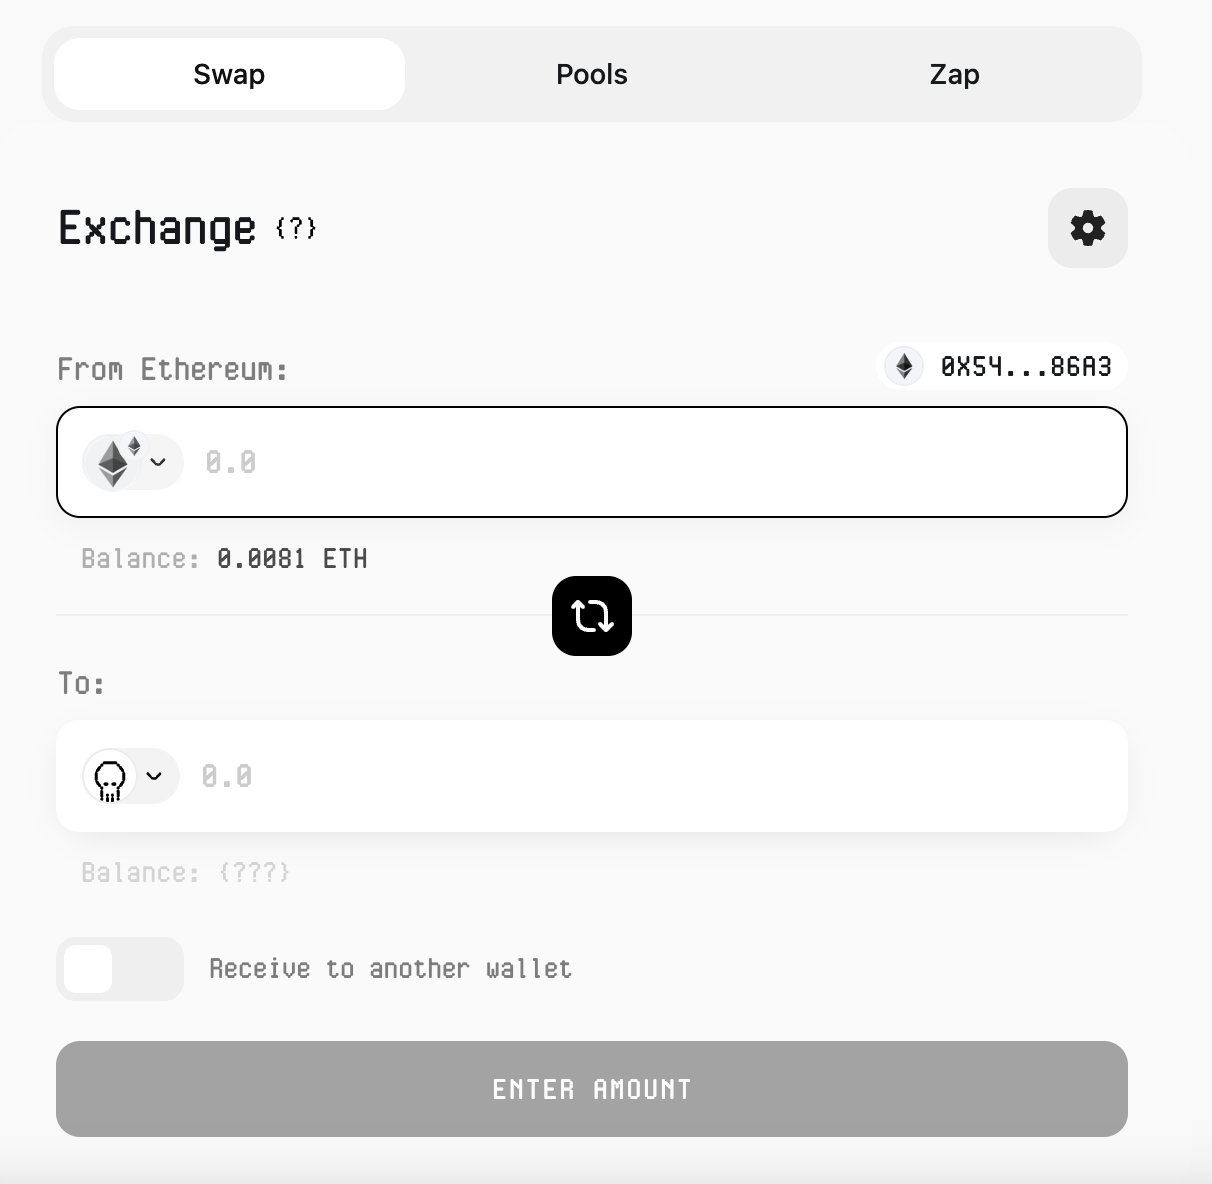
    1. Connect Wallet

      Connect your wallet (e.g., MetaMask).
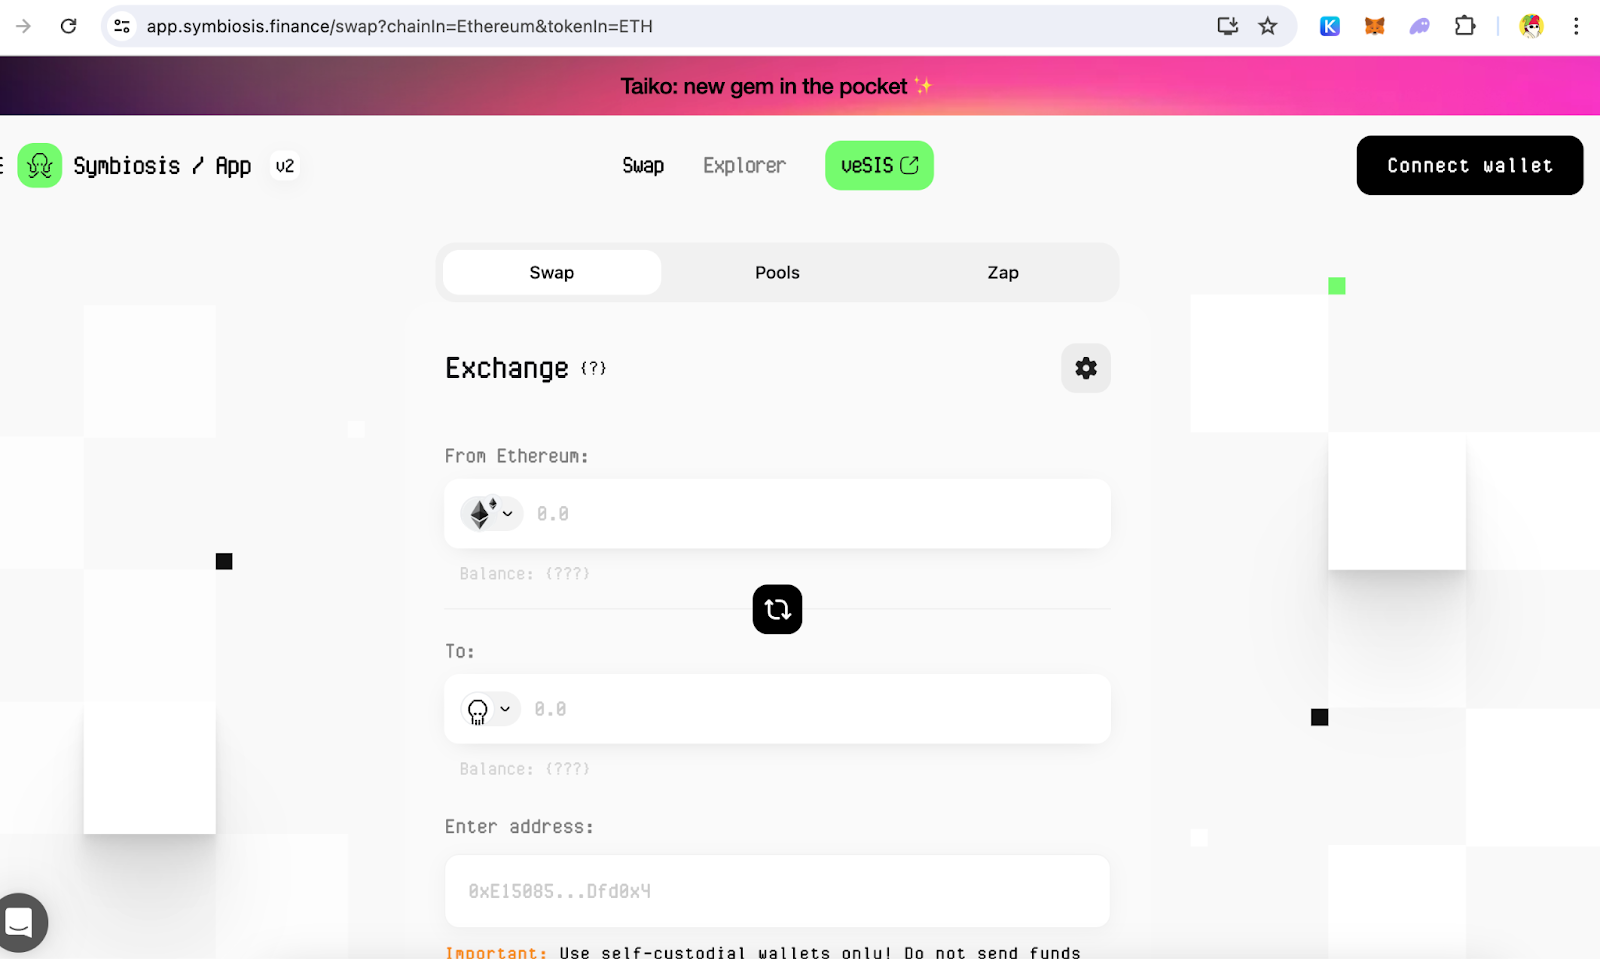
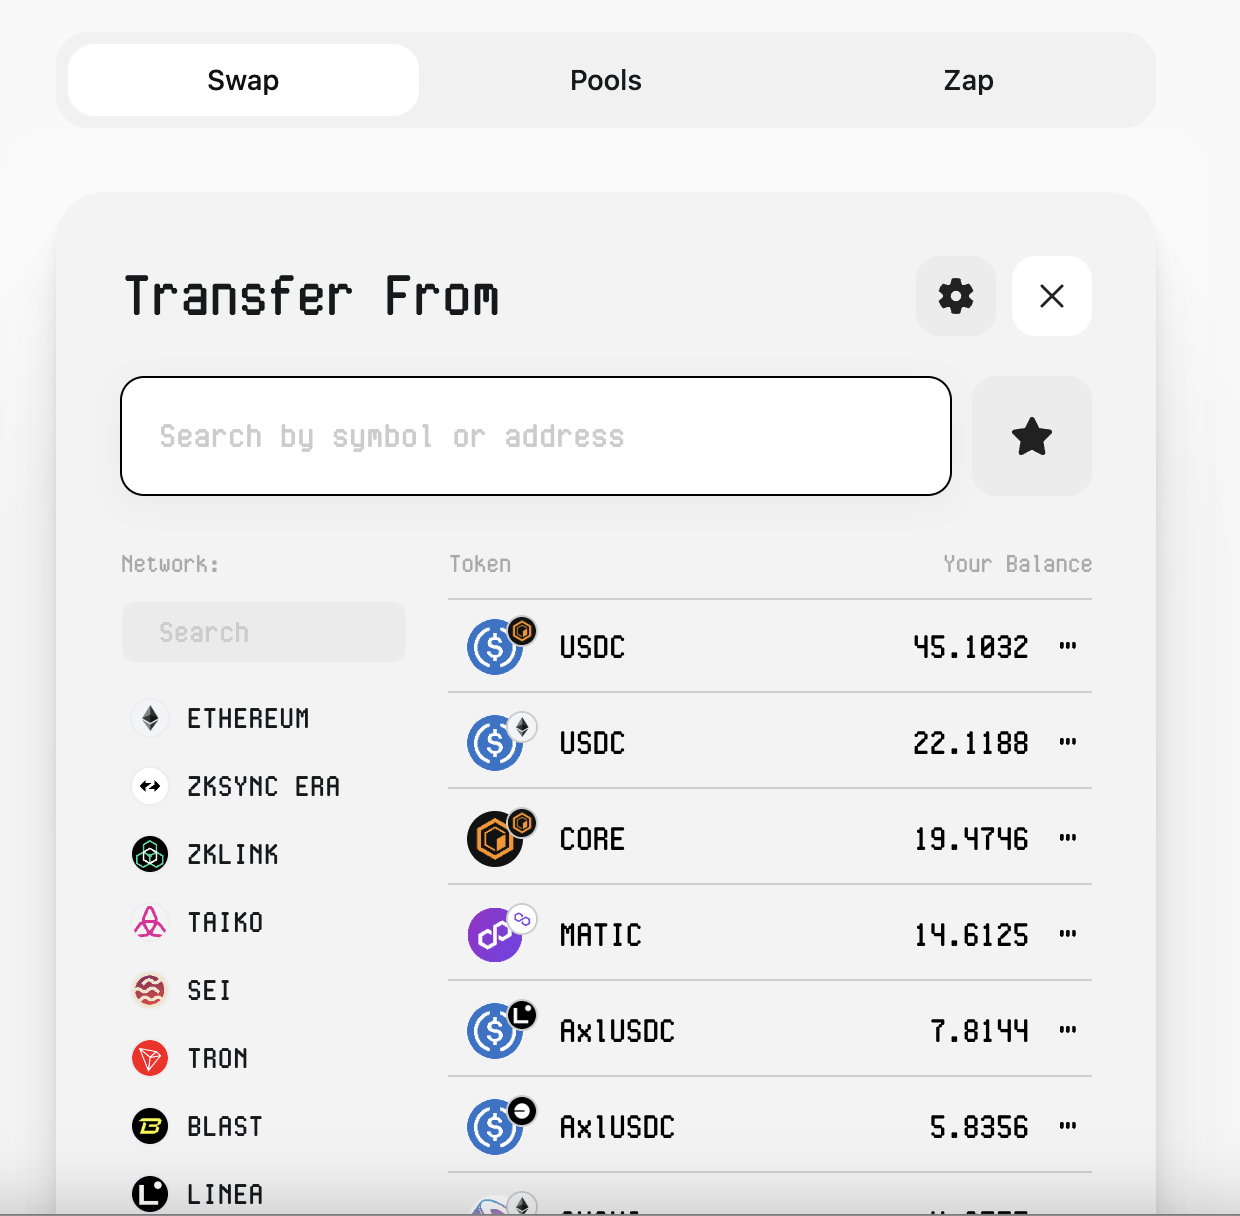
    1. Choose the Token to Transfer From

      Select the token you want to transfer from Ethereum Mainnet and specify the amount.
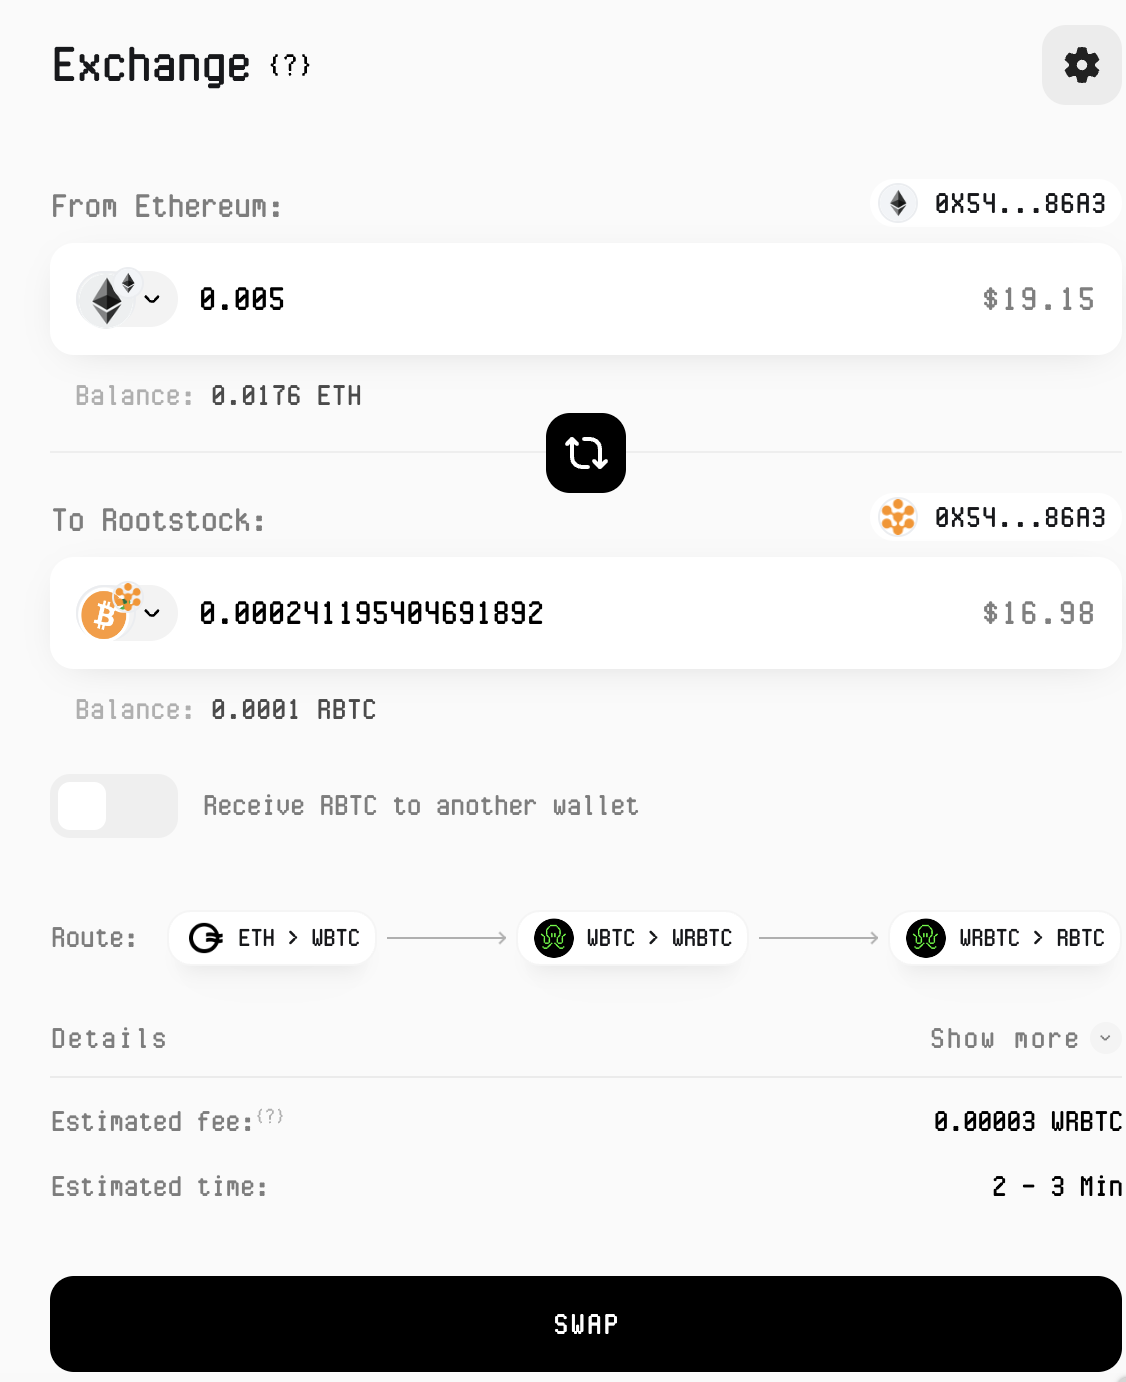
    1. Choose the Destination Chain

      Select Rootstock as the destination chain and RBTC as the destination token, then click "Swap".
    1. Approve the Transaction

    Approve the use of the token in your wallet and follow the prompt on Metamask to submit the transaction.
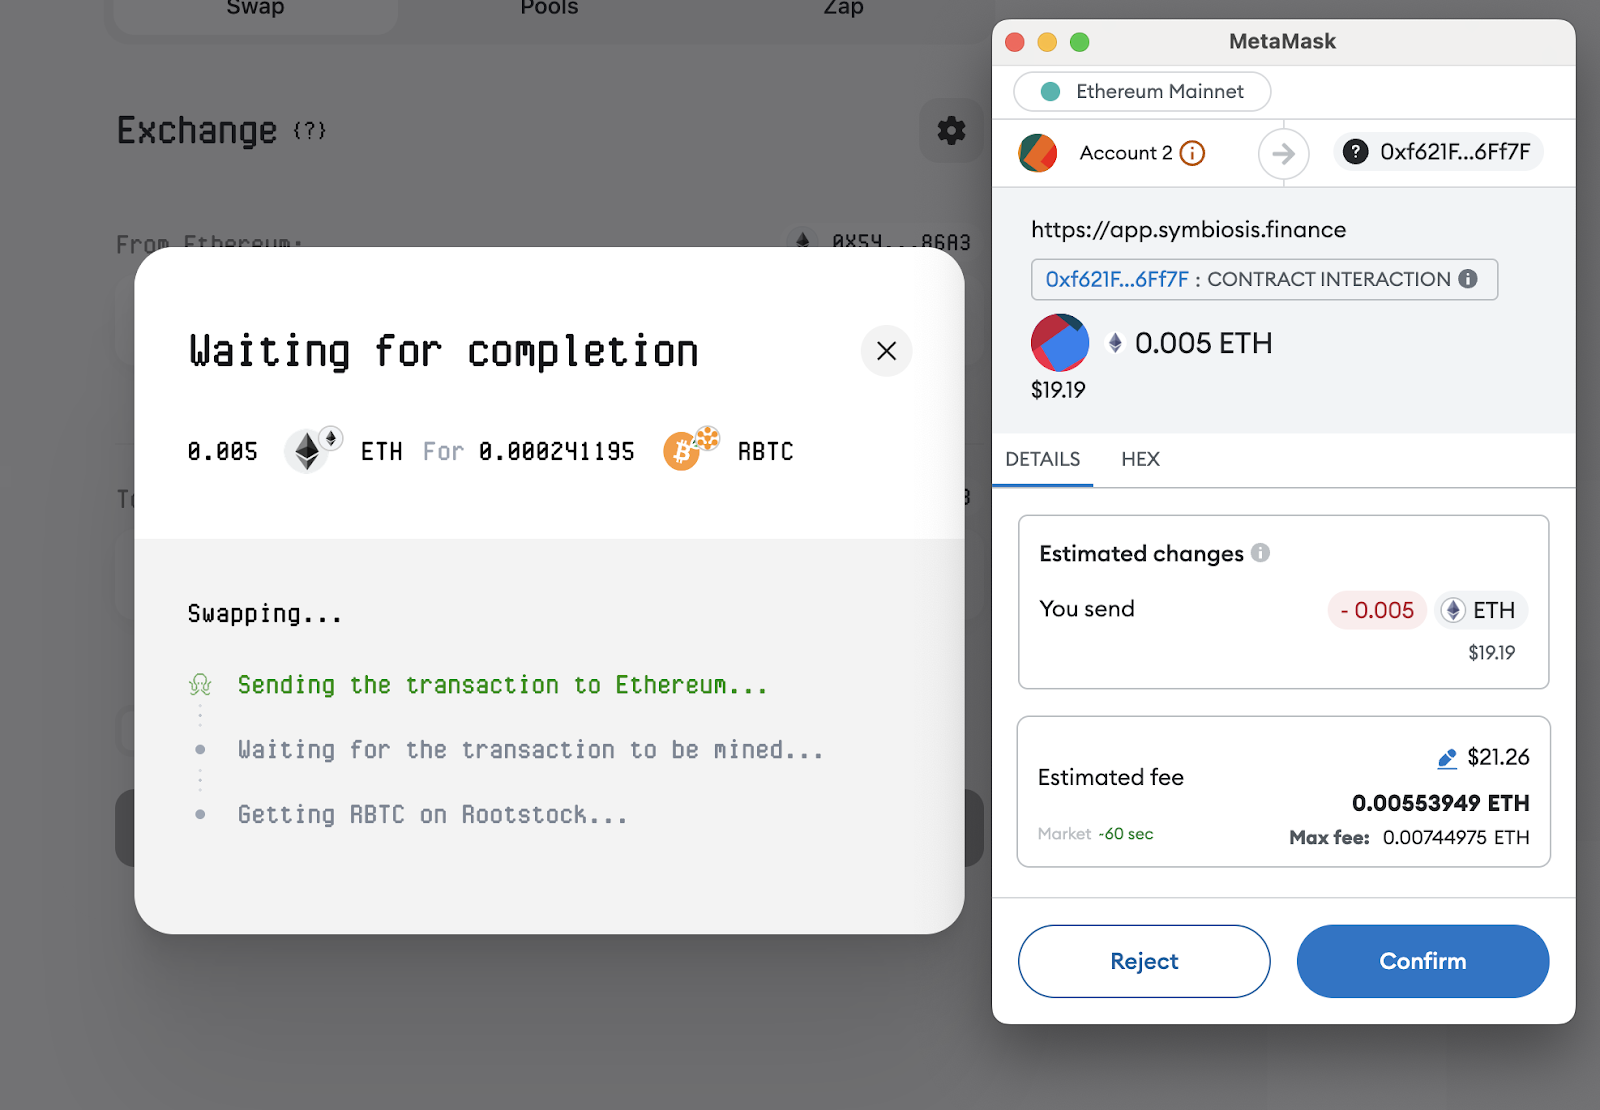
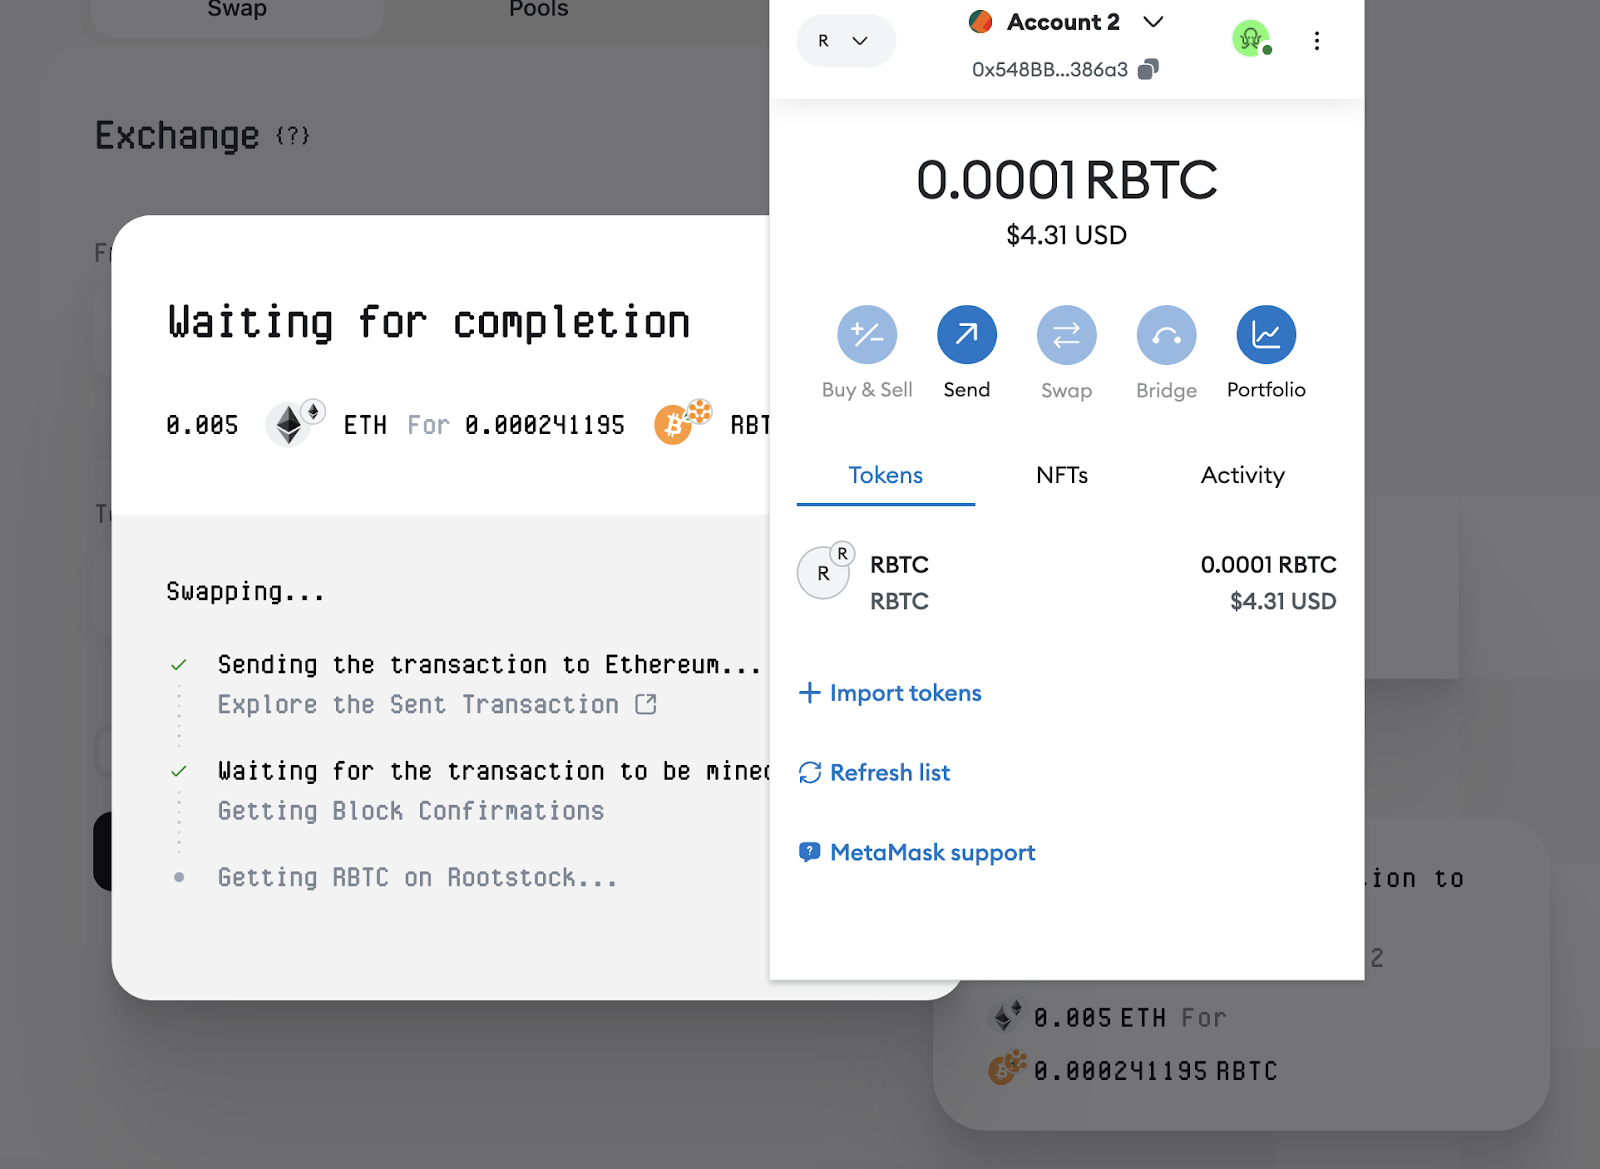
    1. Transaction completed

    You should be able to find the RBTC in your Metamask on the Rootstock network.
    Swap on Rootstock via Sushi

    1. Visit the Sushi Website

    Navigate to the Sushi interface by visiting Sushi.

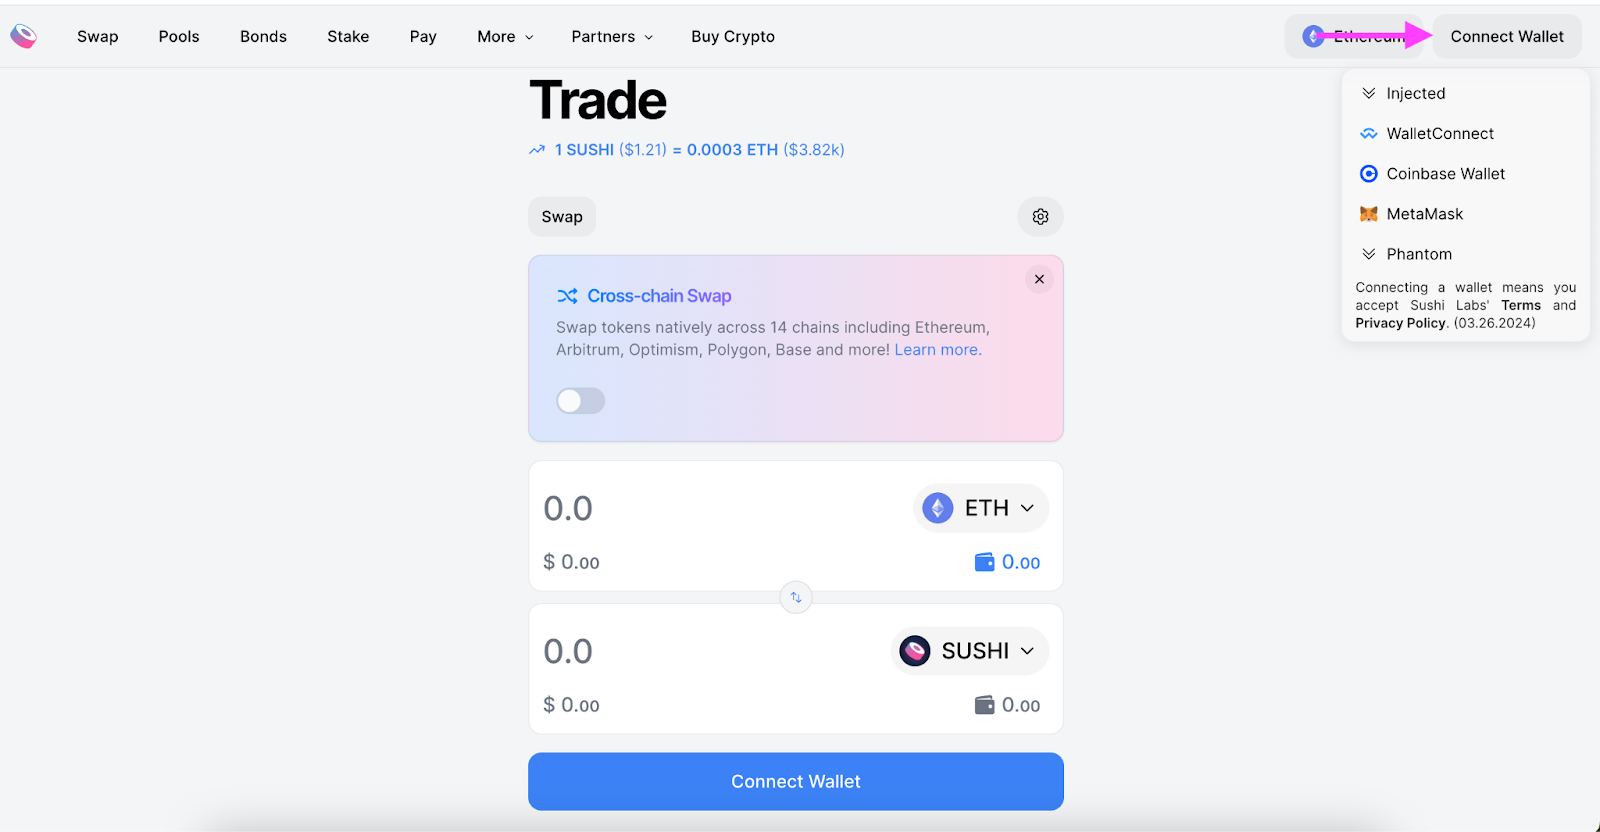
    1. Connect Wallet

    Use a Web3 wallet, such as MetaMask, and connect by following the prompt.
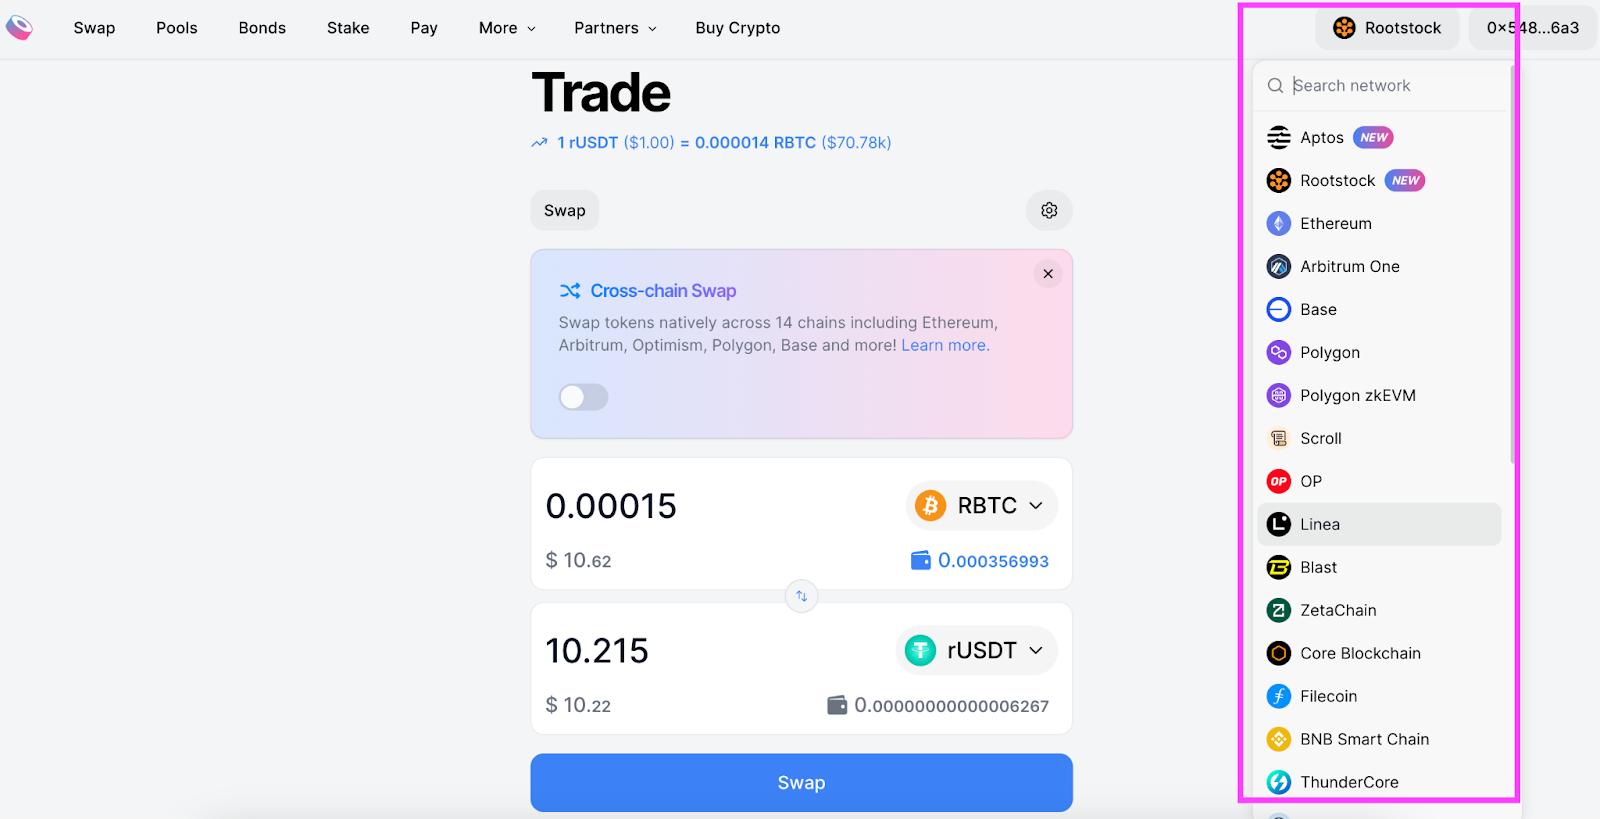
    1. Change Network to Rootstock

    Switch from the default or current network to Rootstock in the network selection area. Ensure your wallet is connected.
    1. Select Tokens to Swap

    Choose the tokens you wish to swap. Click on the token list to see more options in the dropdown menu. Select the tokens you want to swap from and to.
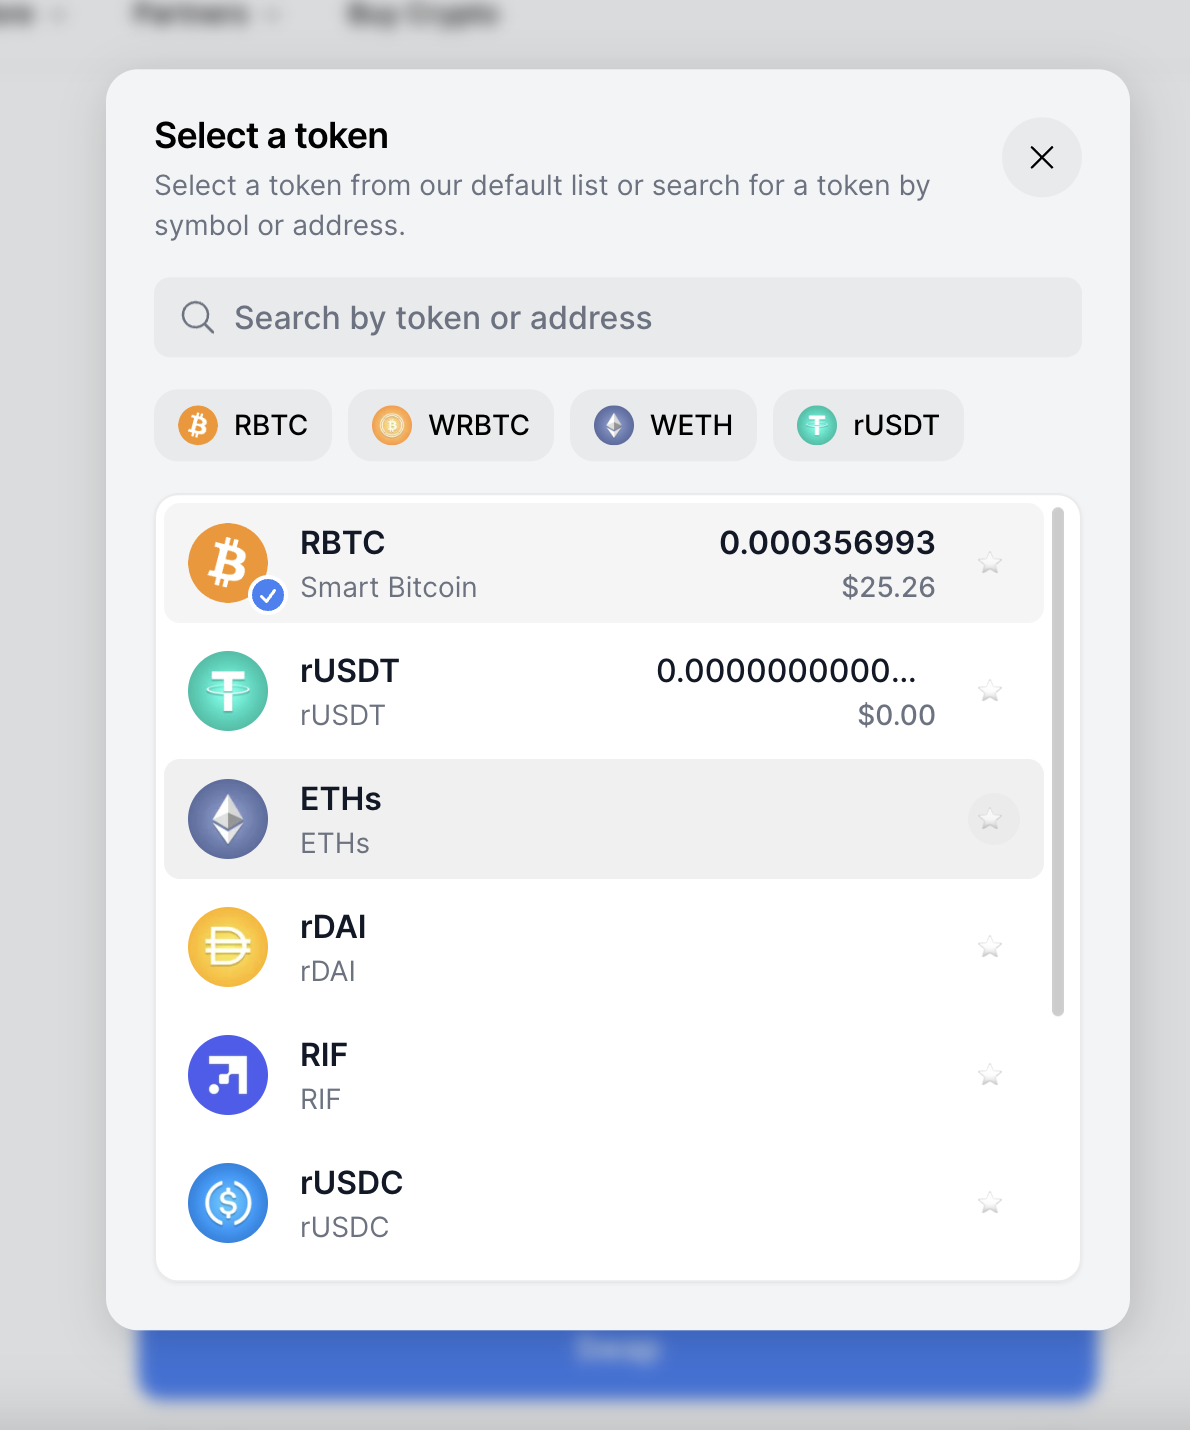
    1. Enter Swap Amount

    Input the number of tokens you want to swap. Click “Swap” to proceed.

    1. Check the details

    Confirm the details of the Swap and follow the instructions. You will have to approve the tokens you want to swap, follow the wallet instructions and click “Approve”. 
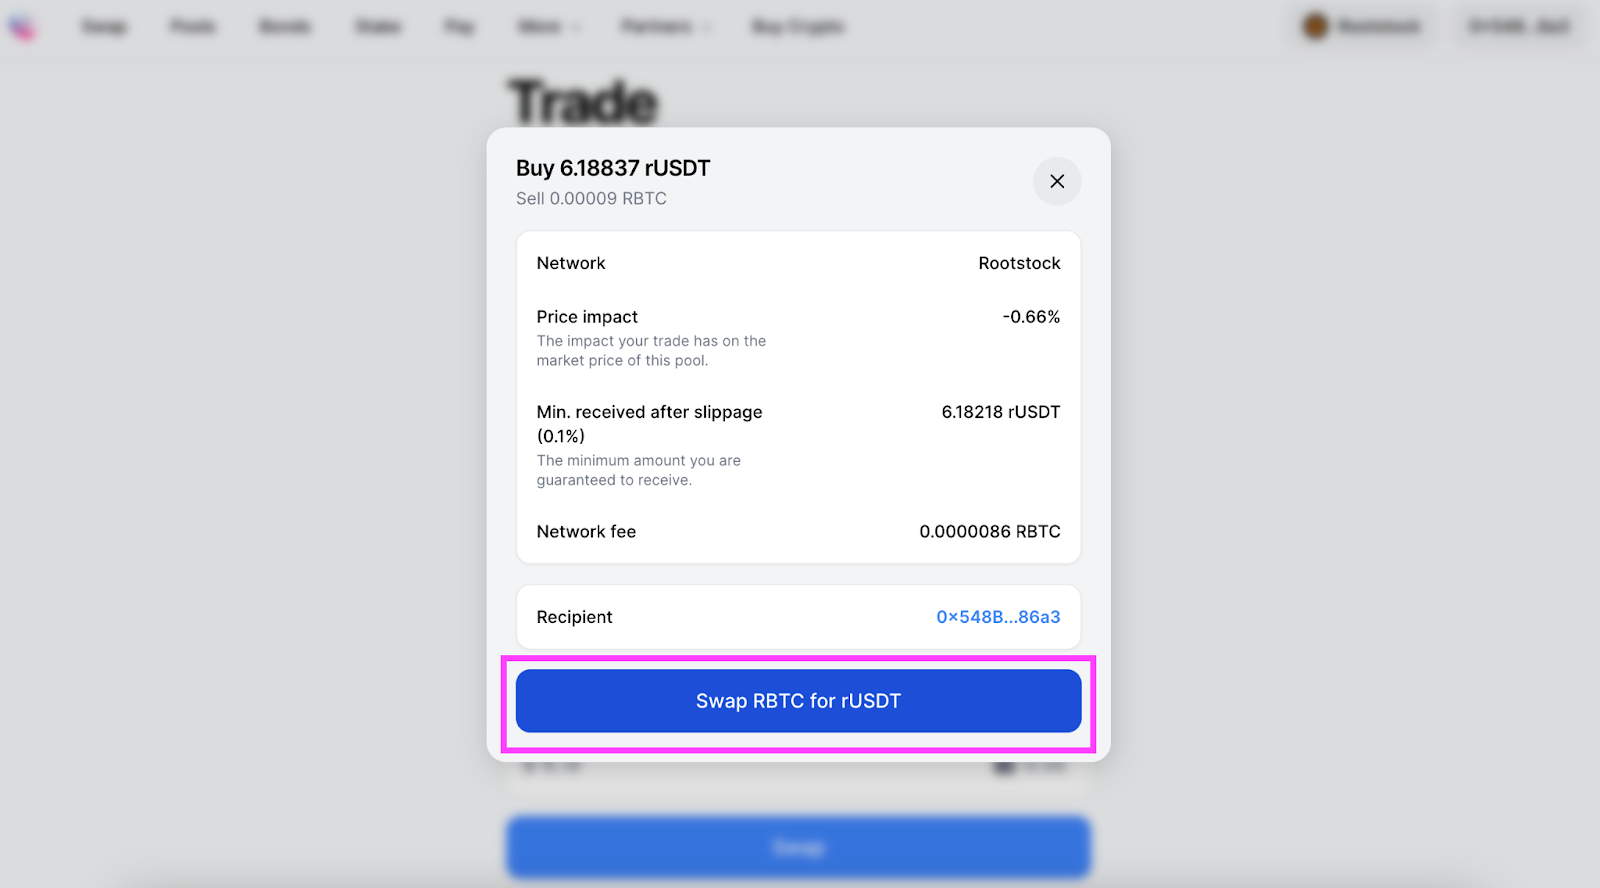
    1. Execute the Swap

    Click “Swap” to initiate the transaction, then click “Confirm” in your wallet interface to execute the swap. Upon successful transaction, you've effectively swapped tokens on Rootstock.
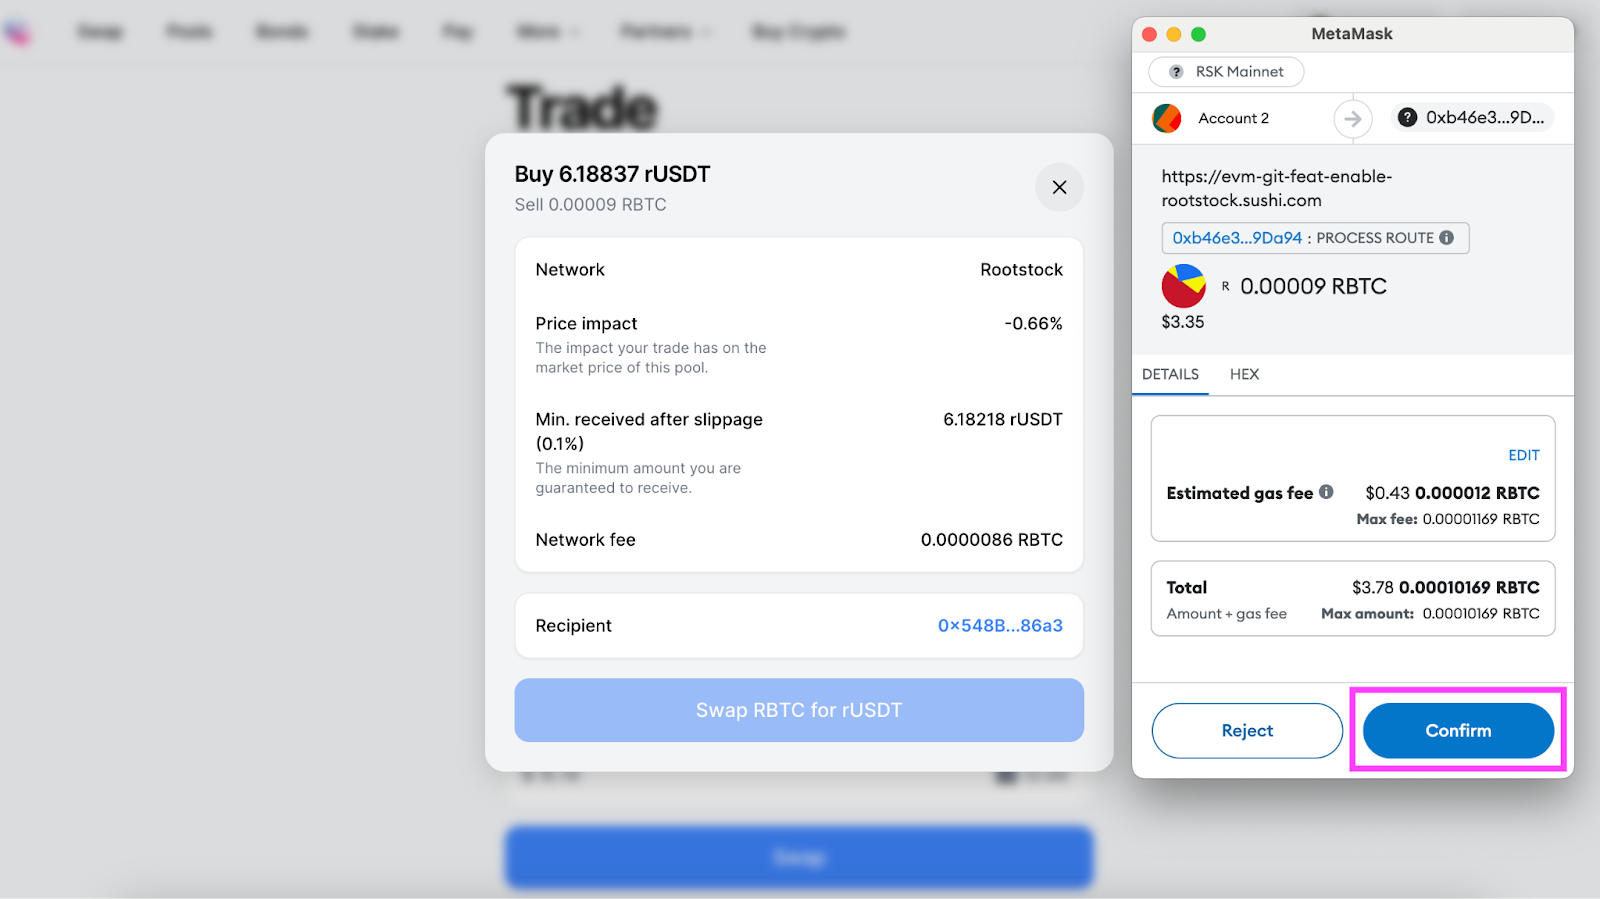
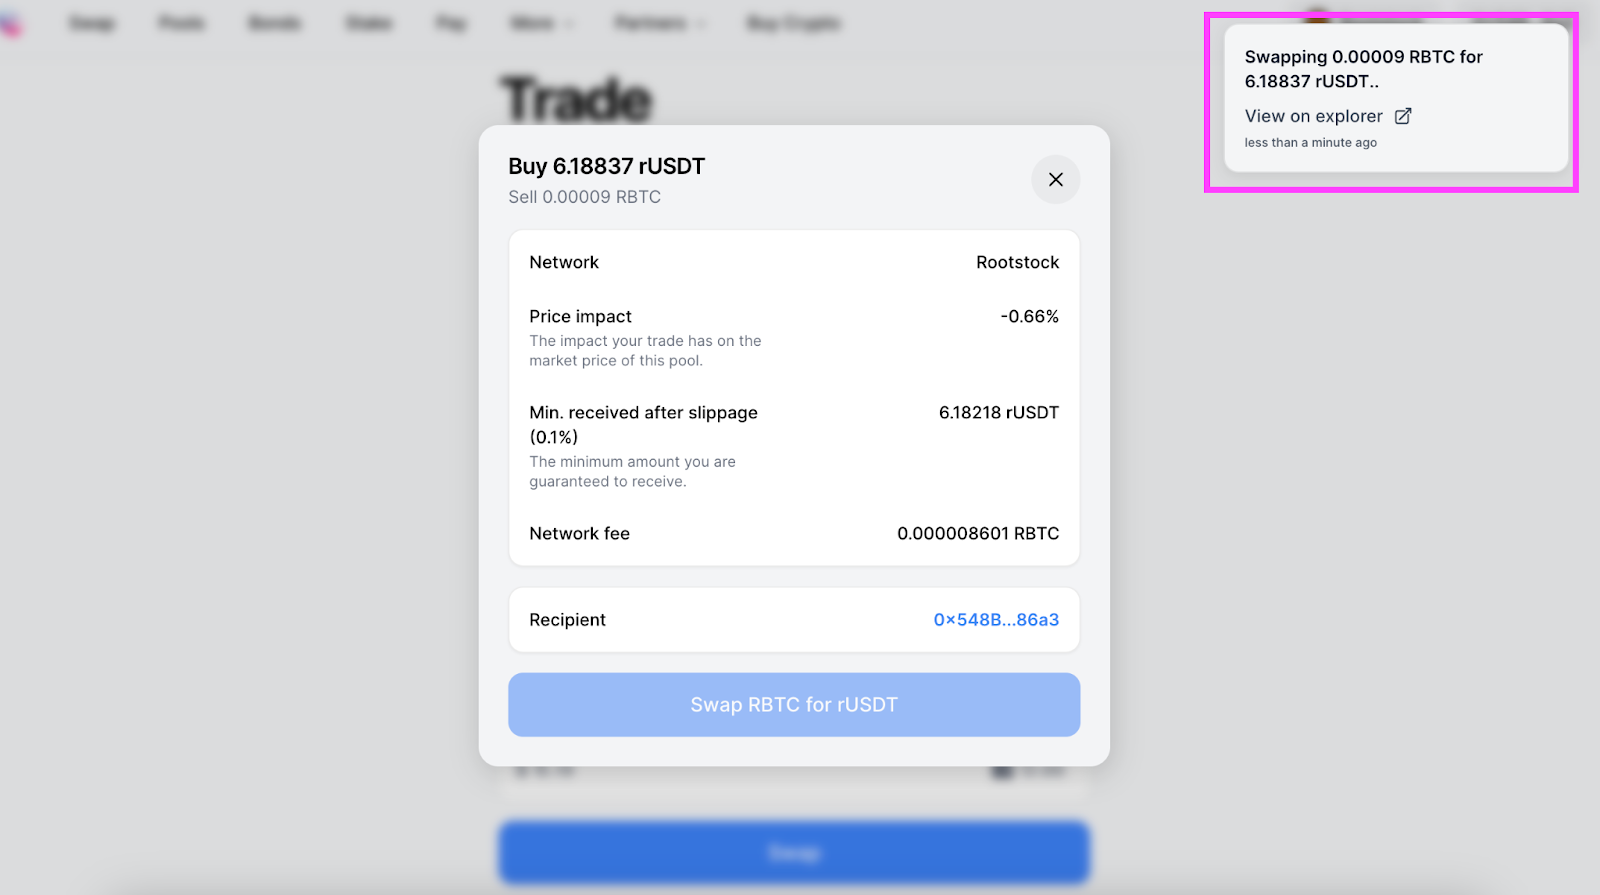
    LP on Rootstock via Sushi (v3):

    1. Visit the Sushi Pool UI

    Navigate to the Sushi Pools interface by visiting Sushi Pools.

    1. Connect Wallet and Change Network

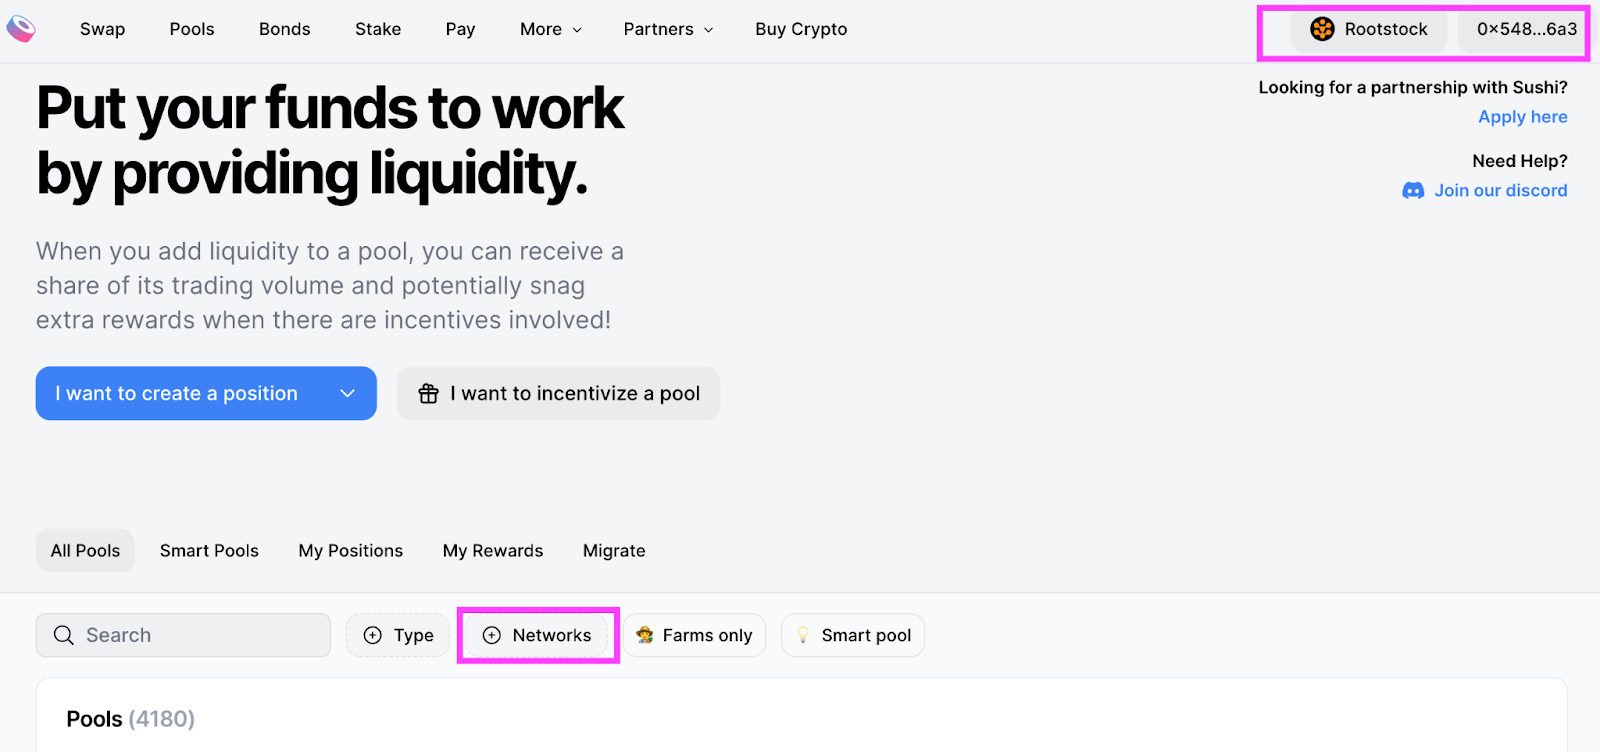
    Connect your wallet and change the network settings to Rootstock if you haven’t already done so.

    1. Select a Pool

    Choose a liquidity pool you're interested in LPing, for example, RBTC/ rUSDT

    1. Select Price Range

    Determine the price range within which you're willing to provide liquidity. There are two ways to do this:

    a. Adjust the price range bar to set the minimum and maximum price.

    b. Enter specific values into the designated boxes.

    Note: Remember that a narrower price range can result in higher fee collection but also increase the risk of being out of range and not earning any fees. Opting for the full range is equivalent to the classic v2, with no concentrated liquidity.

    5. Provide Liquidity Amount

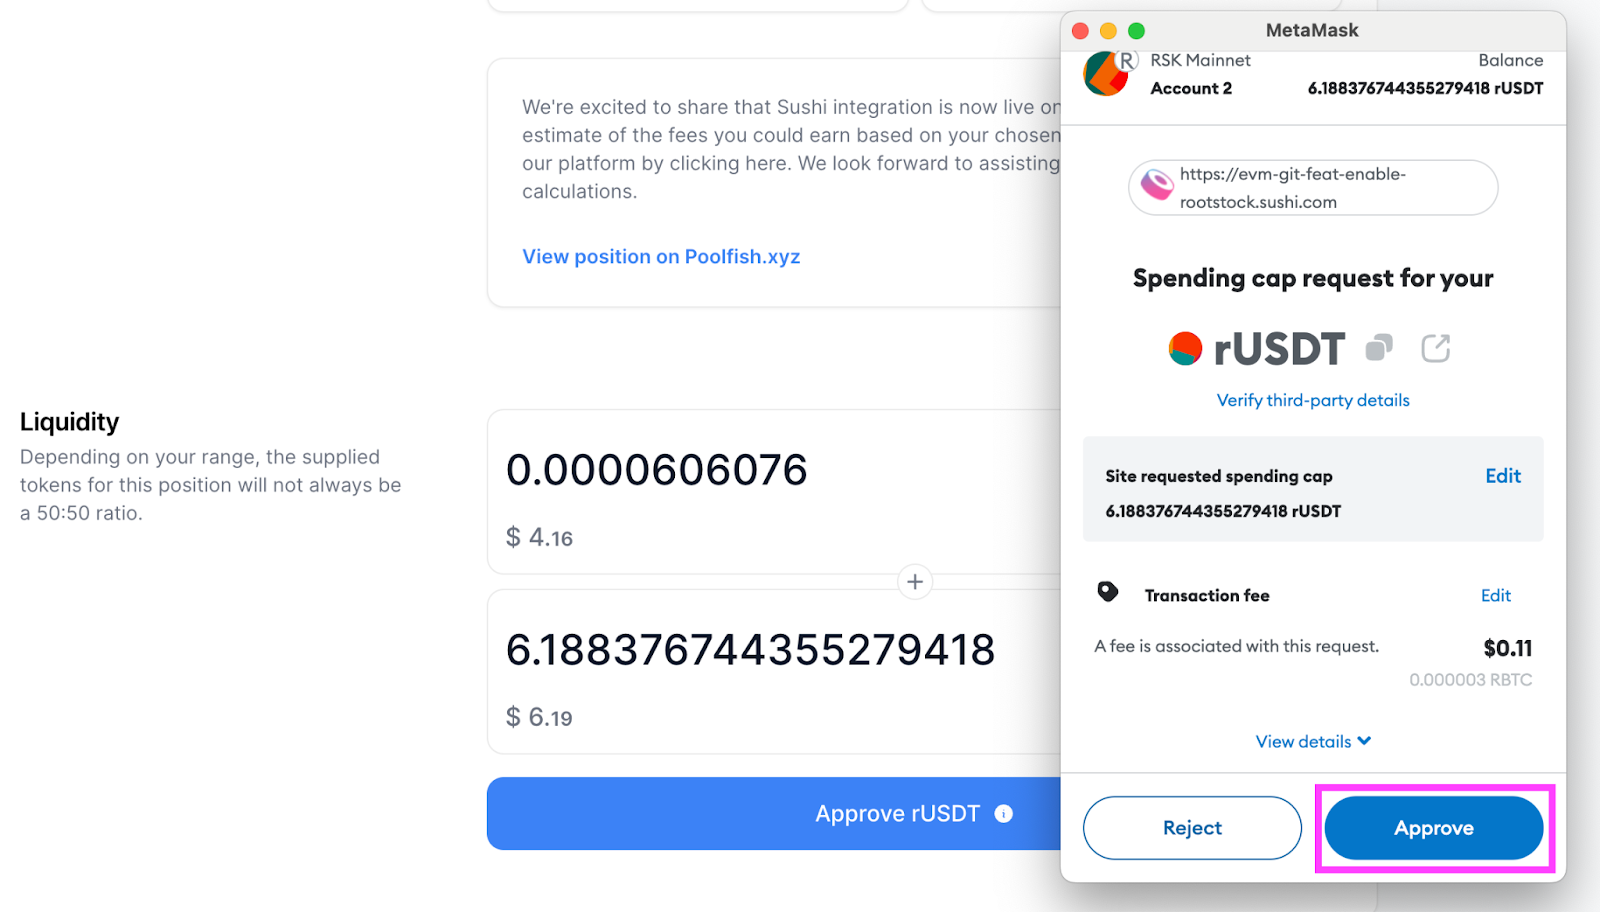
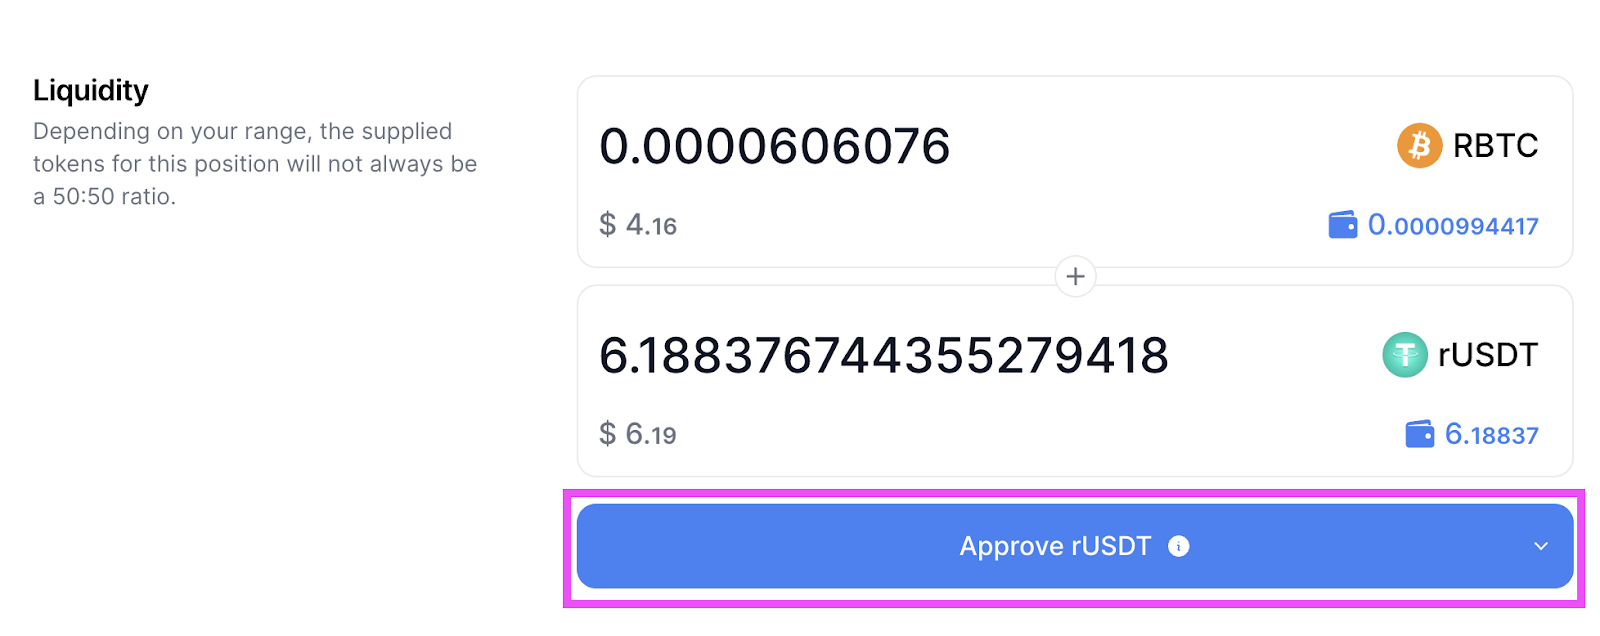
    Enter the amount for one token in the pair. The protocol will populate the other token. If one token exceeds the amount, try inputting the other one first. Just like swapping, you need to approve the spending cap for the tokens. Click “Approve (TKN)” and approve the tokens one by one on your wallet.

    7. Review & Confirm

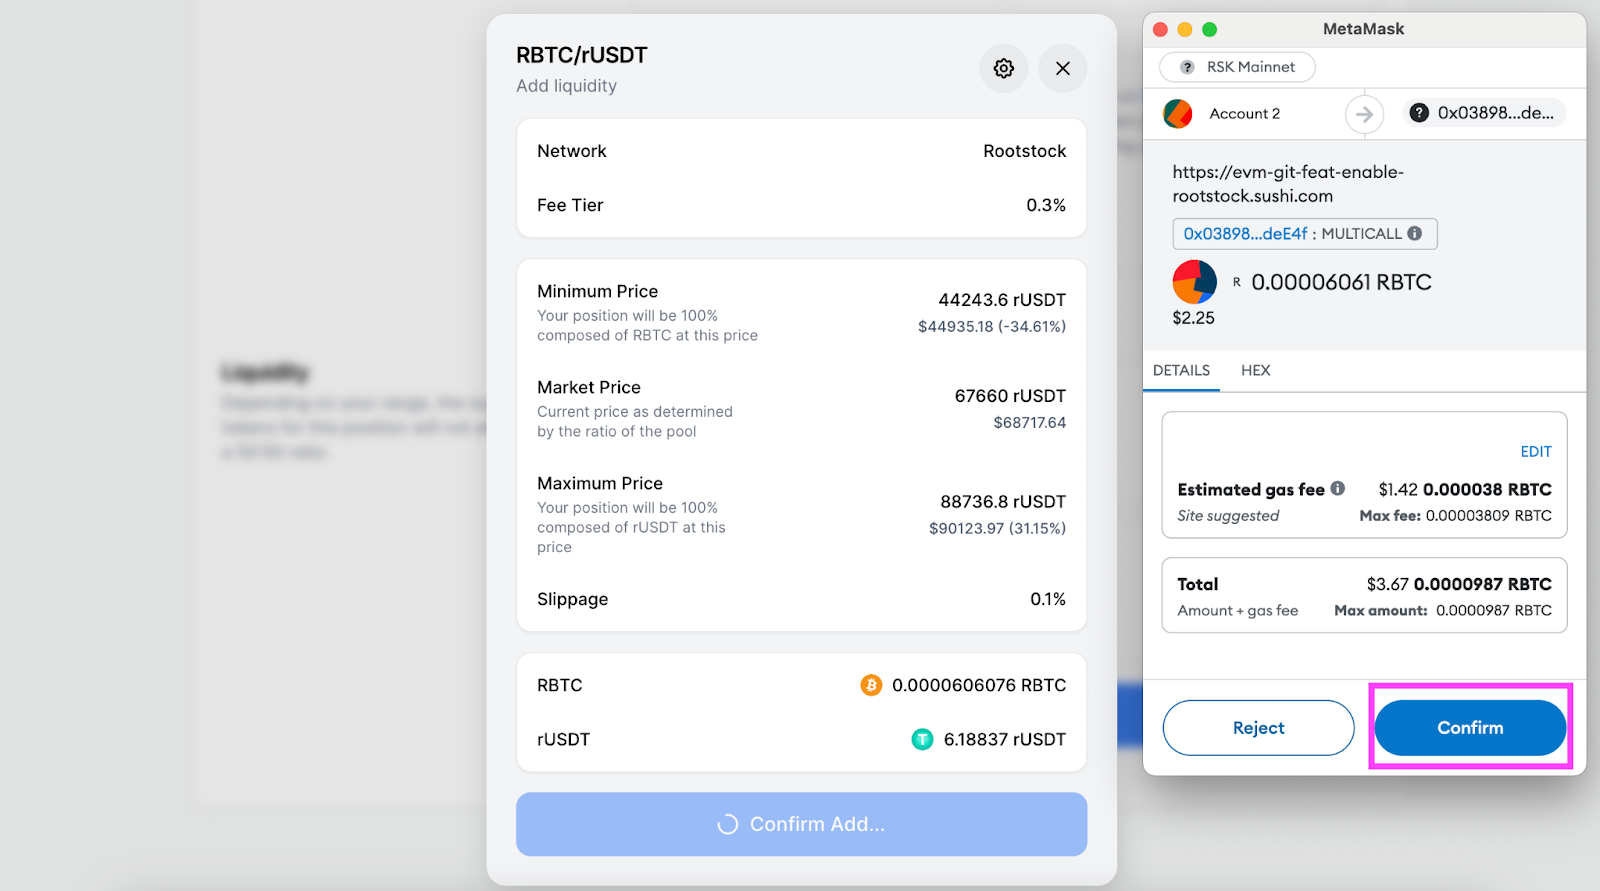
    Follow the instructions on the UI. Click “Preview”, then “Add Liquidity”. Confirm the transactions in your wallet.

    1. Manage Position

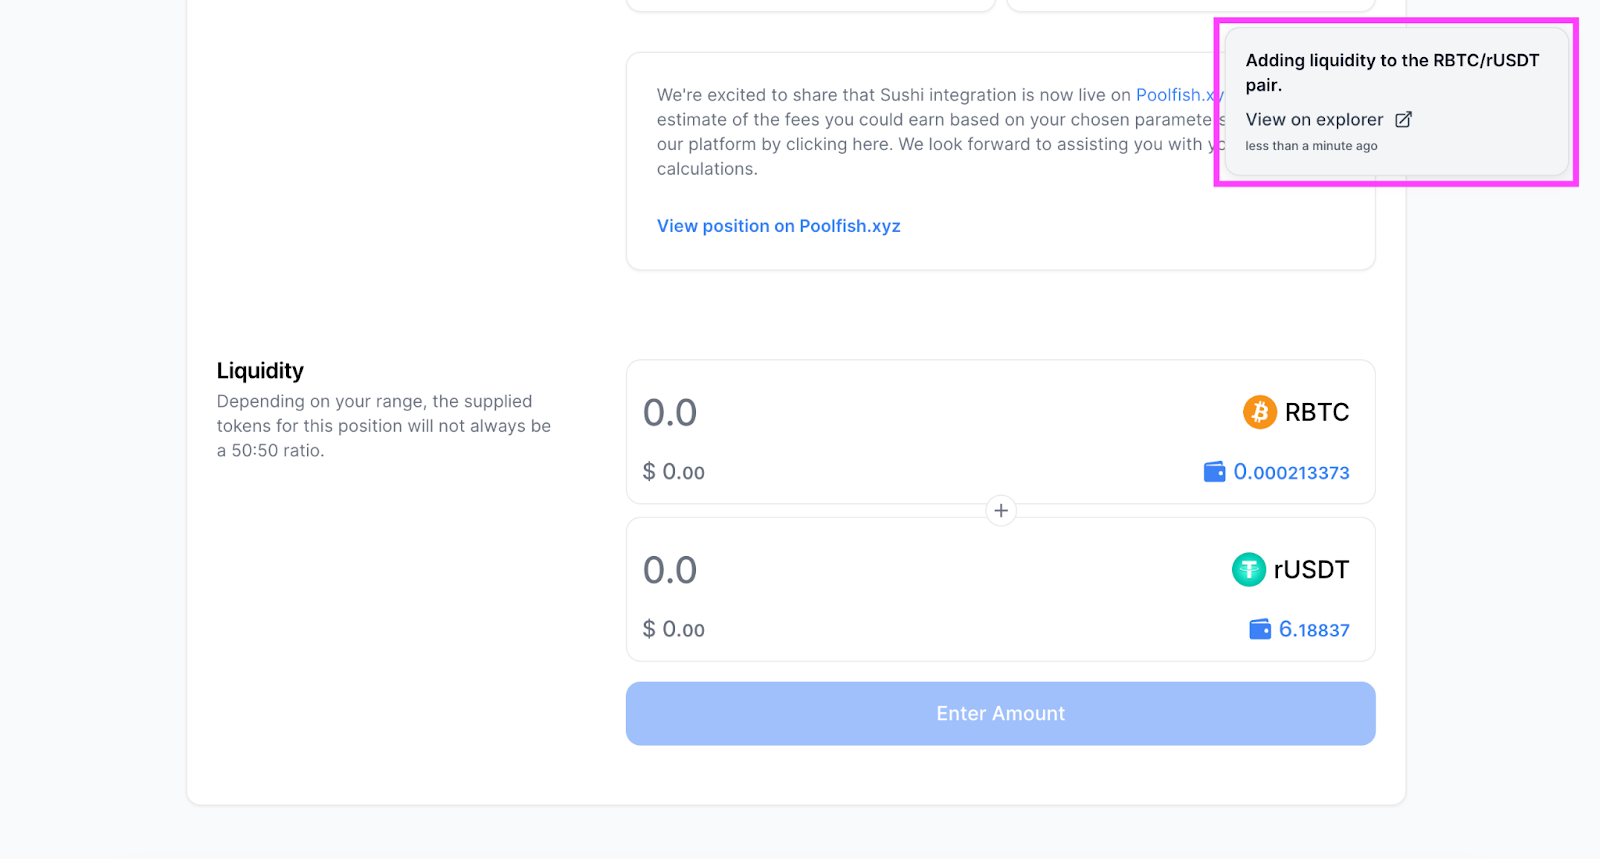
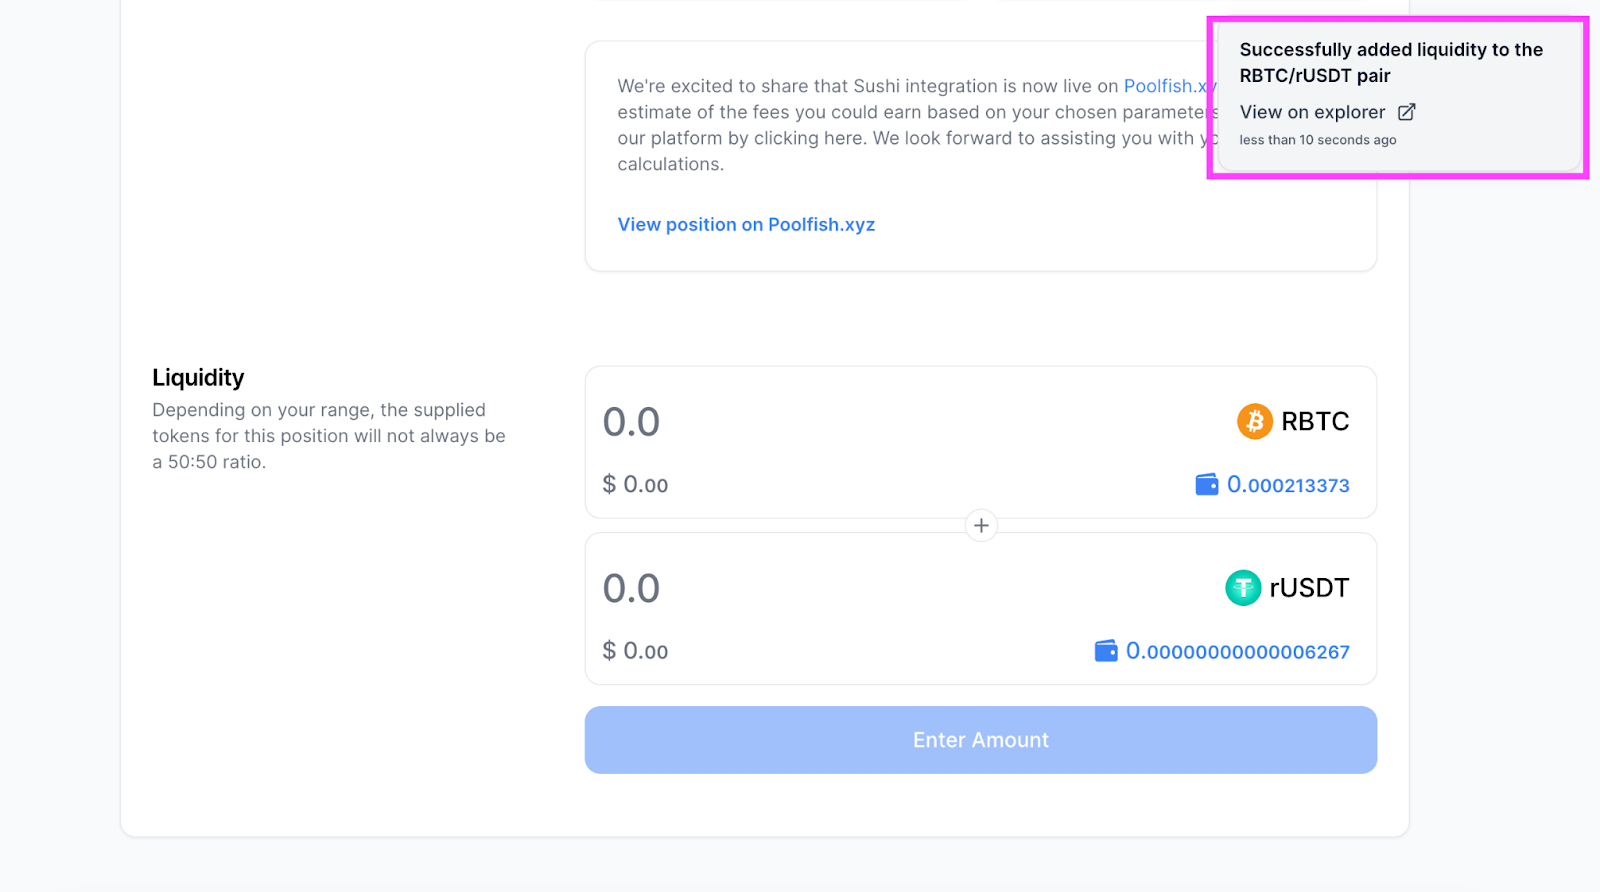
    After adding liquidity, you can manage your position by selecting “My position” under the Pools UI. This allows you to adjust or remove your liquidity as needed.

    LP on Rootstock via Sushi (v2)

    1. Enter Sushi App

    Head over to the Sushi app and select Enter App in the upper right corner. Next, make sure your wallet is connected and select the Pools tab on the upper left corner of the screen to be brought to the pools page.

    1. Select V2 Position

    There are 2 entry points:

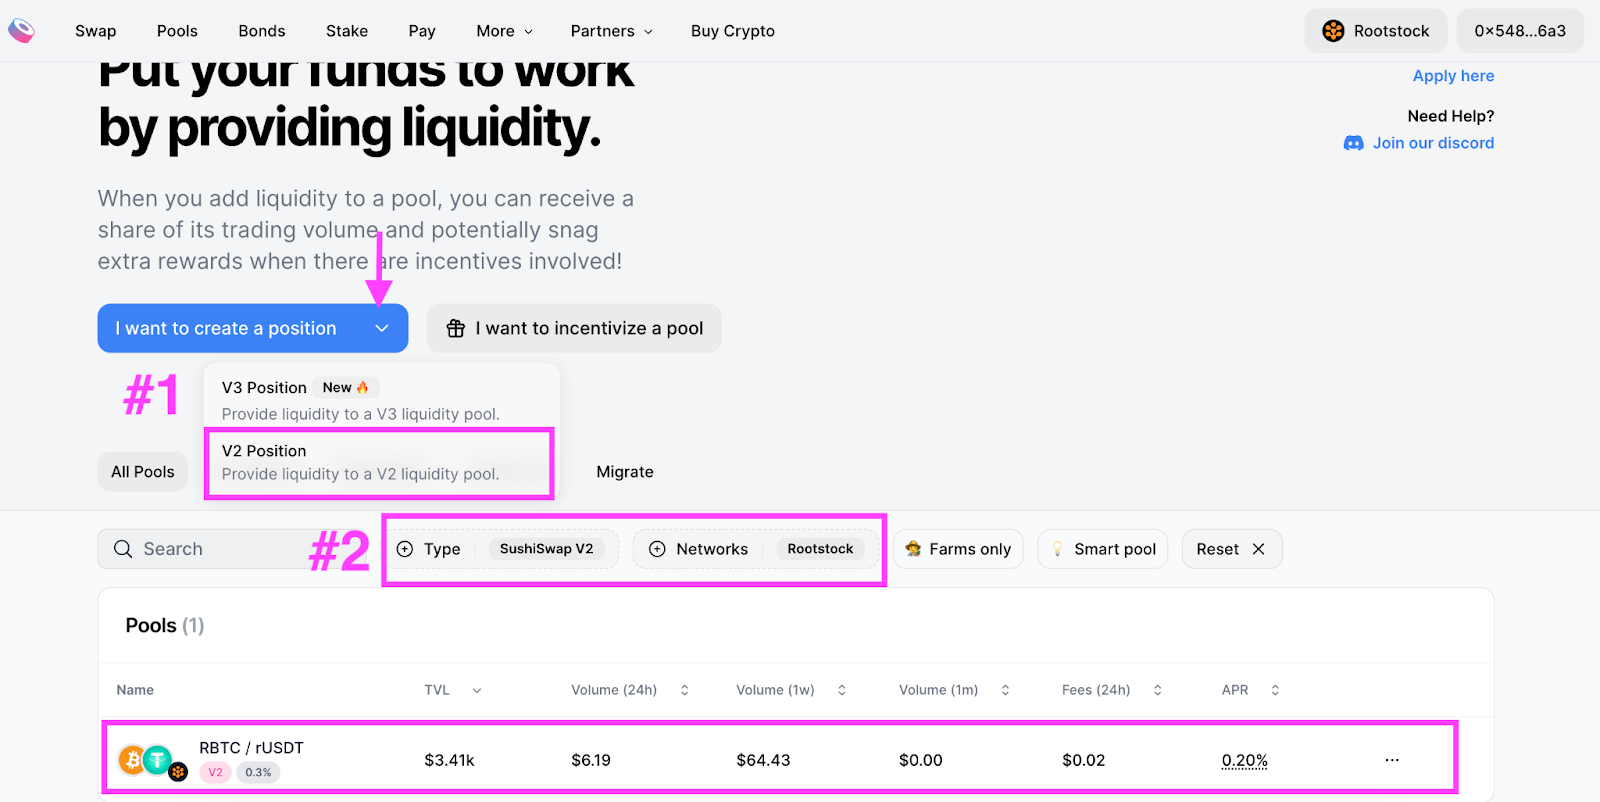
    #1 Once on the Pools page, click on the drop-down menu at the end of "I want to create a position" to see both V3 Position and V2 Position. Select V2 Position. This will bring you to the Add Liquidity page, where you can provide liquidity to an existing pool, or you can choose to create a new pool.

    #2 Choose Rootstock Network. Select Rootstock on the network and choose v2 under “Type” then select a token pair.

    1. Add the amount you want to provide liquidity to.

    Depending on which entry point you use, you will see a slightly different UI. But both will show you the token pair.

    Note: Both tokens will automatically represent a 50/50 balance, so make sure you have enough tokens of each in your wallet. Also, ensure your wallet is on the same network as the network you are providing liquidity to.

    1. Approve Tokens

    Approve the tokens on your wallet.

    1. Add Liquidity and Confirm

    Add liquidity and confirm on your wallet.

    1. Done

    You can see your position on the pool page.

    Important Links

    Symbiosis: https://symbiosis.finance/

    Sushi Swap: https://www.sushi.com/swap

    Sushi Pools: https://www.sushi.com/pool

    Full Sushi v3 Tutorial: https://www.sushi.com/blog/how-to-v3

    In this step-by-step guide, you will learn how to bridge assets to Rootstock network, make a swap, and LP on Rootstock via Sushi v2 & v3 AMM.

    Bridge Assets From Ethereum Mainnet to Rootstock

    There are a few ways to bridge from Ethereum Mainnet to Rootstock. If you are starting from scratch, we recommend Symbiosis to get some RBTC to start. If you already have gas tokens like RBTC in your wallet, you can use the native RSK bridge with Ethereum.

    1. Visit Symbiosis website

      Go to Symbiosis
    1. Go to Swap

      Navigate to the Swap section on the Symbiosis website.
    1. Connect Wallet

      Connect your wallet (e.g., MetaMask).
    1. Choose the Token to Transfer From

      Select the token you want to transfer from Ethereum Mainnet and specify the amount.
    1. Choose the Destination Chain

      Select Rootstock as the destination chain and RBTC as the destination token, then click "Swap".
    1. Approve the Transaction

    Approve the use of the token in your wallet and follow the prompt on Metamask to submit the transaction.

    1. Transaction completed

    You should be able to find the RBTC in your Metamask on the Rootstock network.

    Swap on Rootstock via Sushi

    1. Visit the Sushi Website

    Navigate to the Sushi interface by visiting Sushi.

    1. Connect Wallet

    Use a Web3 wallet, such as MetaMask, and connect by following the prompt.

    1. Change Network to Rootstock

    Switch from the default or current network to Rootstock in the network selection area. Ensure your wallet is connected.

    1. Select Tokens to Swap

    Choose the tokens you wish to swap. Click on the token list to see more options in the dropdown menu. Select the tokens you want to swap from and to.

    1. Enter Swap Amount

    Input the number of tokens you want to swap. Click “Swap” to proceed.

    1. Check the details

    Confirm the details of the Swap and follow the instructions. You will have to approve the tokens you want to swap, follow the wallet instructions and click “Approve”. 

    1. Execute the Swap

    Click “Swap” to initiate the transaction, then click “Confirm” in your wallet interface to execute the swap. Upon successful transaction, you've effectively swapped tokens on Rootstock.

    LP on Rootstock via Sushi (v3):

    1. Visit the Sushi Pool UI

    Navigate to the Sushi Pools interface by visiting Sushi Pools.

    1. Connect Wallet and Change Network

    Connect your wallet and change the network settings to Rootstock if you haven’t already done so.
    1. Select a Pool

    Choose a liquidity pool you're interested in LPing, for example, RBTC/ rUSDT

    1. Select Price Range

    Determine the price range within which you're willing to provide liquidity. There are two ways to do this:
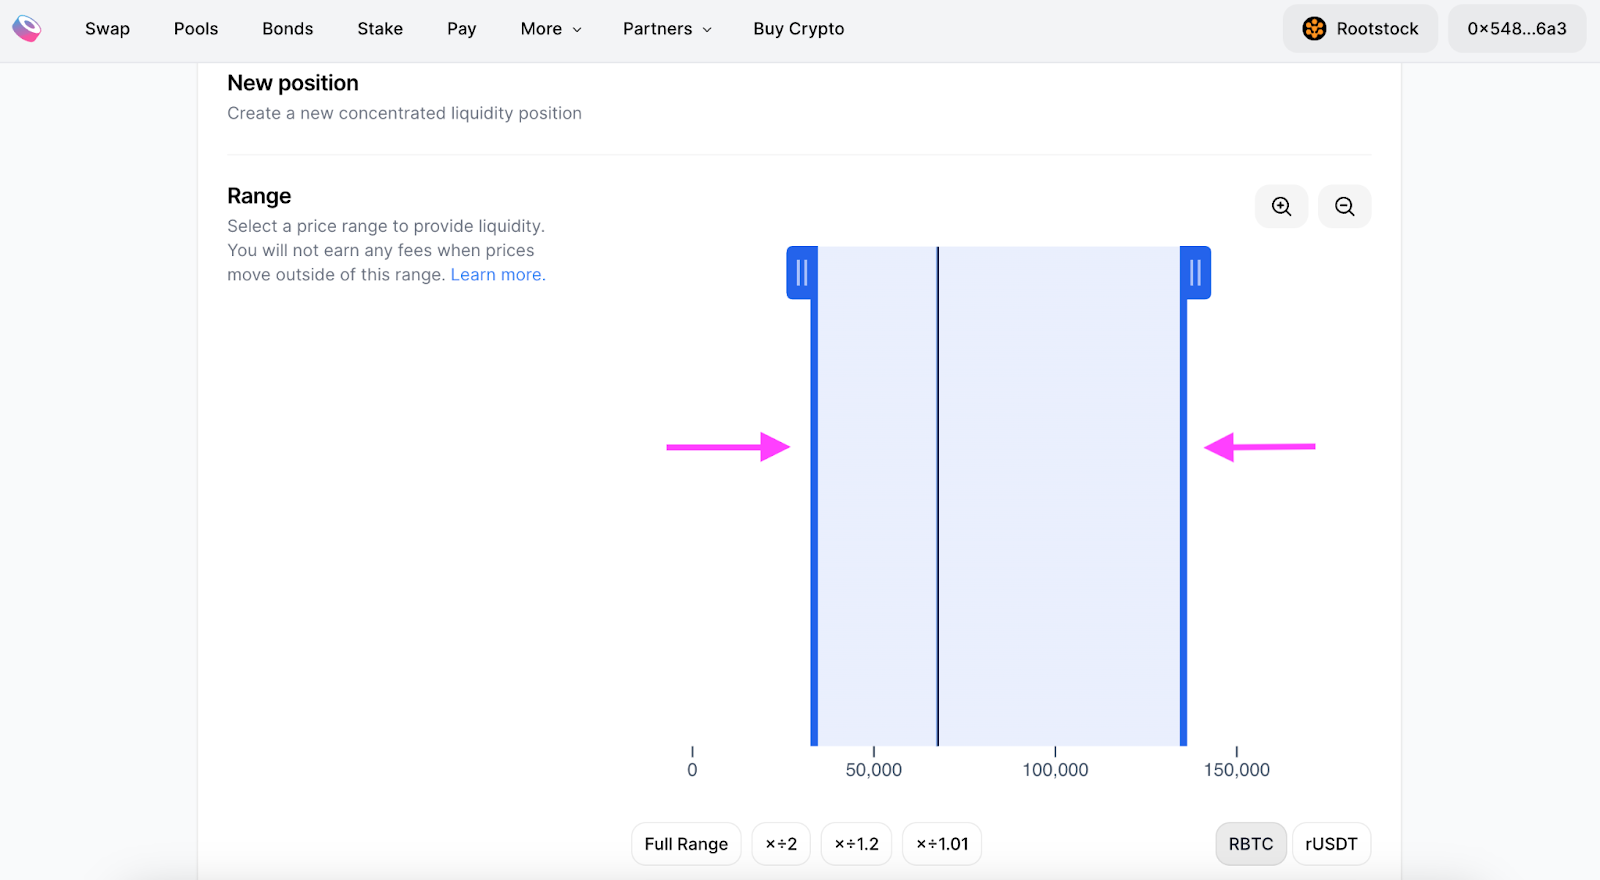
    a. Adjust the price range bar to set the minimum and maximum price.
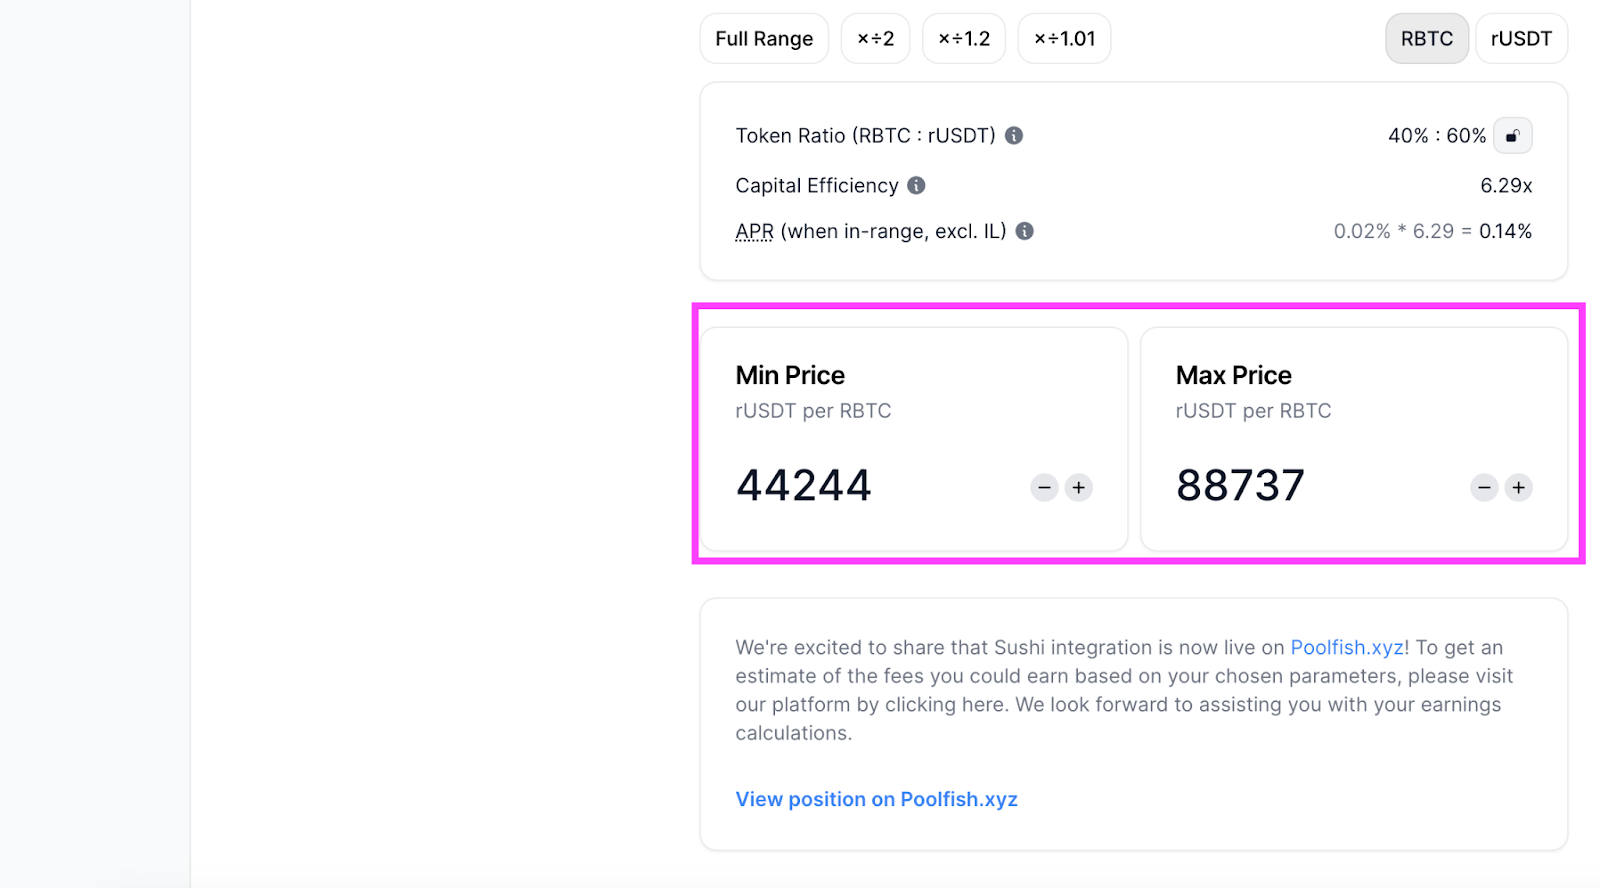
    b. Enter specific values into the designated boxes.

    Note: Remember that a narrower price range can result in higher fee collection but also increase the risk of being out of range and not earning any fees. Opting for the full range is equivalent to the classic v2, with no concentrated liquidity.

    5. Provide Liquidity Amount

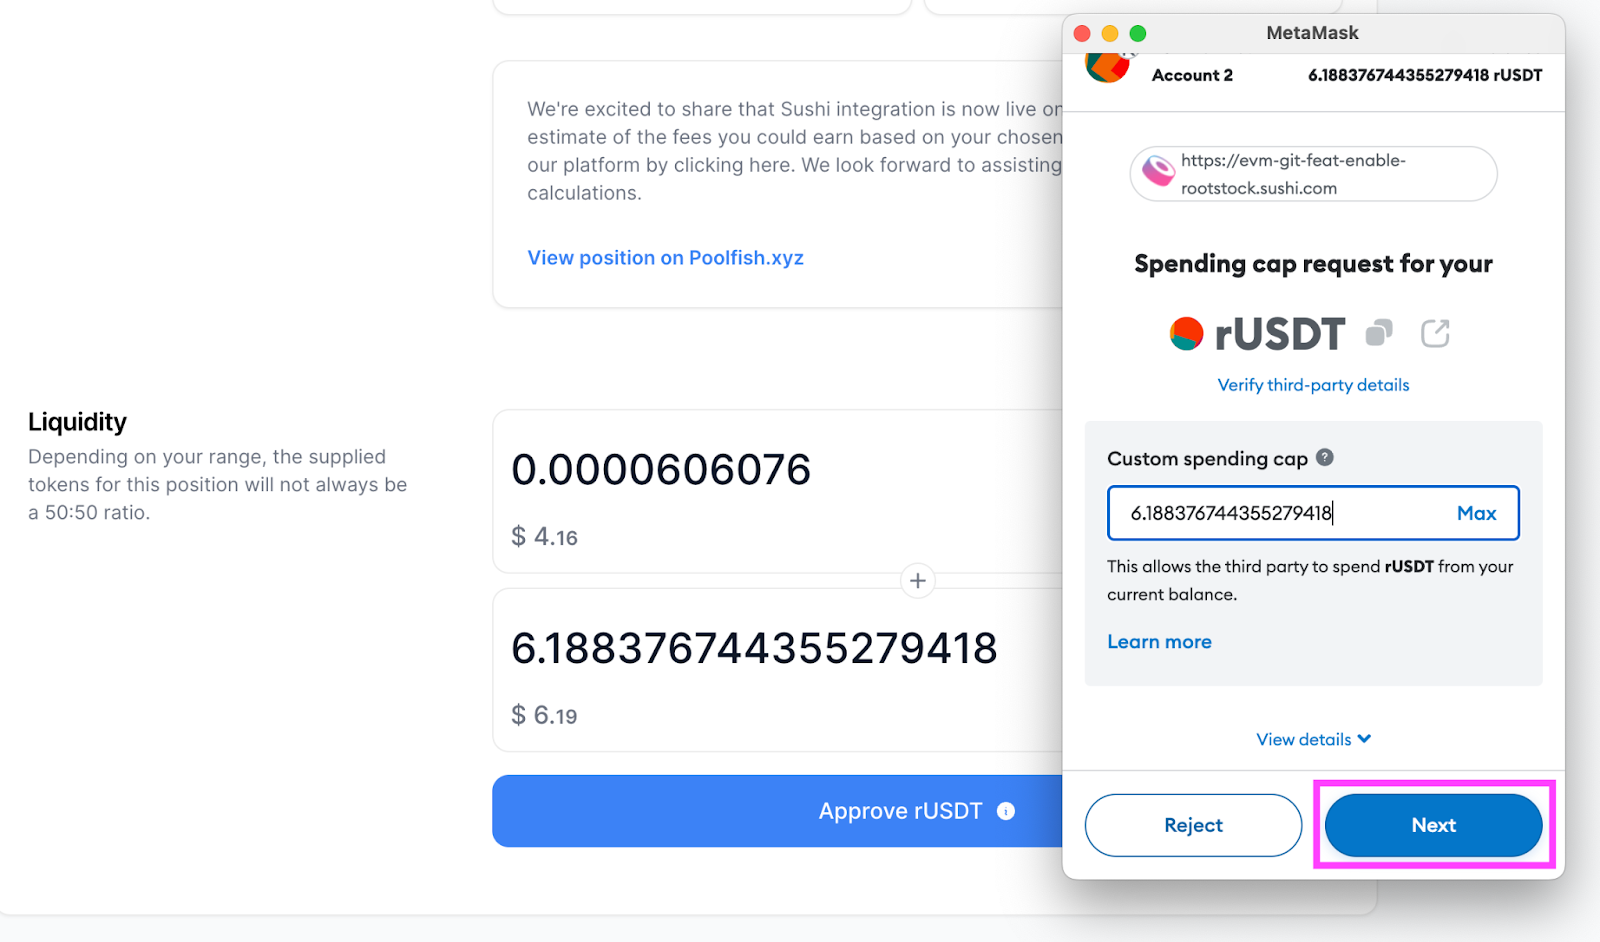
    Enter the amount for one token in the pair. The protocol will populate the other token. If one token exceeds the amount, try inputting the other one first. Just like swapping, you need to approve the spending cap for the tokens. Click “Approve (TKN)” and approve the tokens one by one on your wallet.
    7. Review & Confirm

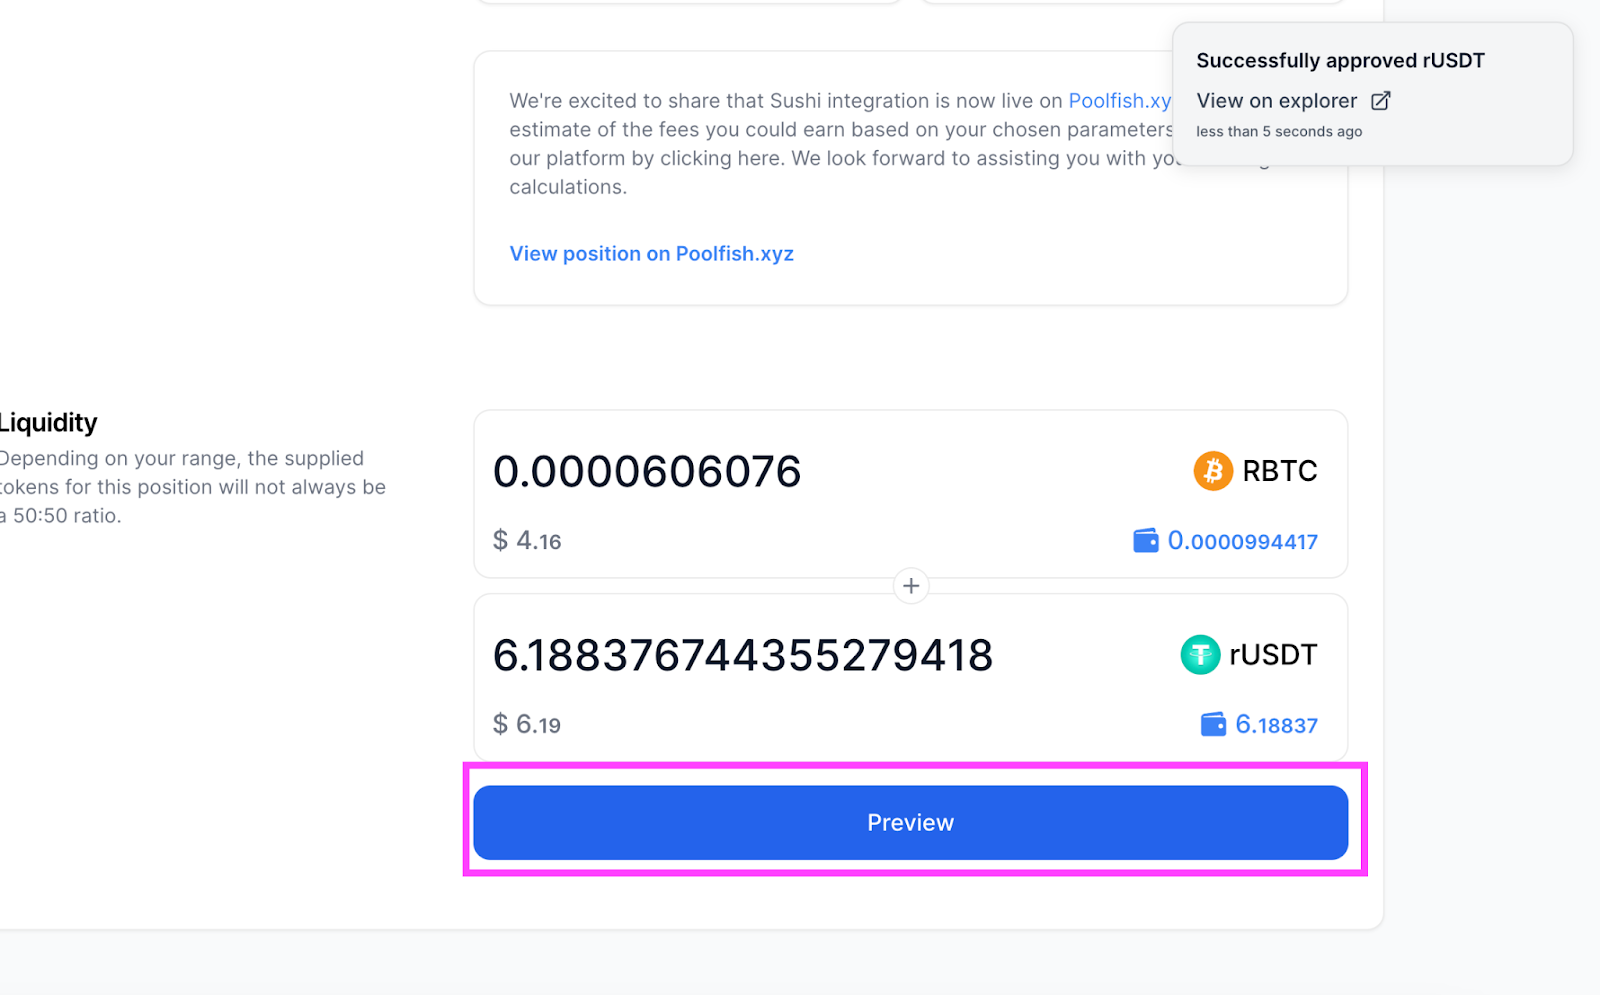
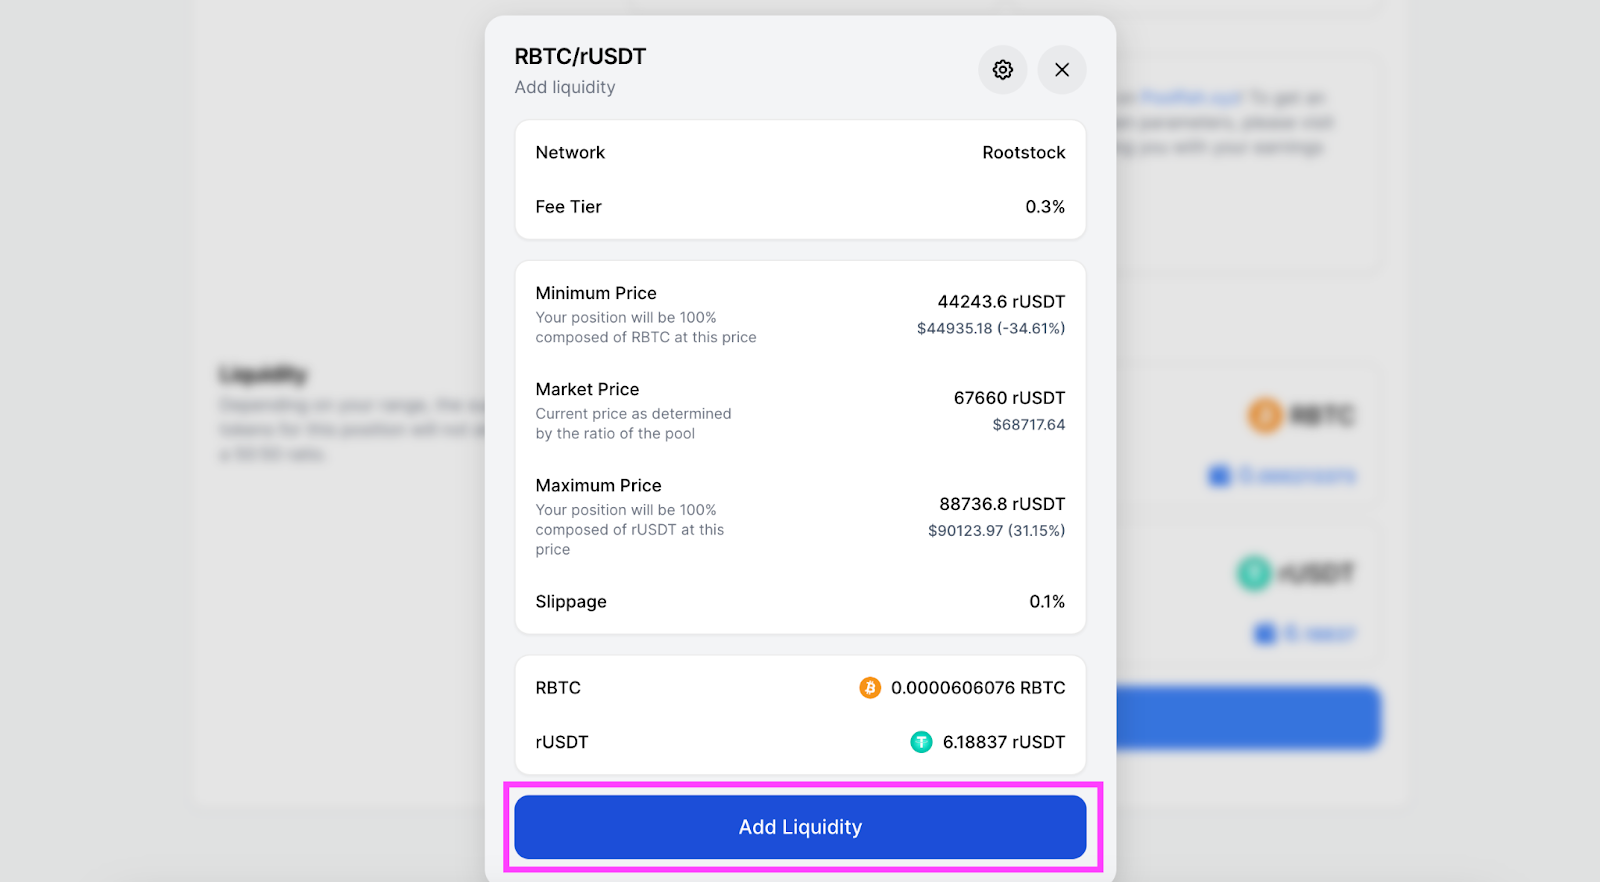
    Follow the instructions on the UI. Click “Preview”, then “Add Liquidity”. Confirm the transactions in your wallet.
    1. Manage Position

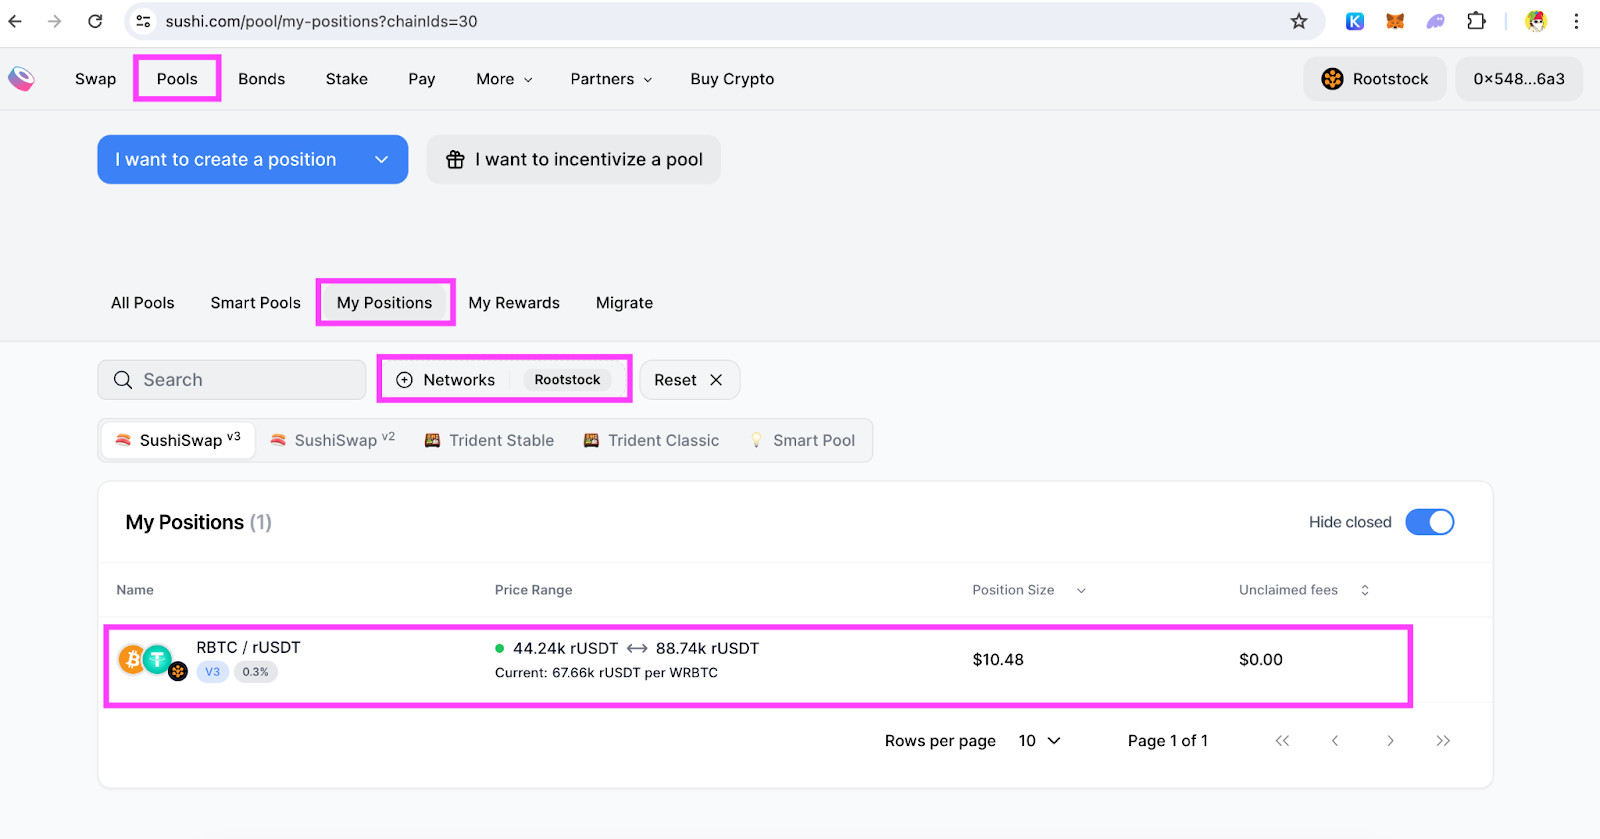
    After adding liquidity, you can manage your position by selecting “My position” under the Pools UI. This allows you to adjust or remove your liquidity as needed.
    LP on Rootstock via Sushi (v2)

    1. Enter Sushi App

    Head over to the Sushi app and select Enter App in the upper right corner. Next, make sure your wallet is connected and select the Pools tab on the upper left corner of the screen to be brought to the pools page.

    1. Select V2 Position

    There are 2 entry points:

    #1 Once on the Pools page, click on the drop-down menu at the end of "I want to create a position" to see both V3 Position and V2 Position. Select V2 Position. This will bring you to the Add Liquidity page, where you can provide liquidity to an existing pool, or you can choose to create a new pool.

    #2 Choose Rootstock Network. Select Rootstock on the network and choose v2 under “Type” then select a token pair.
    1. Add the amount you want to provide liquidity to.

    Depending on which entry point you use, you will see a slightly different UI. But both will show you the token pair.
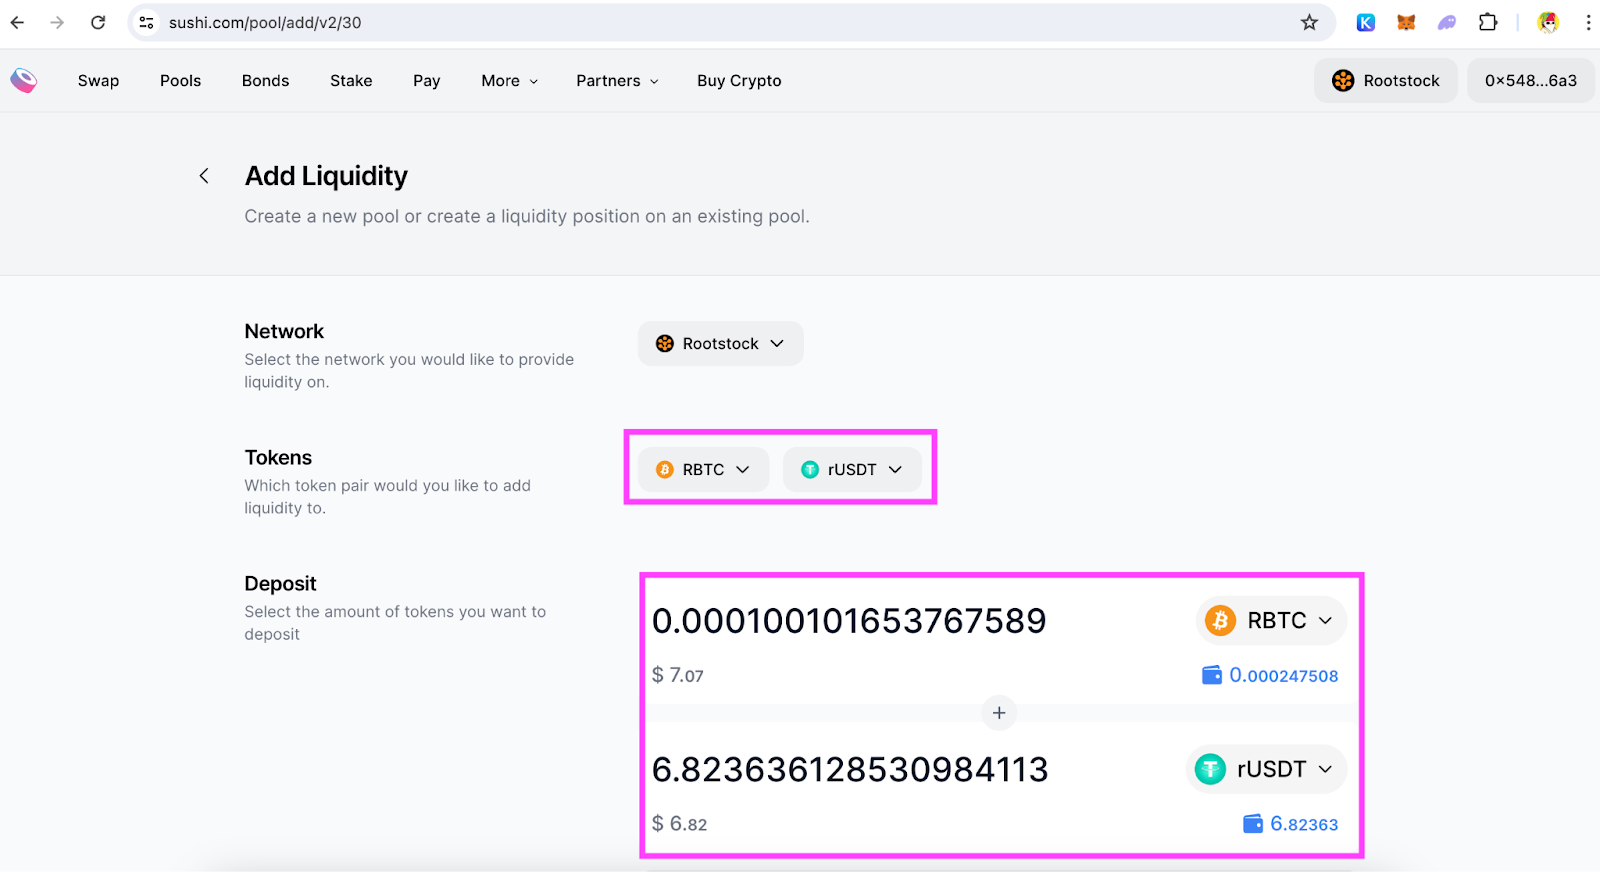
    Note: Both tokens will automatically represent a 50/50 balance, so make sure you have enough tokens of each in your wallet. Also, ensure your wallet is on the same network as the network you are providing liquidity to.

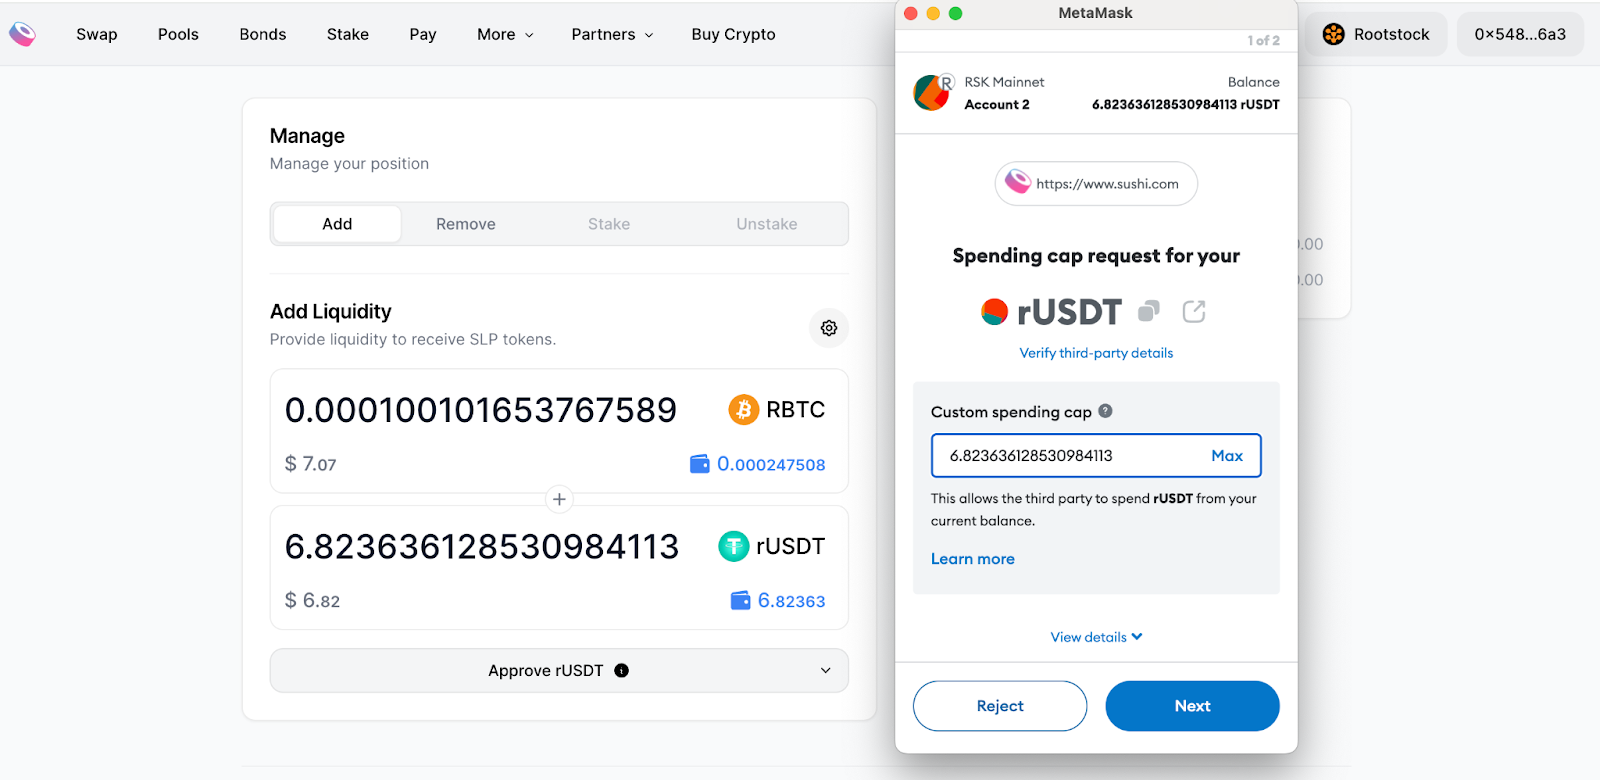
    1. Approve Tokens

    Approve the tokens on your wallet.
    1. Add Liquidity and Confirm

    Add liquidity and confirm on your wallet.
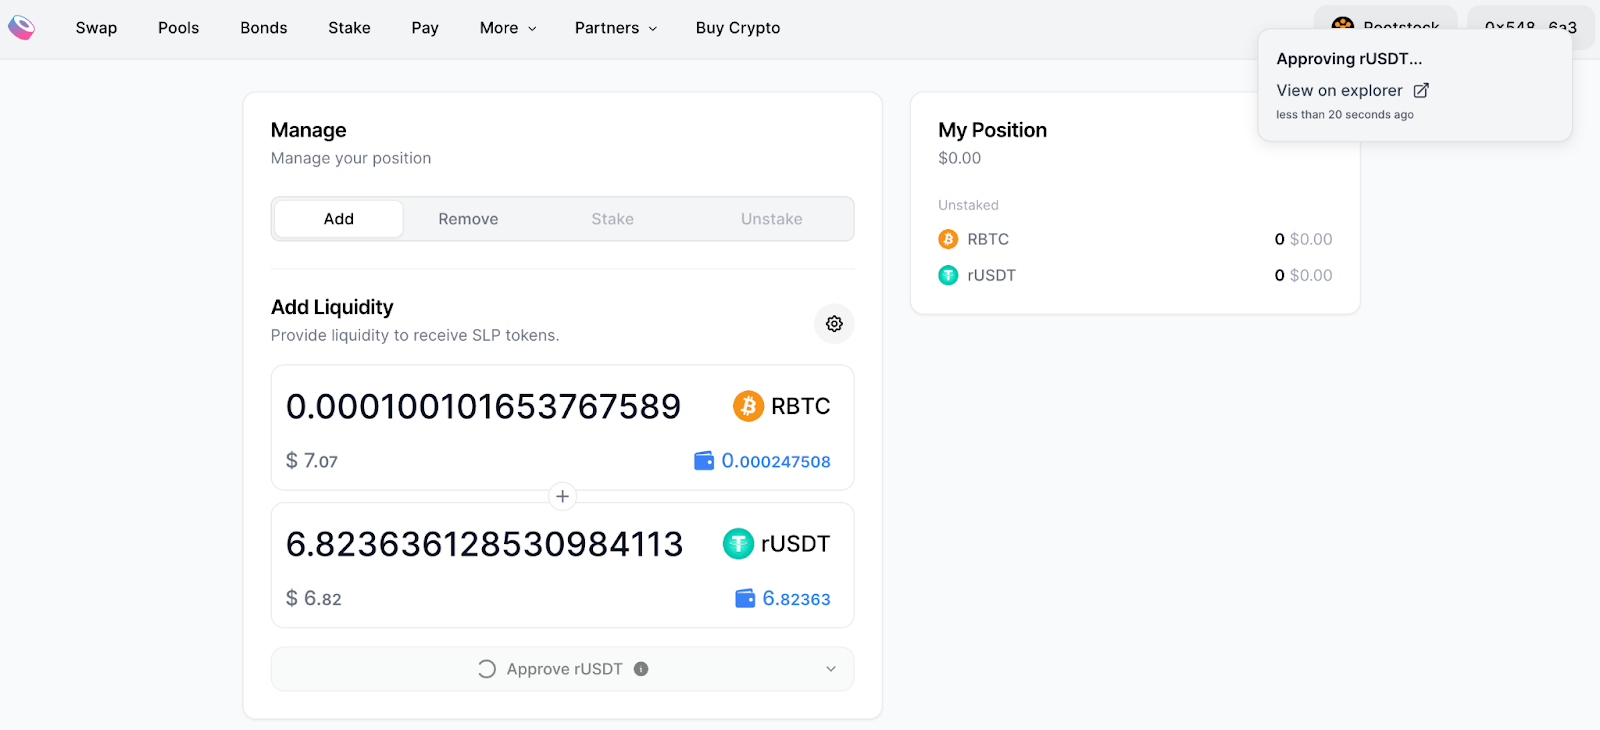
    1. Done

    You can see your position on the pool page.

    Important Links

    Symbiosis: https://symbiosis.finance/

    Sushi Swap: https://www.sushi.com/swap

    Sushi Pools: https://www.sushi.com/pool

    Full Sushi v3 Tutorial: https://www.sushi.com/blog/how-to-v3