• Academy
  • Blog
  • FAQ
  • Swap

    What tokens are available to swap?
    How to get a token whitelisted?
    What Is Slippage?
    What Is Price Impact?
    Why Are Slippage & Price Impact Important?
    How To Adjust Slippage?
    How much are the trading fees on Sushi?
    How Are Swap Fees Distributed?
    I Didn't Receive wETH... Where Is It?
    X/Y/Z Token Hasn't Arrived!
    How To Make A Swap
    Swap Settings
    FAQ: Limit Orders
    FAQ: Dollar-Cost Averaging (DCA)
    What tokens are available to swap?
    How to get a token whitelisted?
    What Is Slippage?
    What Is Price Impact?
    Why Are Slippage & Price Impact Important?
    How To Adjust Slippage?
    How much are the trading fees on Sushi?
    How Are Swap Fees Distributed?
    I Didn't Receive wETH... Where Is It?
    X/Y/Z Token Hasn't Arrived!
    How To Make A Swap
    Swap Settings
    FAQ: Limit Orders
    FAQ: Dollar-Cost Averaging (DCA)

    Here is a step-by-step tutorial to swap tokens and provide liquidity on Sonic via Sushi:


    Bridge Assets to Sonic

    Before swapping tokens on the Sonic network, ensure your assets are bridged to the Sonic ecosystem.

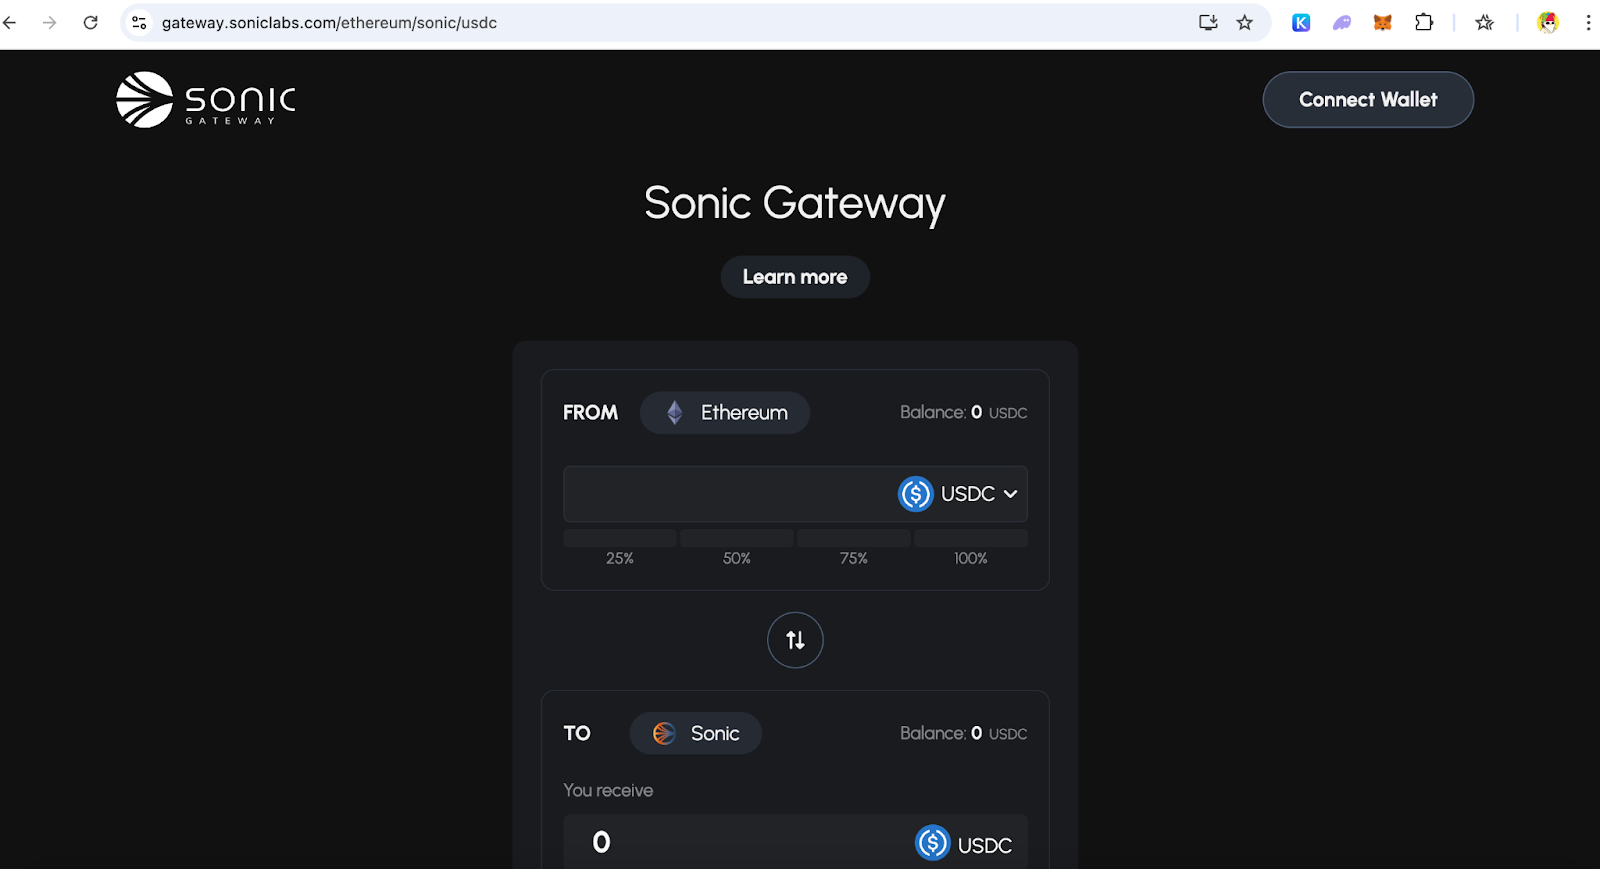
    1. Visit Sonic Gateway
    • Go to Sonic Gateway.
    • Connect Wallet - such as MetaMask.
    1. Select Source and Target Networks
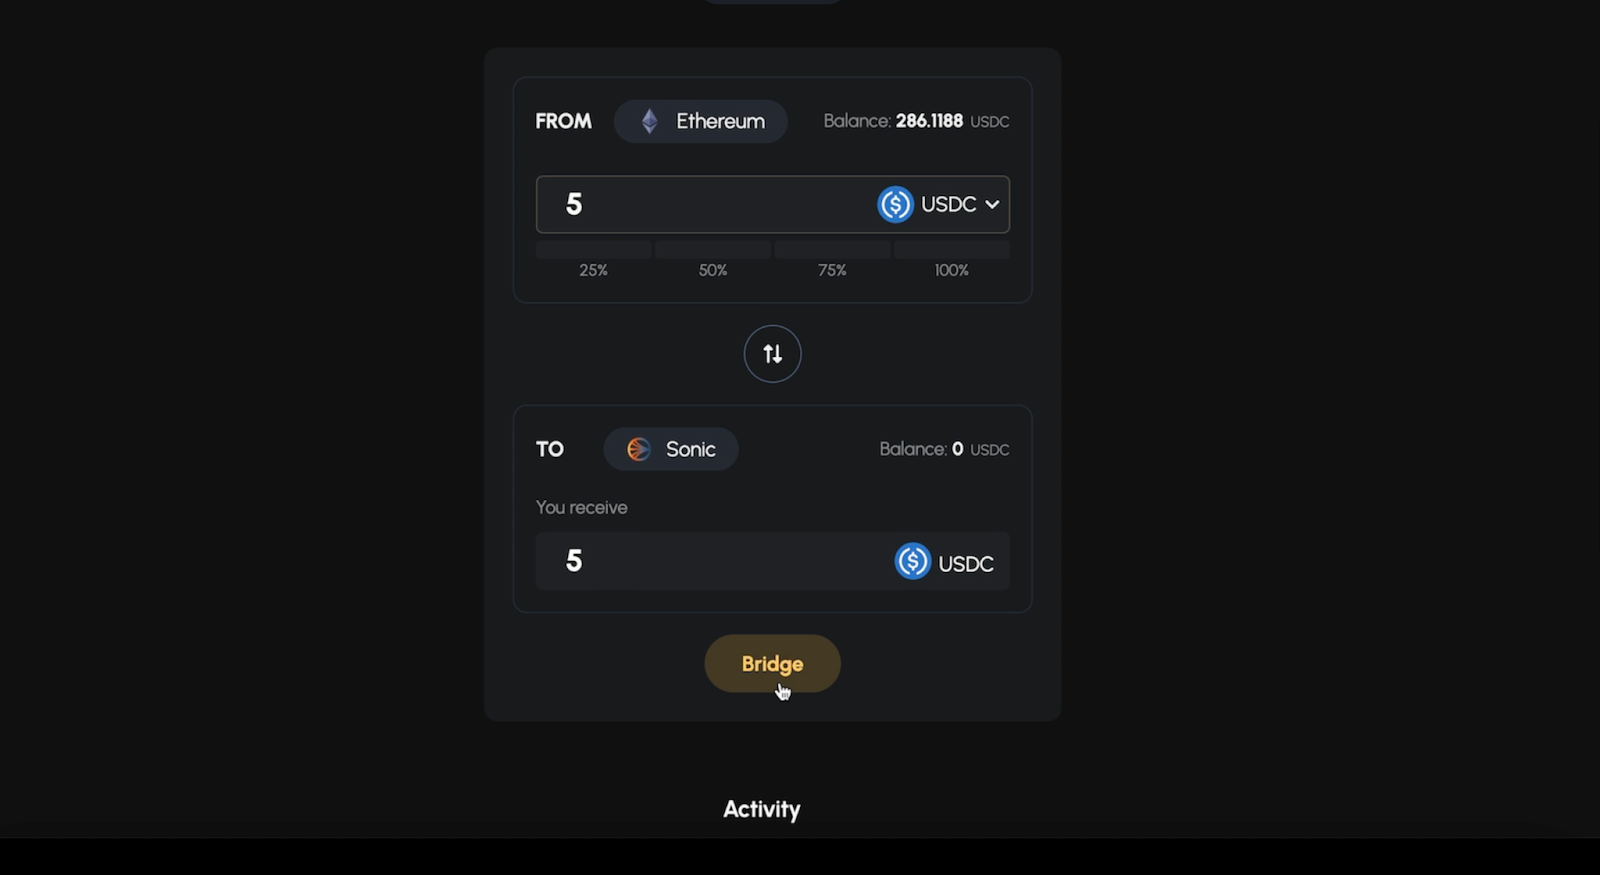
    • Choose Ethereum as the source network and Sonic as the target network.
    • Put the amount you like to bridge over from Ethereum to Sonic.
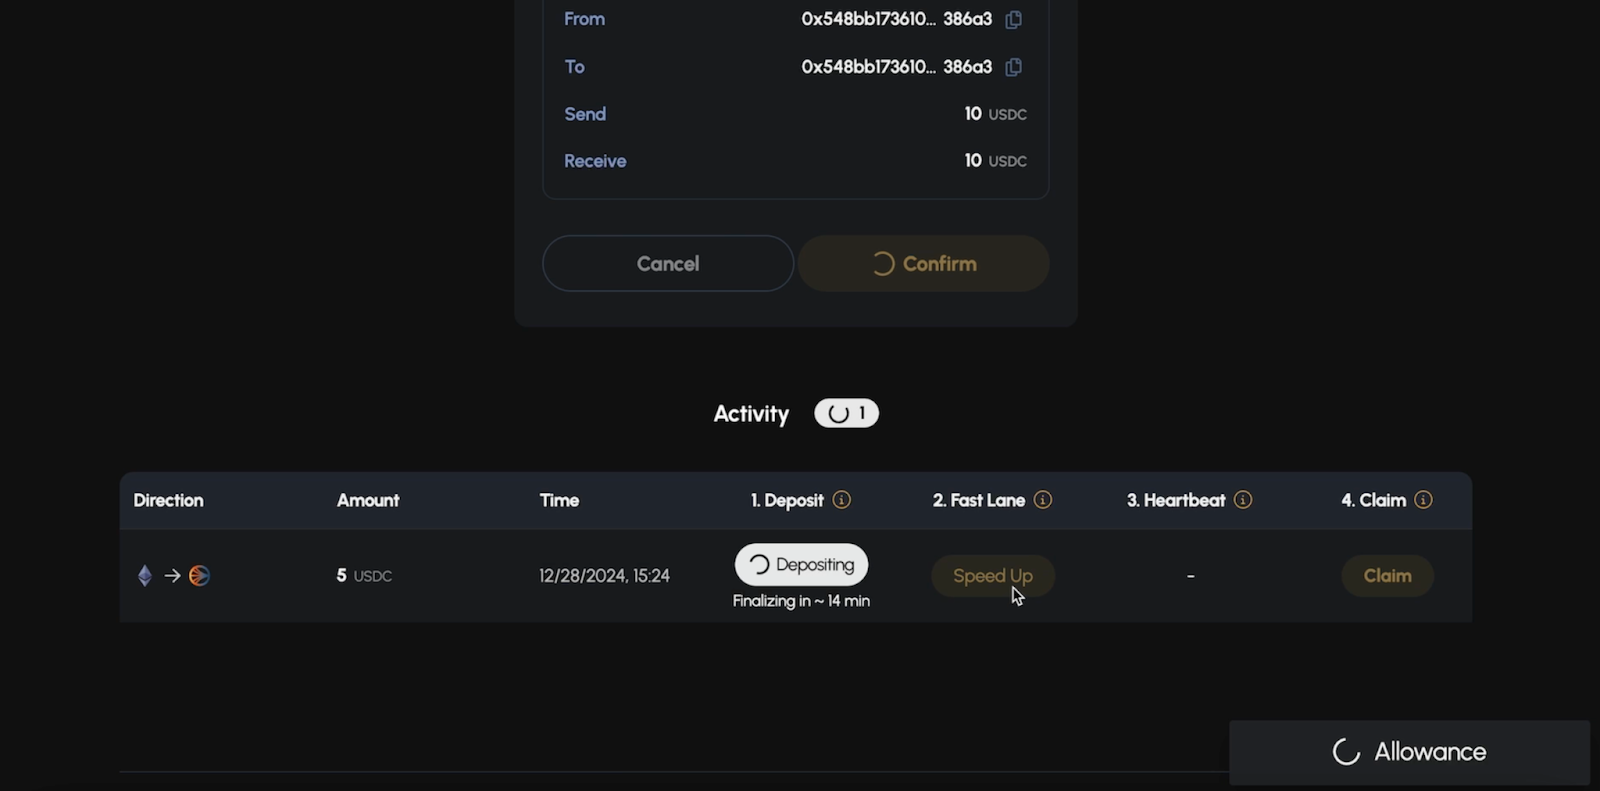
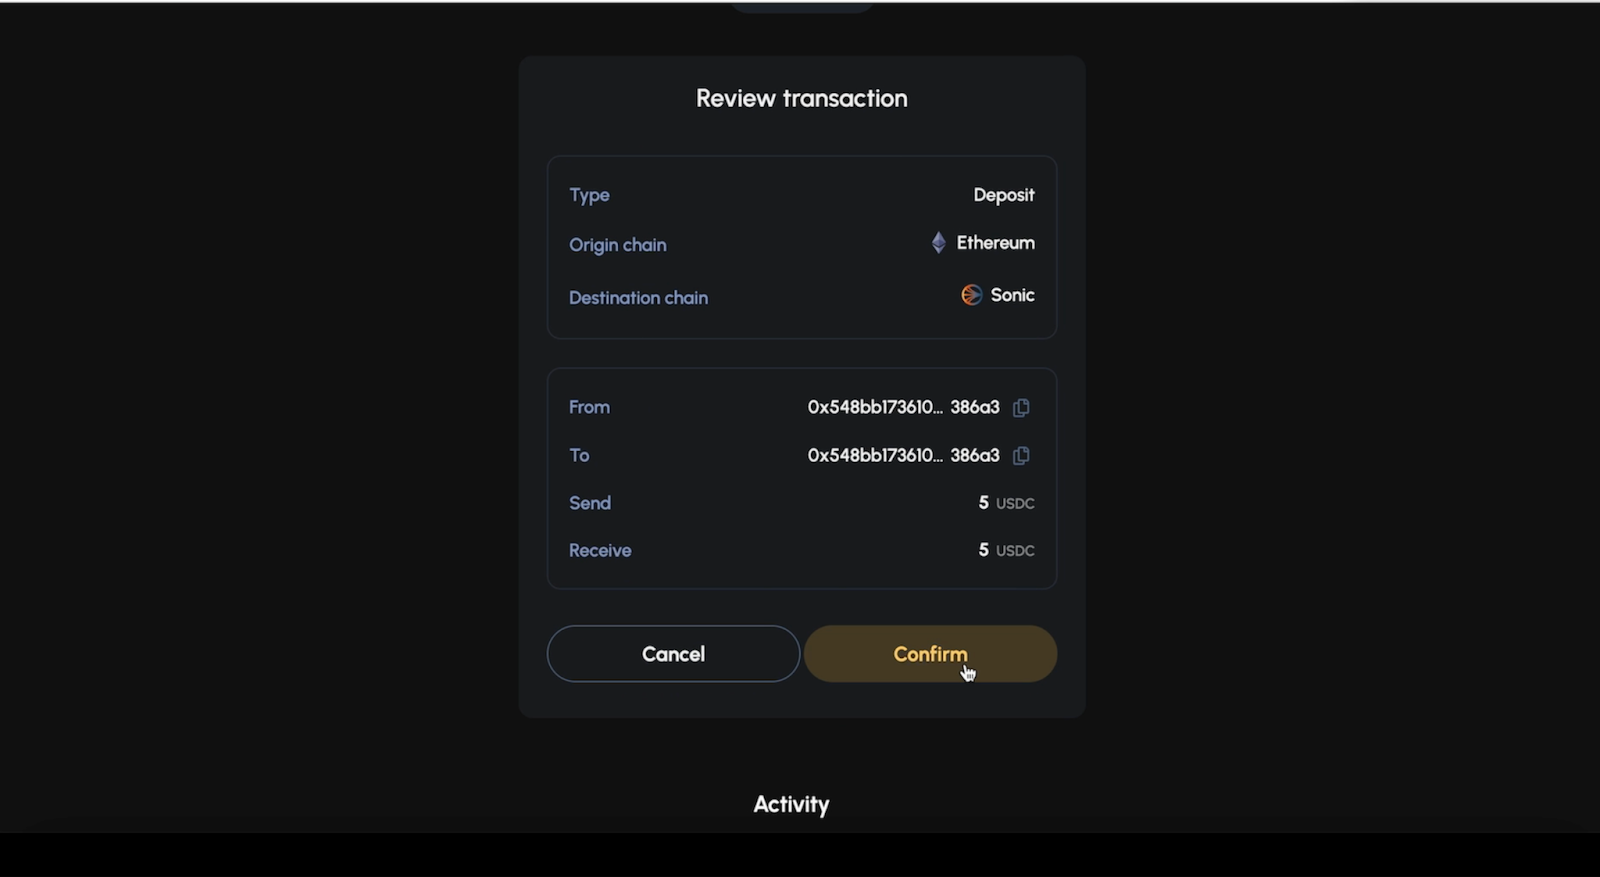
    1. Transfer Assets
    • Bridge the desired tokens (e.g., USDC) to Sonic.
    • Confirm the transaction and wait for it to complete. The interface will display the estimated time for the bridge.
    1. Claim the Assets
    • Once the bridging process is complete, hit the Claim button to receive the assets in your Sonic wallet.

    Swap on Sonic via Sushi

    1. Visit Sushi Interface

    • Navigate to the Sushi interface: Sushi Sonic Swap.

    2. Connect Wallet

    • Use a Web3 wallet compatible with Sonic, such as MetaMask.
    • Follow the prompts to connect your wallet.

    3. Change Network to Sonic

    • Switch from your current network to Sonic using the network selection menu on the left-hand side.
    • Ensure your wallet is correctly configured for the Sonic network.

    4. Select Tokens to Swap

    • Click on the token dropdown menu to view available tokens.
    • Note: Your wallet should already contain some Sonic Gas Token (S) to cover gas fees.
    • Choose the token you want to swap from (e.g., USDC.e) and the token you want to receive (e.g., WAGMI).

    5. Enter Swap Amount

    • Input the amount of tokens you wish to swap.
    • Review the details such as the estimated received amount, price impact, and fees.

    6. Approve Tokens

    • If this is your first swap for the selected token, click Approve.
    • Confirm the approval transaction in your wallet.

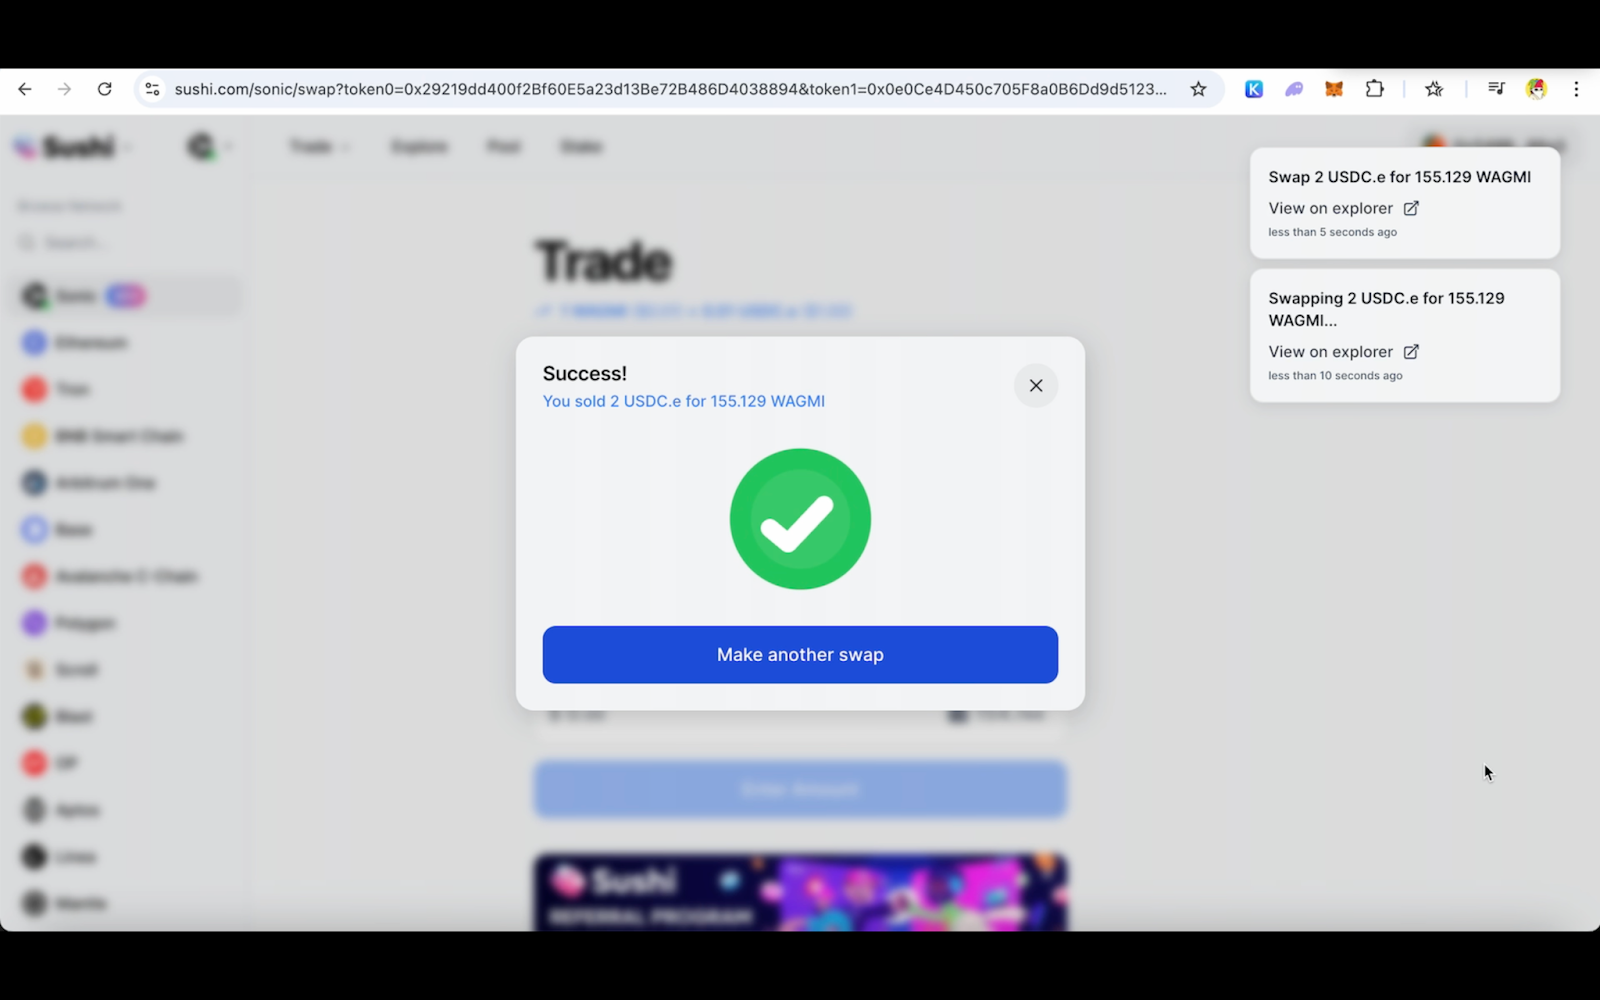
    7. Execute the Swap

    • After approval, click Swap to initiate the transaction.
    • Confirm the transaction in your wallet interface.

    8. Verify Completion

    • Wait for the confirmation message.
    • The swapped tokens will appear in your wallet.

    How to Provide Liquidity on Sonic via Sushi (V3)


    Liquidity Provisioning on Sonic via Sushi (V3)

    Step 1: Visit the Sushi Pool UI

    Open Sushi Pools or navigate to the Explore tab from Sushi main UI.


    Step 2: Connect Wallet and Change Network

    • Connect your Web3 wallet (e.g., MetaMask).
    • Switch the network to Sonic from the left-hand menu.

    Step 3: Select a Pool

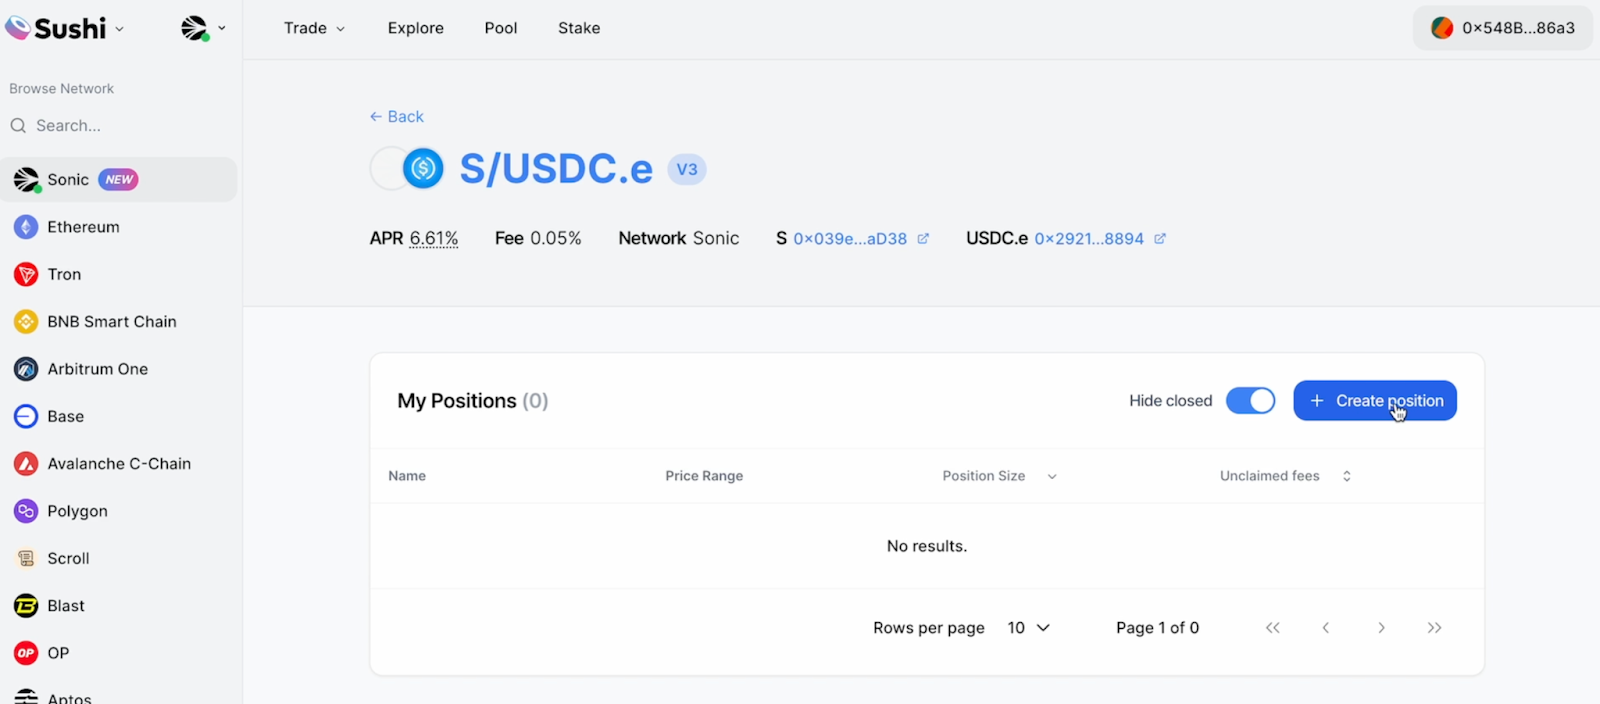
    Browse available pools, such as wS/USDC.e, and click on the desired pool.


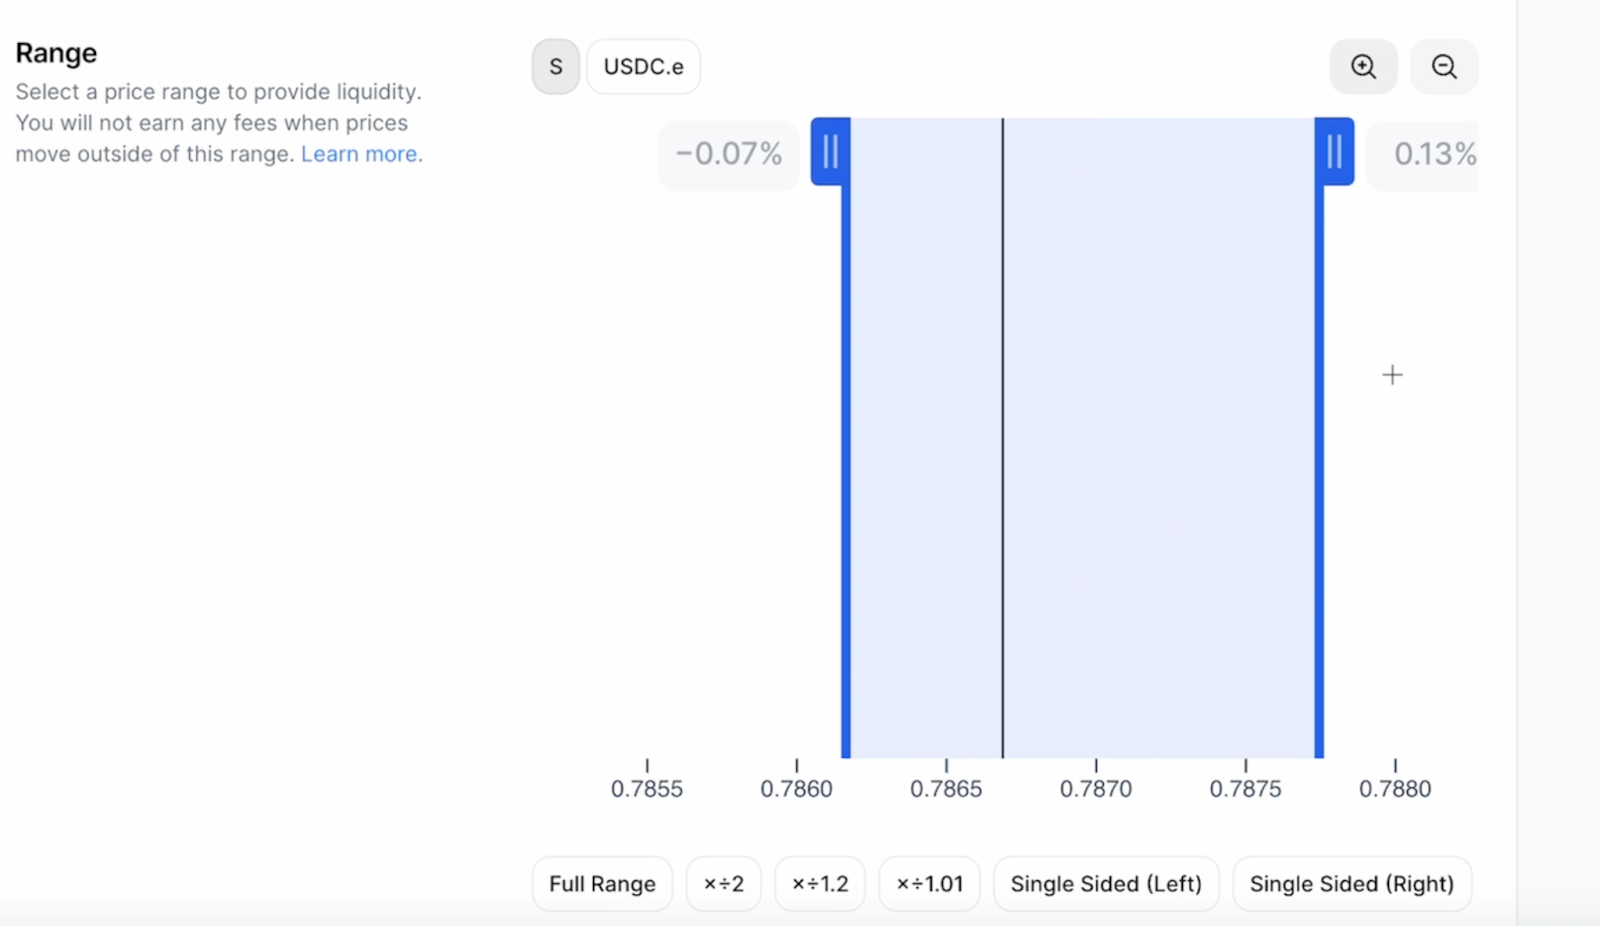
    Step 4: Select Price Range

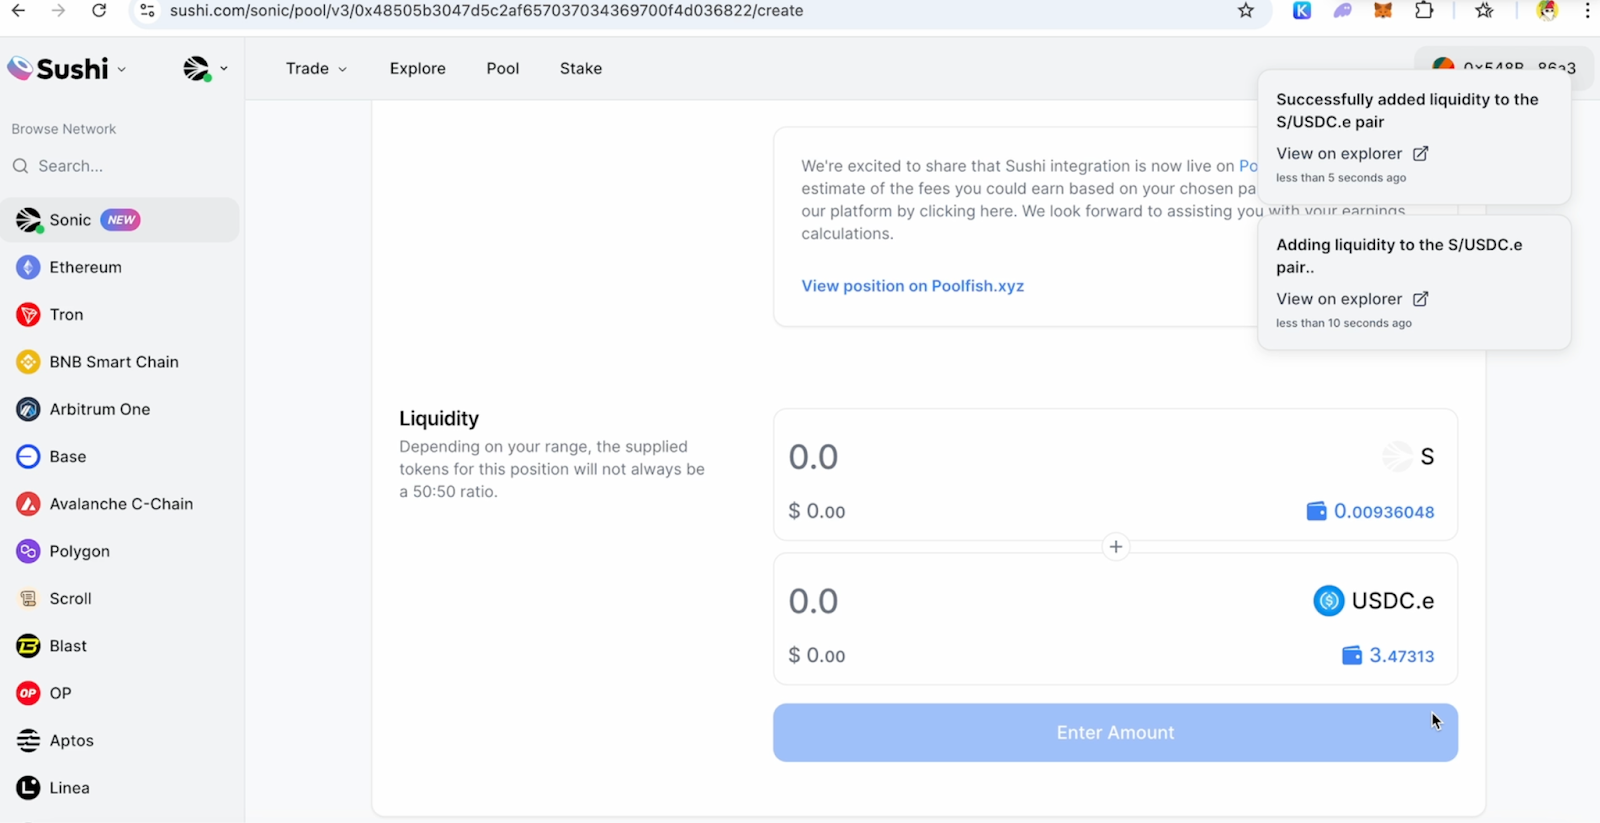
    • After selecting a pool, click Create Position.
    • Define your price range:
      • Adjust the slider or manually input min and max prices.
      • Choose full-range liquidity if you prefer the classic v2 approach.

    Step 5: Provide Liquidity Amount

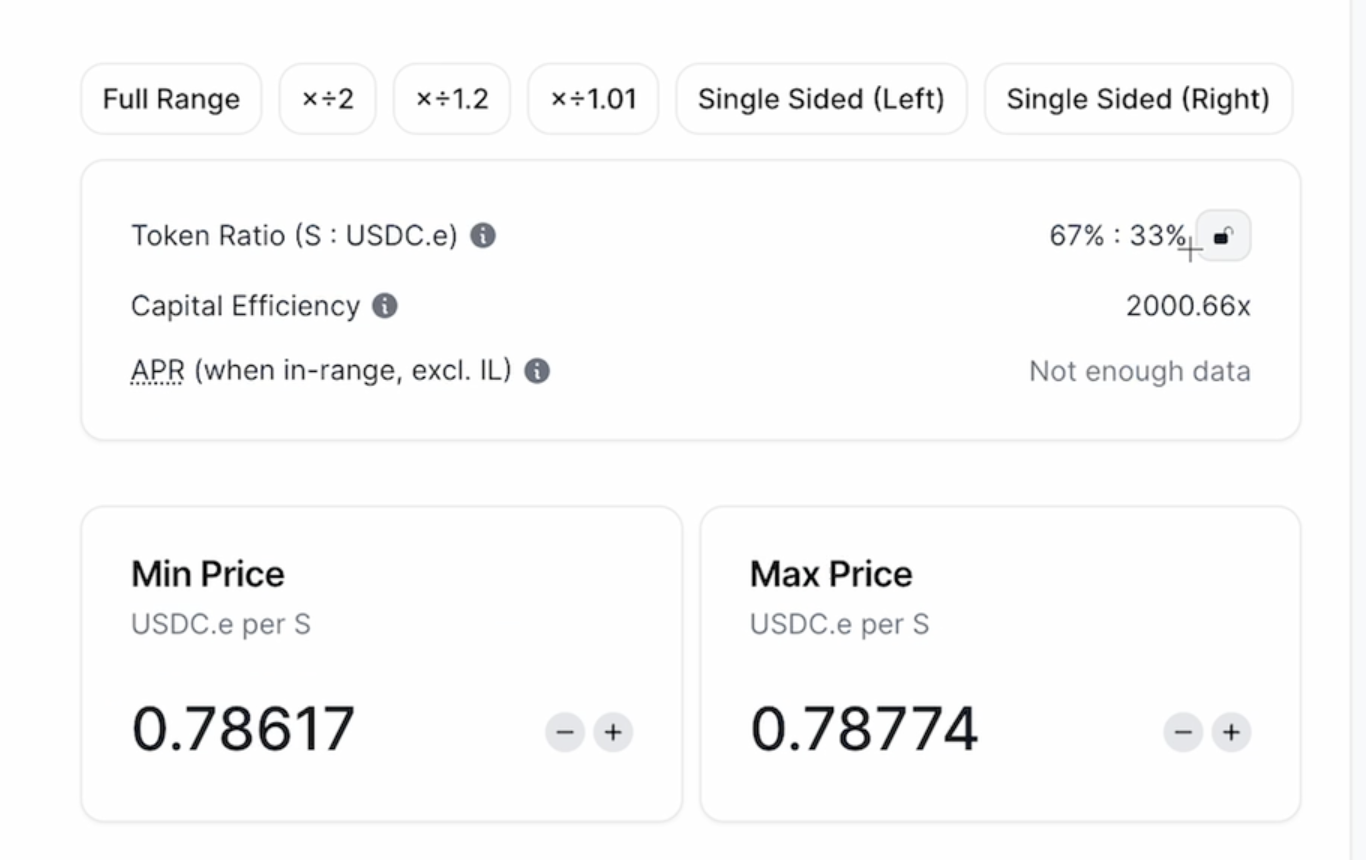
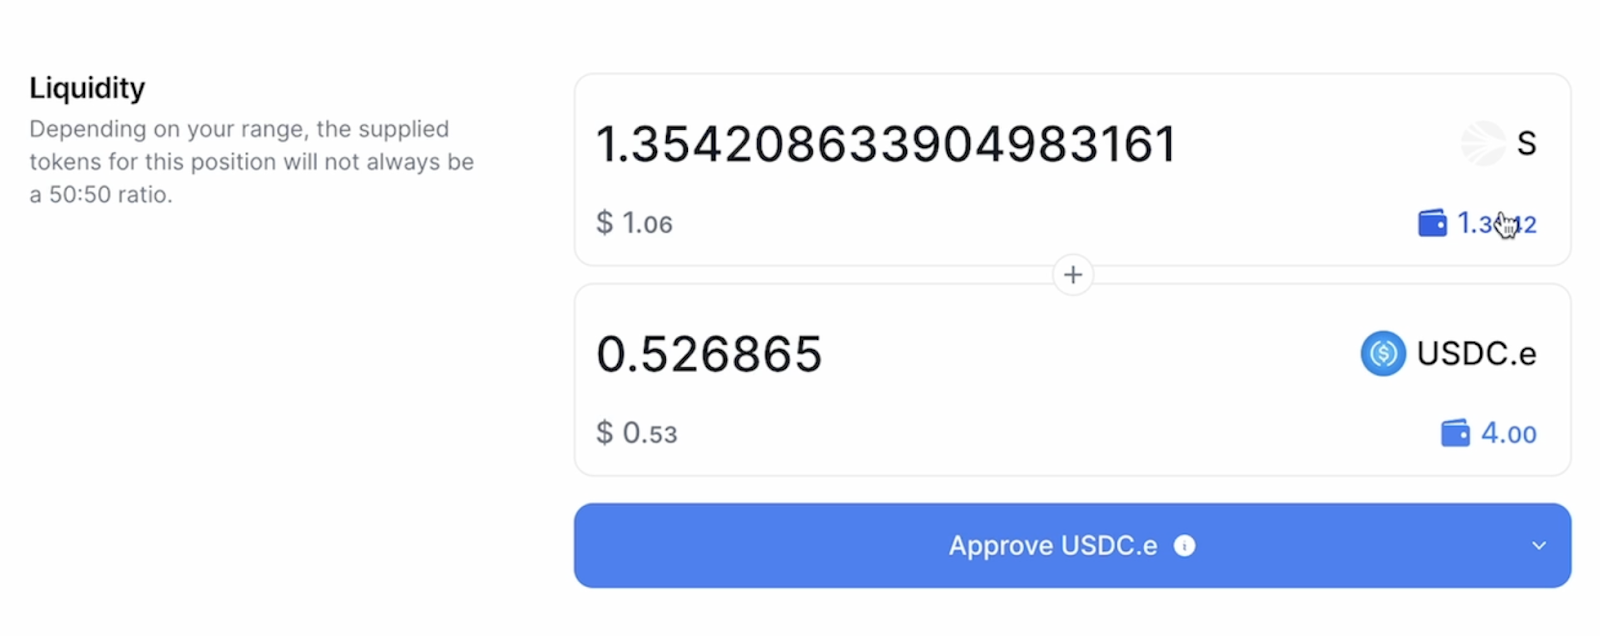
    • Enter the amount for one token. The other token amount will auto-populate based on the ratio.
    • Review liquidity details, including token ratios and capital efficiency.
    • Approve tokens by clicking Approve (Token) and confirming the transaction in your wallet.

    Step 6: Approve Tokens

    • Approve tokens by clicking Approve (Token) and confirming the transaction in your wallet.

    Step 7: Review & Confirm

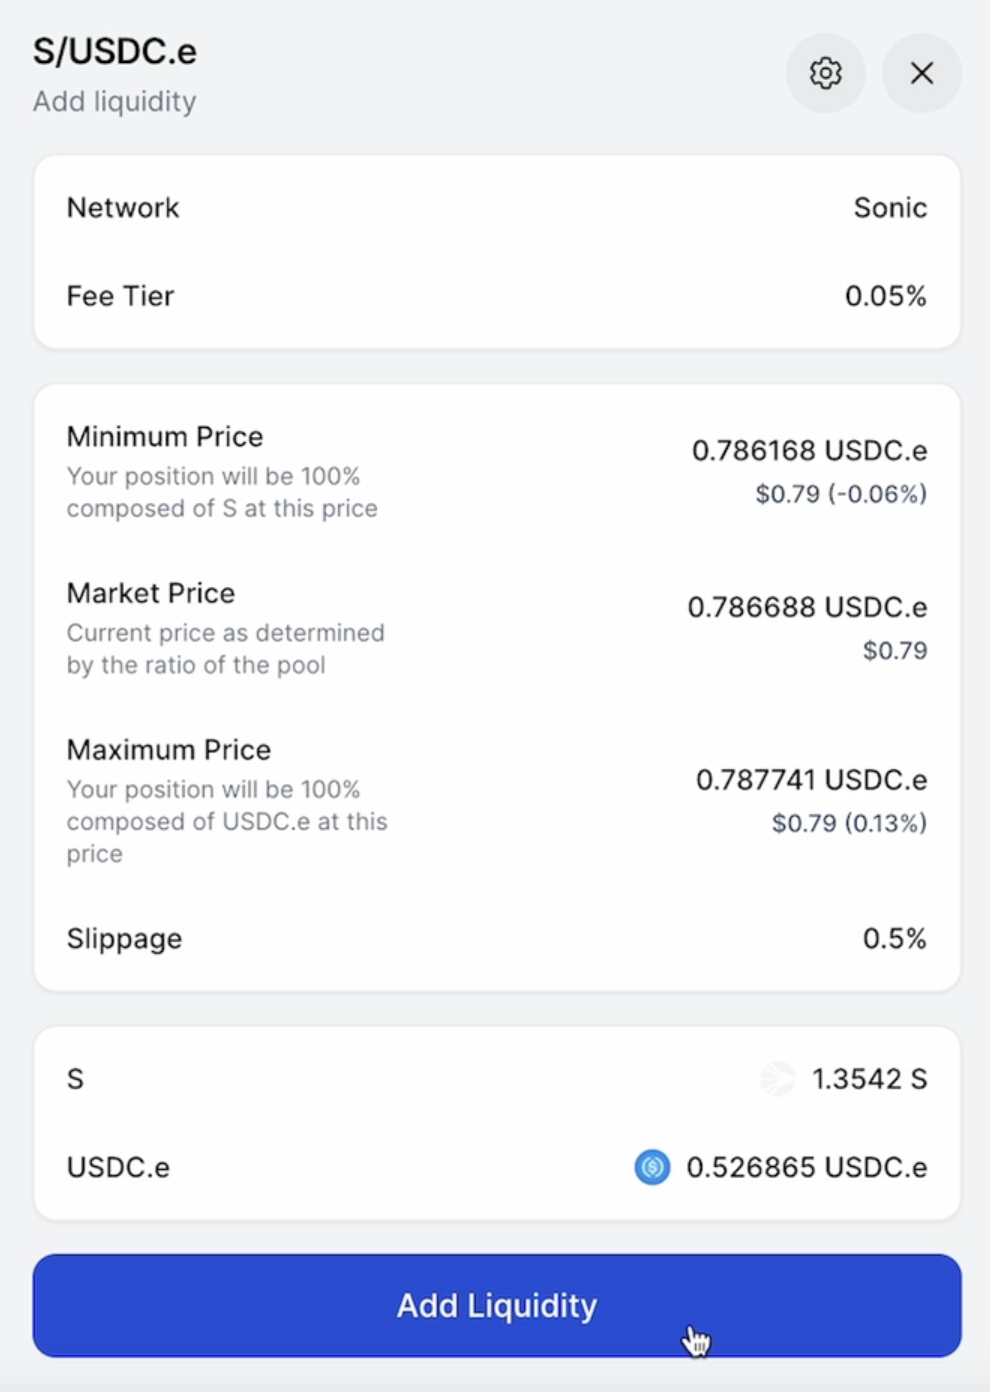
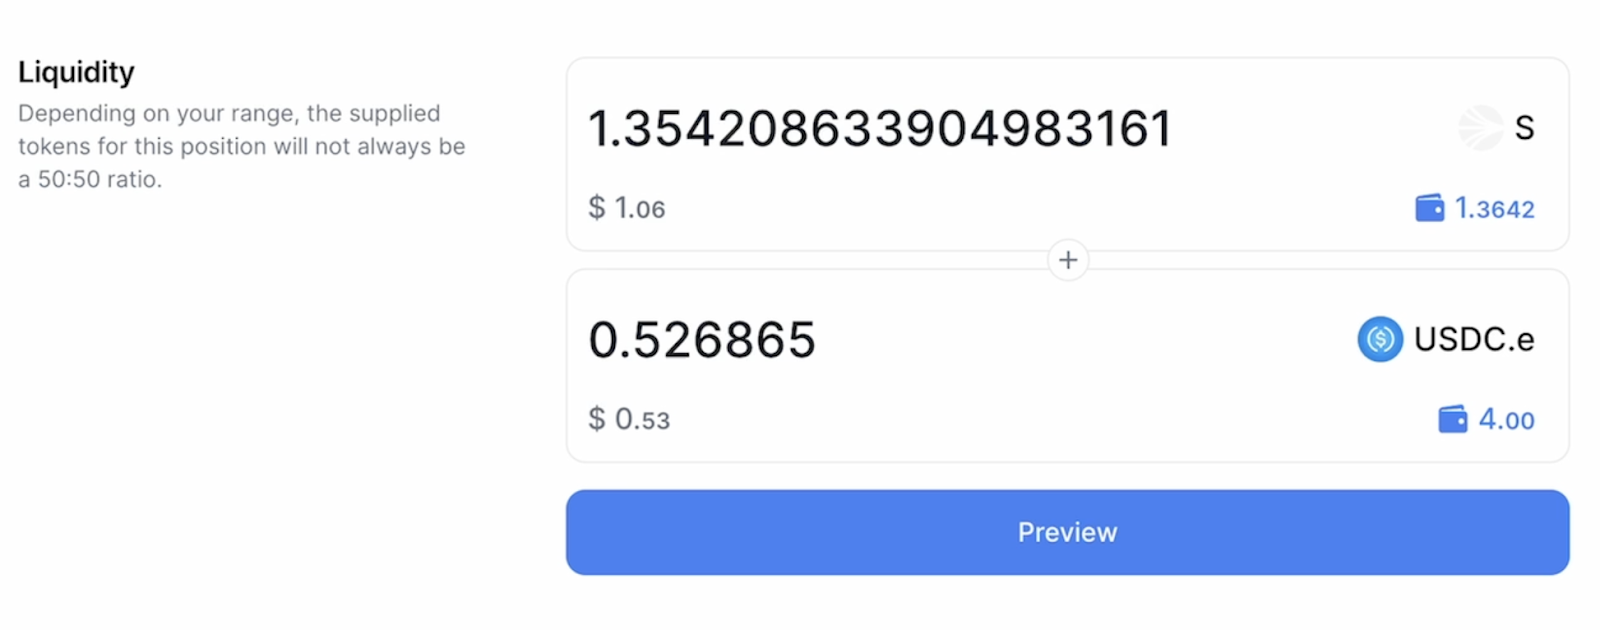
    • Click Preview to review your inputs.

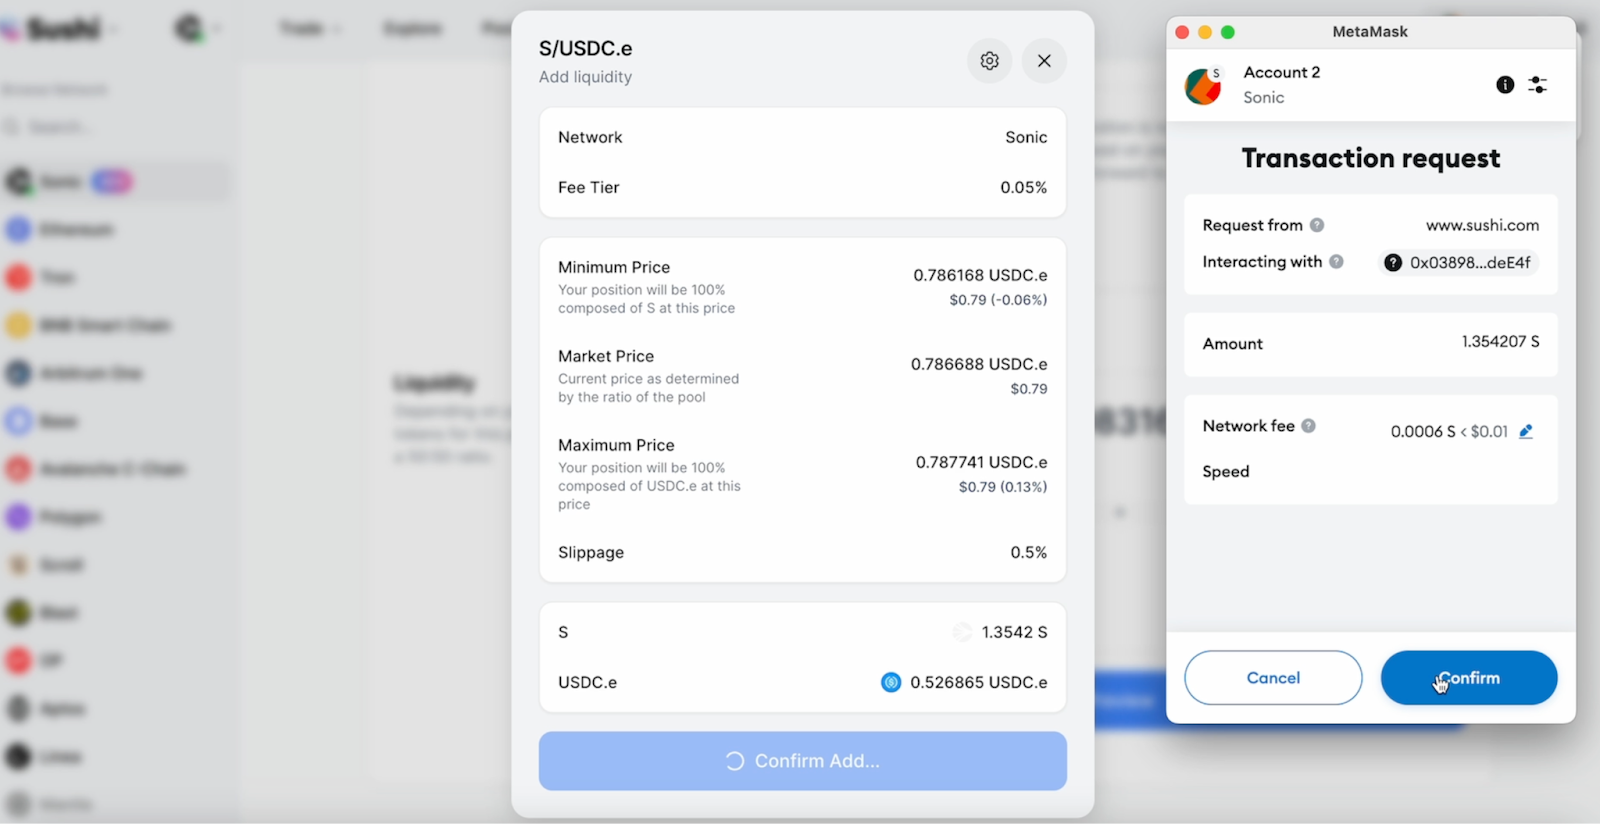
    Confirm the transaction by clicking Add Liquidity and approve it in your wallet.


    Step 8: Manage Position

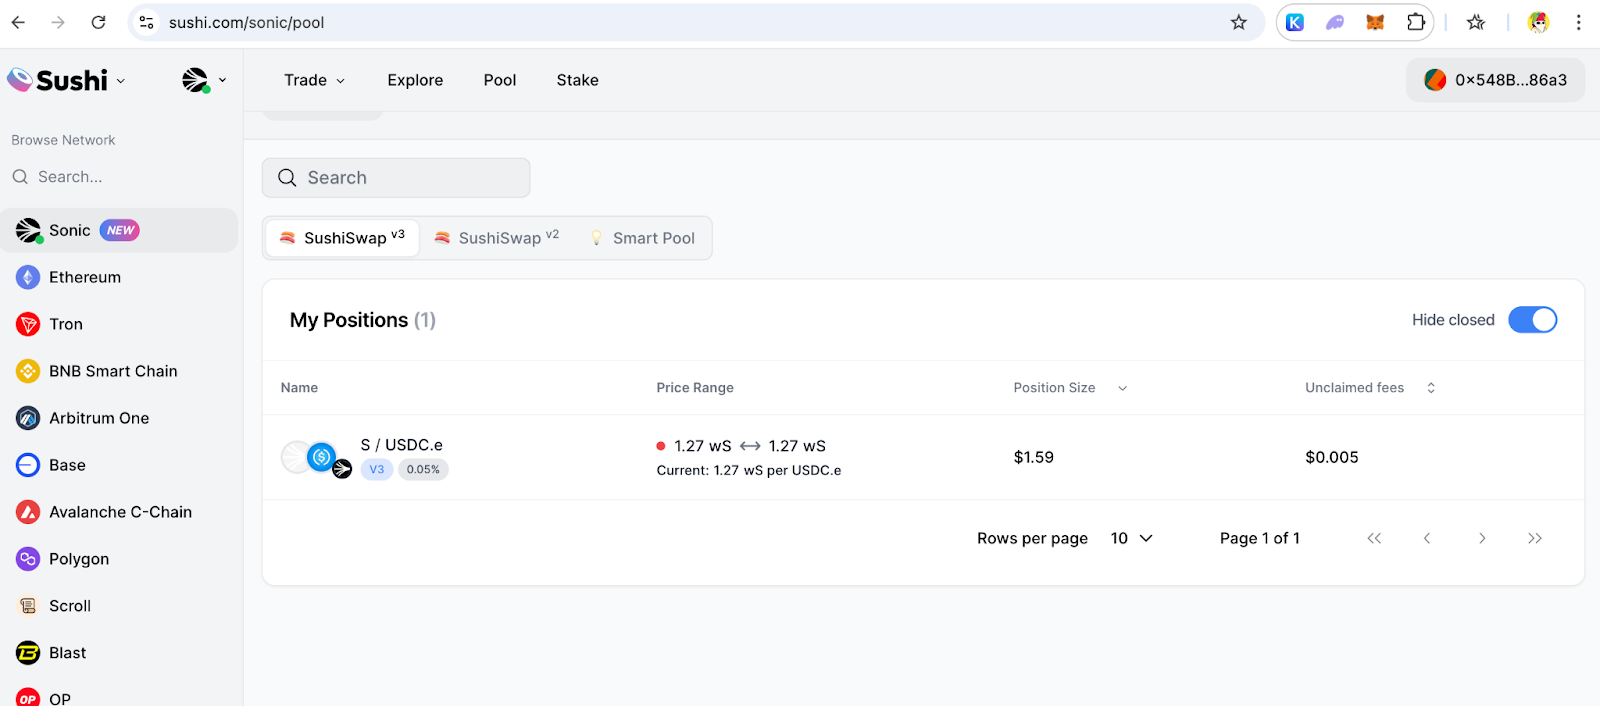
    • Go to the My Position section under the Pools UI to monitor your liquidity.

    Adjust or remove liquidity as needed.


    Notes

    • Use gas tokens (S) for transactions on the Sonic network.
    • Fees and APRs vary by pool. Choose a pool that aligns with your investment goals.
    • Monitor your liquidity position regularly to maximize earnings.

    Important Links

    • Sushi Pools Interface: Sushi Pools
    • Sushi Swap Interface: Sushi Swap

    Here is a step-by-step tutorial to swap tokens and provide liquidity on Sonic via Sushi:


    Bridge Assets to Sonic

    Before swapping tokens on the Sonic network, ensure your assets are bridged to the Sonic ecosystem.

    1. Visit Sonic Gateway
    • Go to Sonic Gateway.
    • Connect Wallet - such as MetaMask.
    1. Select Source and Target Networks
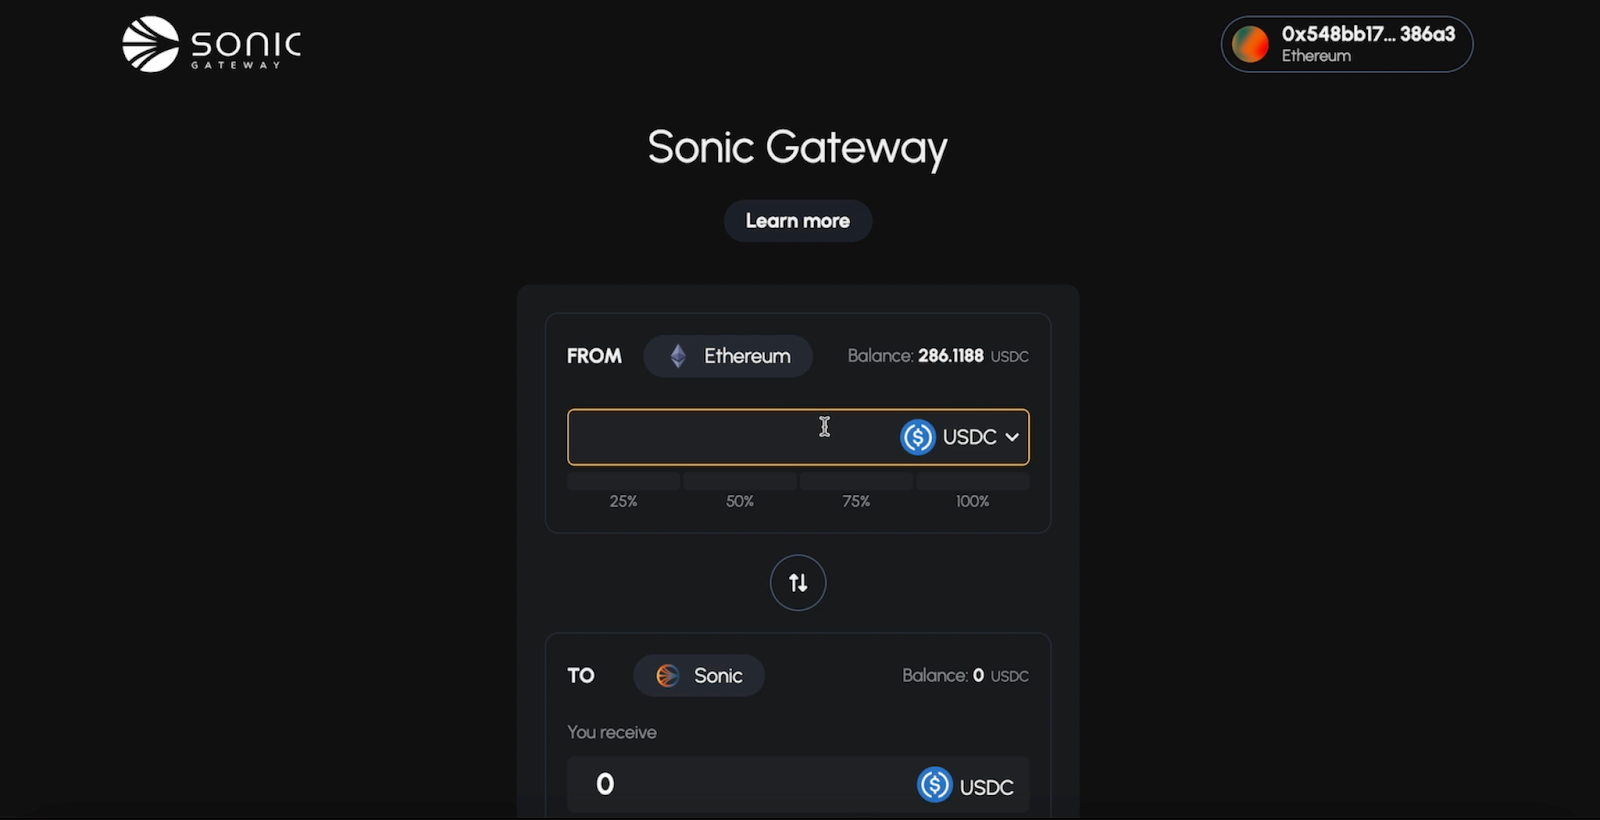
    • Choose Ethereum as the source network and Sonic as the target network.
    • Put the amount you like to bridge over from Ethereum to Sonic.
    1. Transfer Assets
    • Bridge the desired tokens (e.g., USDC) to Sonic.
    • Confirm the transaction and wait for it to complete. The interface will display the estimated time for the bridge.
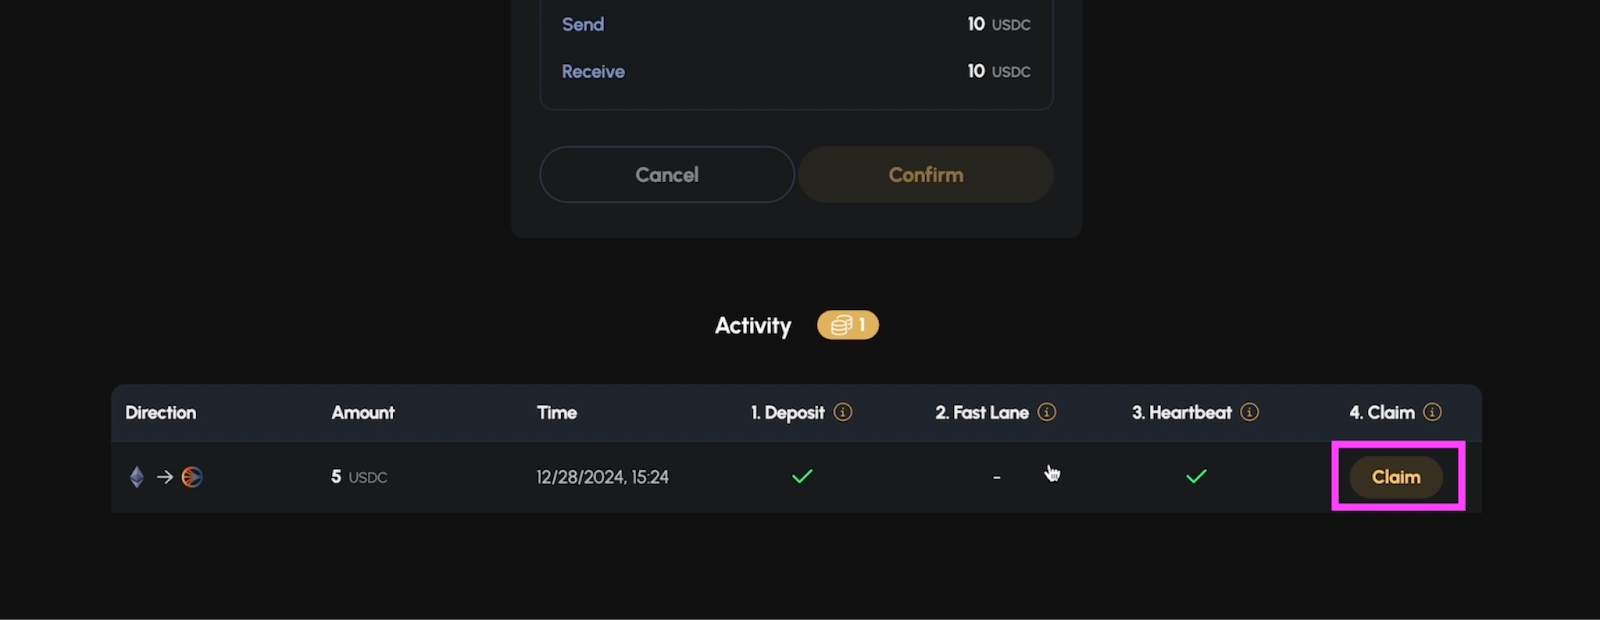
    1. Claim the Assets
    • Once the bridging process is complete, hit the Claim button to receive the assets in your Sonic wallet.
    Swap on Sonic via Sushi

    1. Visit Sushi Interface

    • Navigate to the Sushi interface: Sushi Sonic Swap.

    2. Connect Wallet

    • Use a Web3 wallet compatible with Sonic, such as MetaMask.
    • Follow the prompts to connect your wallet.

    3. Change Network to Sonic

    • Switch from your current network to Sonic using the network selection menu on the left-hand side.
    • Ensure your wallet is correctly configured for the Sonic network.
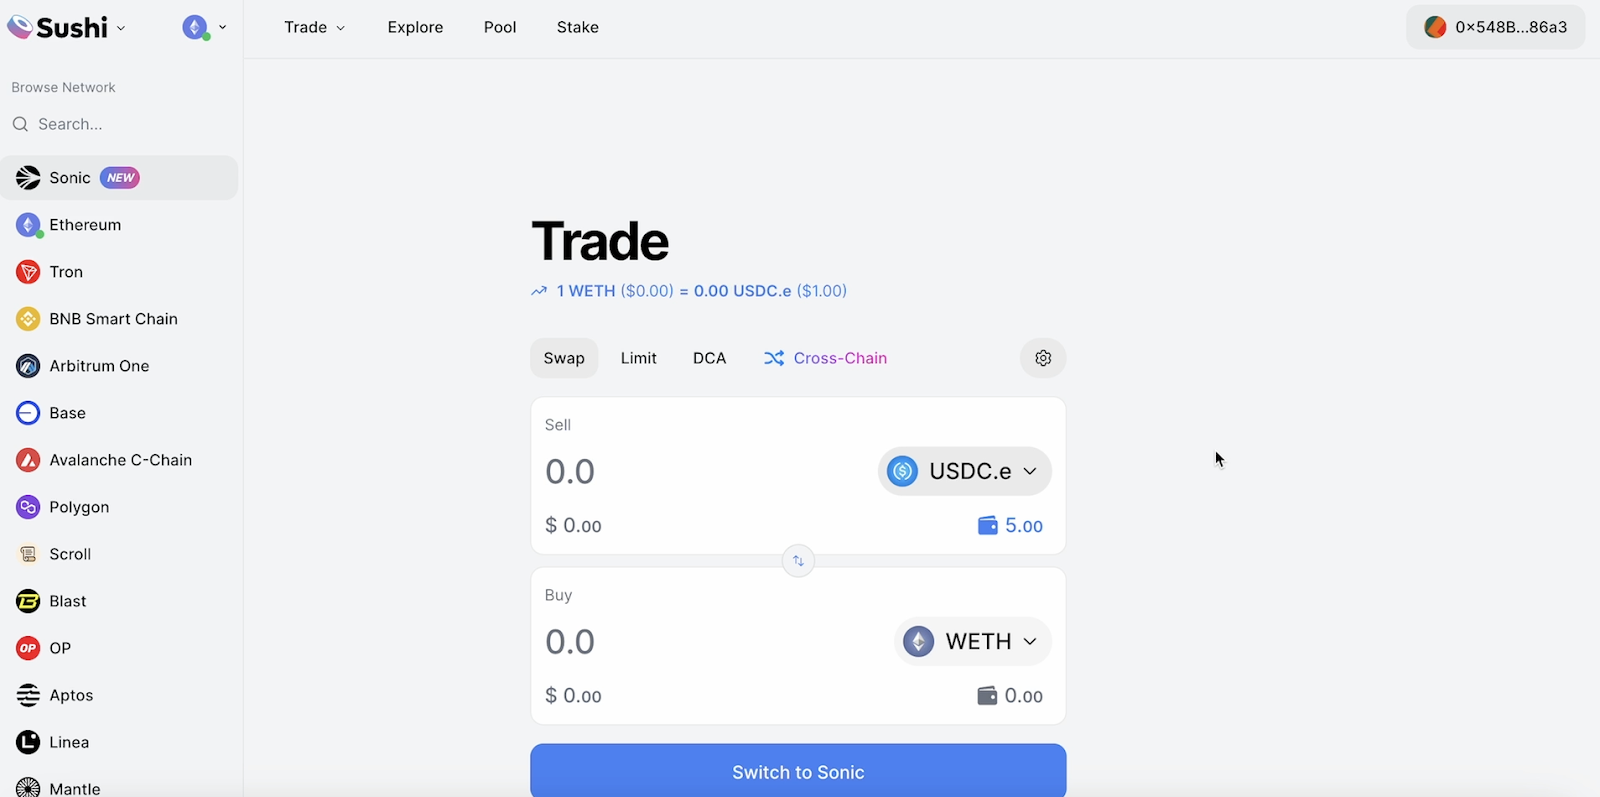
    4. Select Tokens to Swap

    • Click on the token dropdown menu to view available tokens.
    • Note: Your wallet should already contain some Sonic Gas Token (S) to cover gas fees.
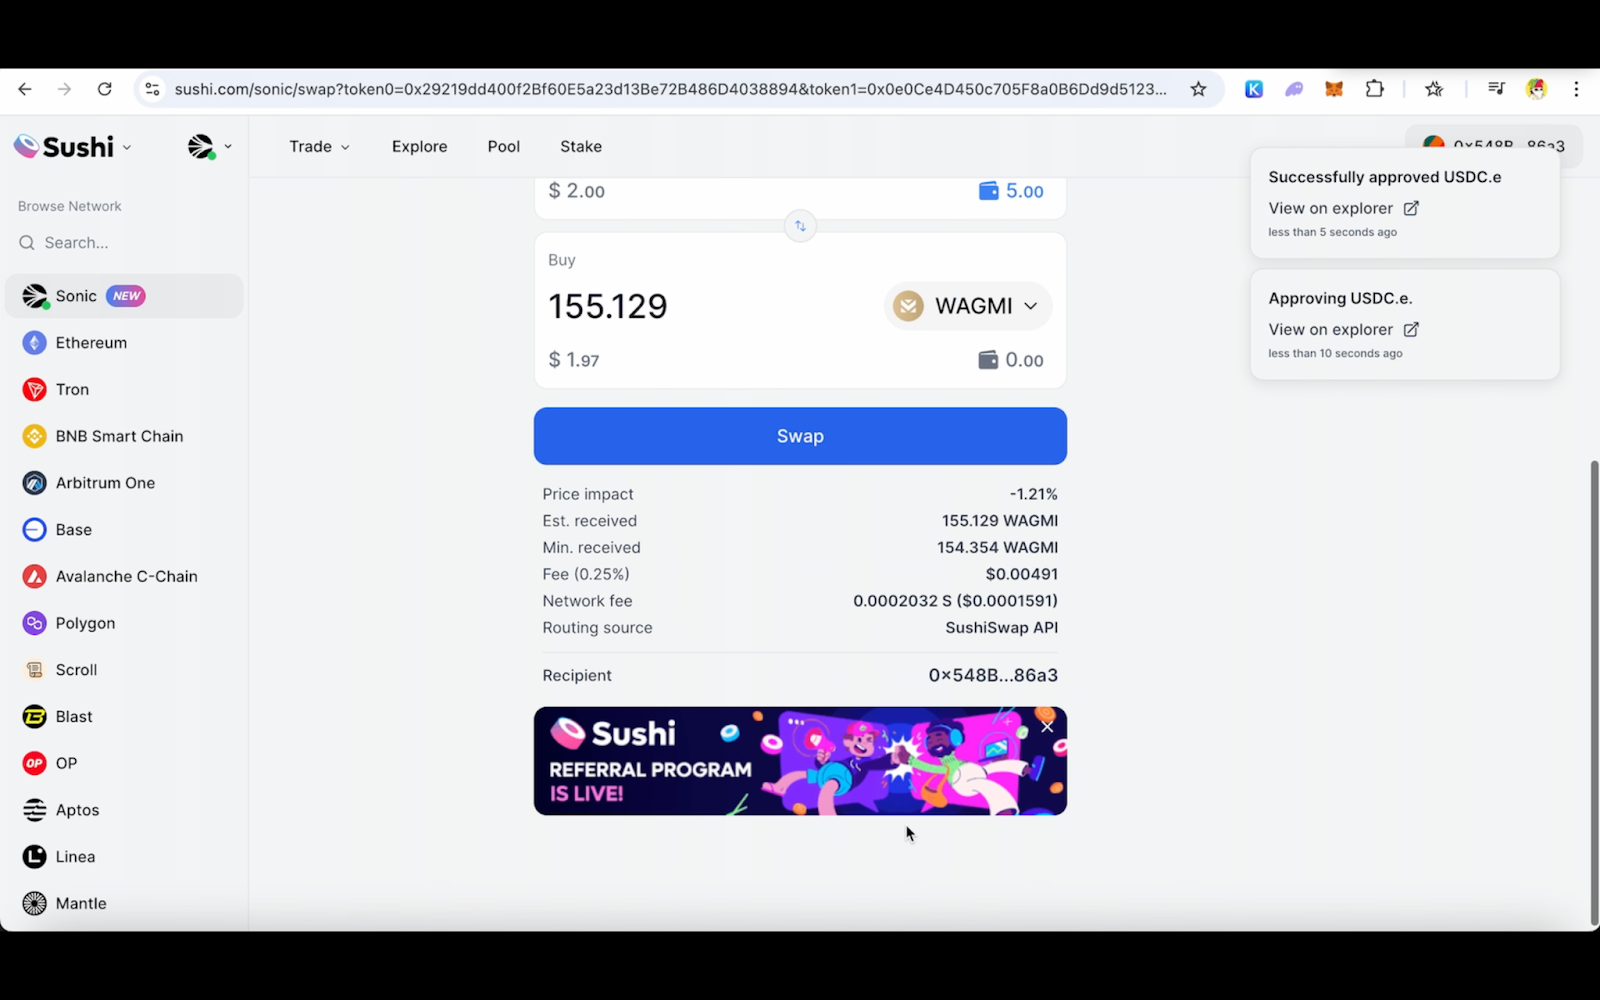
    • Choose the token you want to swap from (e.g., USDC.e) and the token you want to receive (e.g., WAGMI).
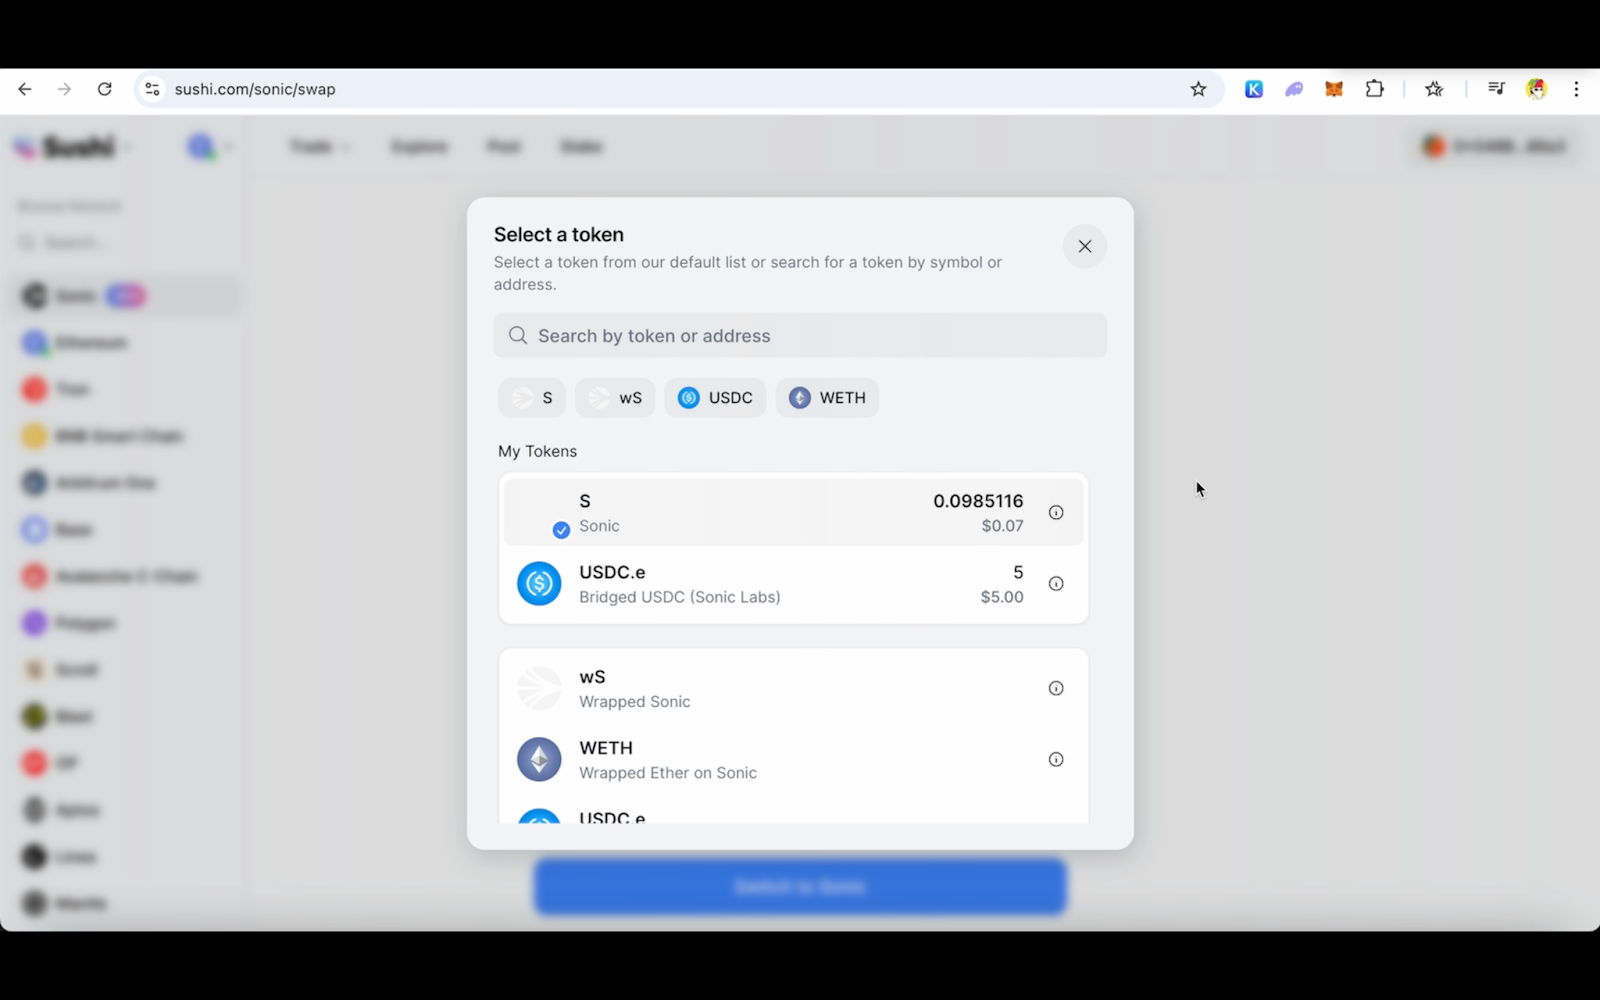
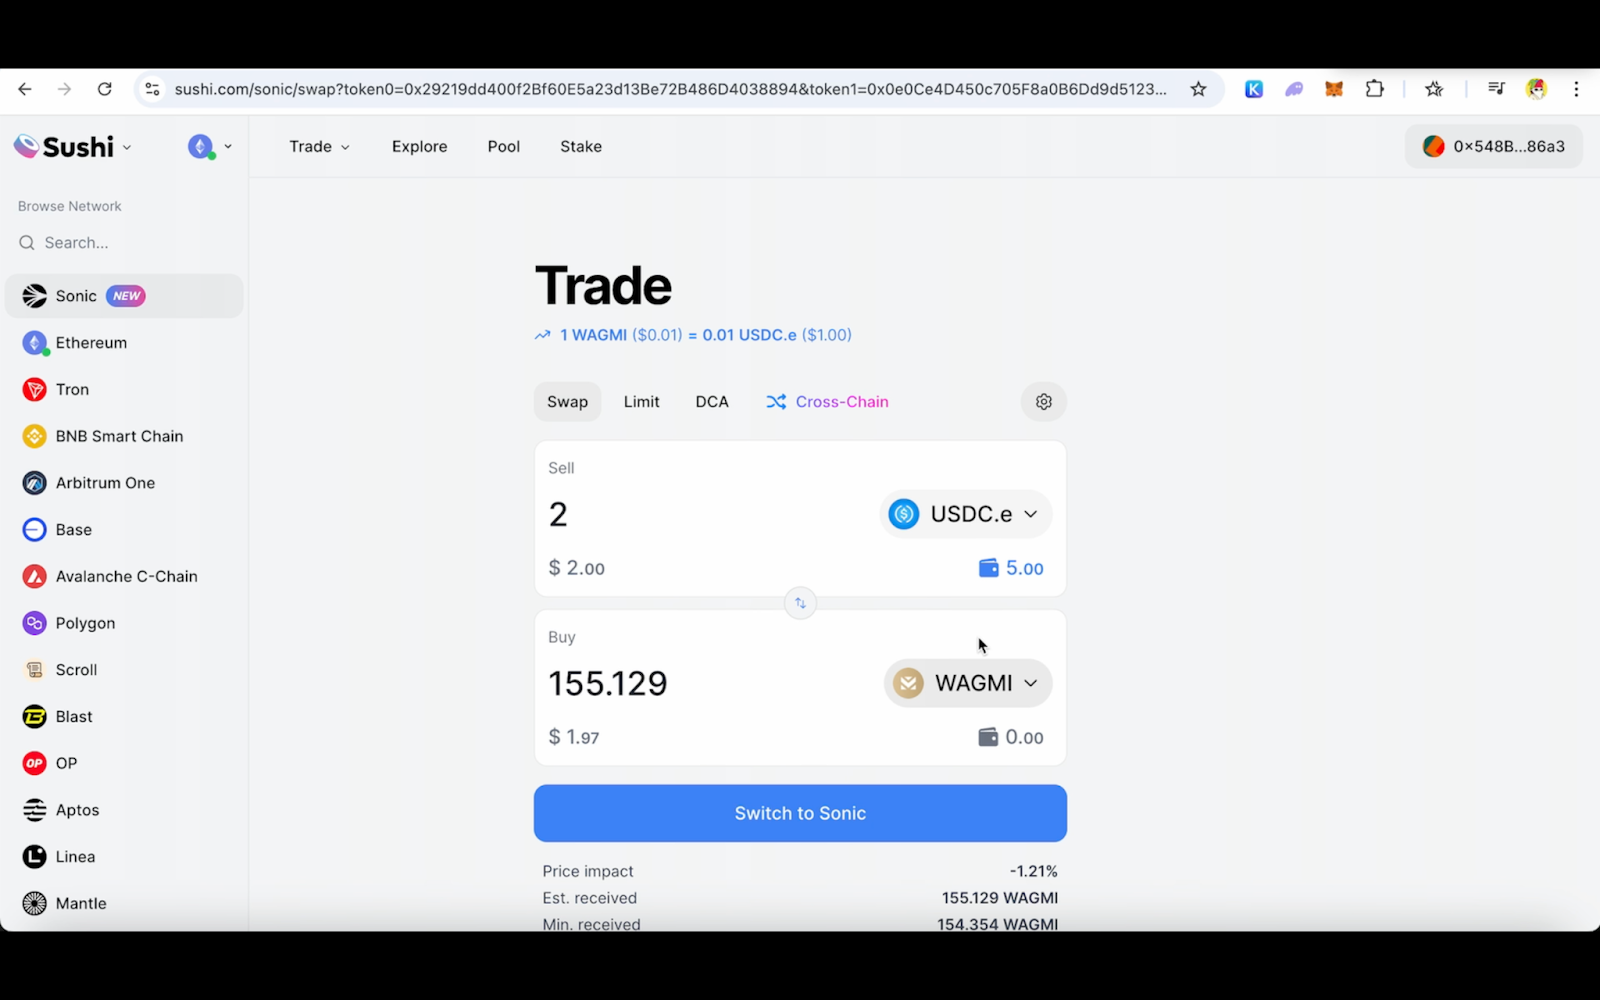
    5. Enter Swap Amount

    • Input the amount of tokens you wish to swap.
    • Review the details such as the estimated received amount, price impact, and fees.
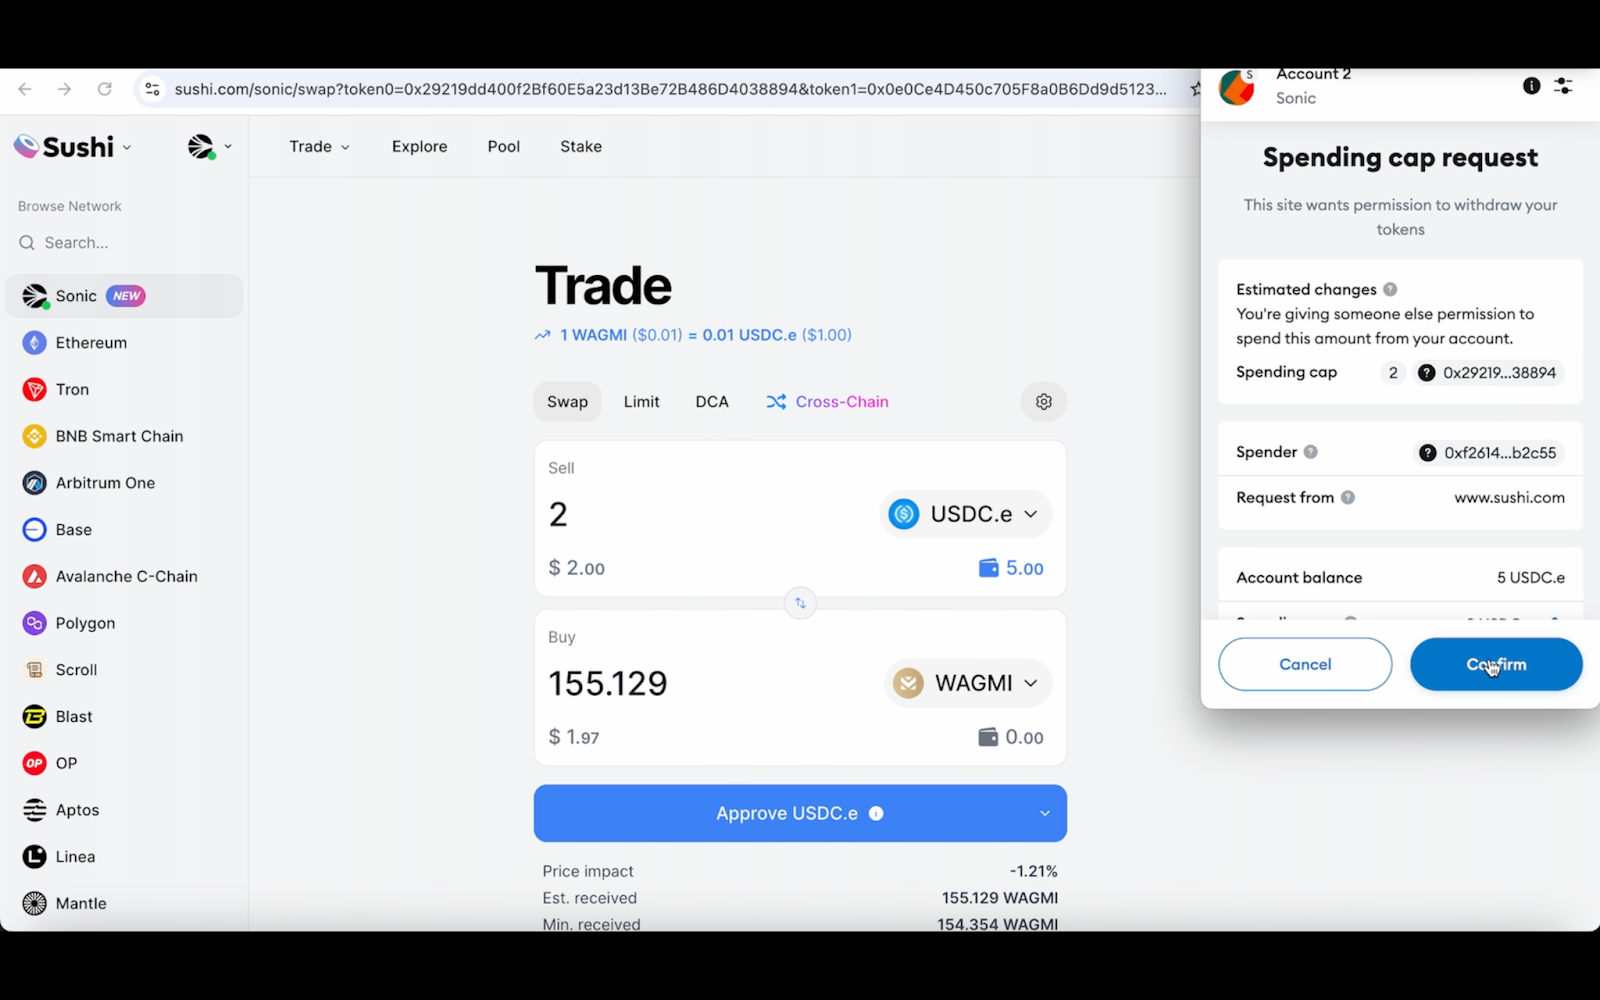
    6. Approve Tokens

    • If this is your first swap for the selected token, click Approve.
    • Confirm the approval transaction in your wallet.
    7. Execute the Swap

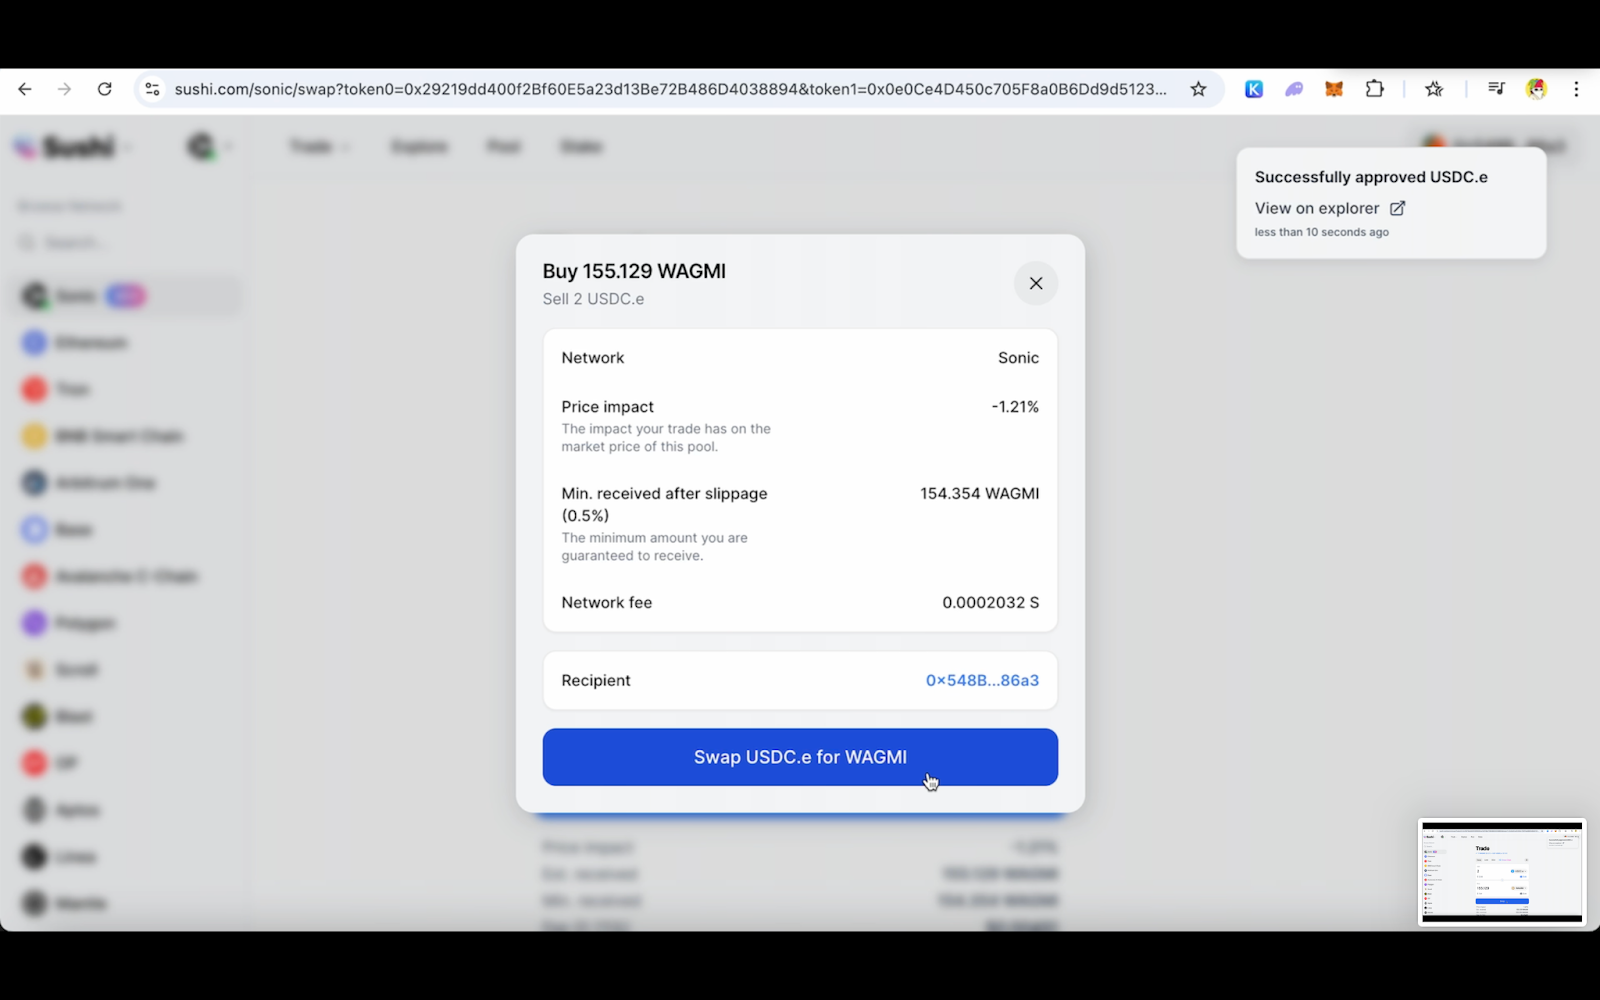
    • After approval, click Swap to initiate the transaction.
    • Confirm the transaction in your wallet interface.
    8. Verify Completion

    • Wait for the confirmation message.
    • The swapped tokens will appear in your wallet.
    How to Provide Liquidity on Sonic via Sushi (V3)


    Liquidity Provisioning on Sonic via Sushi (V3)

    Step 1: Visit the Sushi Pool UI

    Open Sushi Pools or navigate to the Explore tab from Sushi main UI.
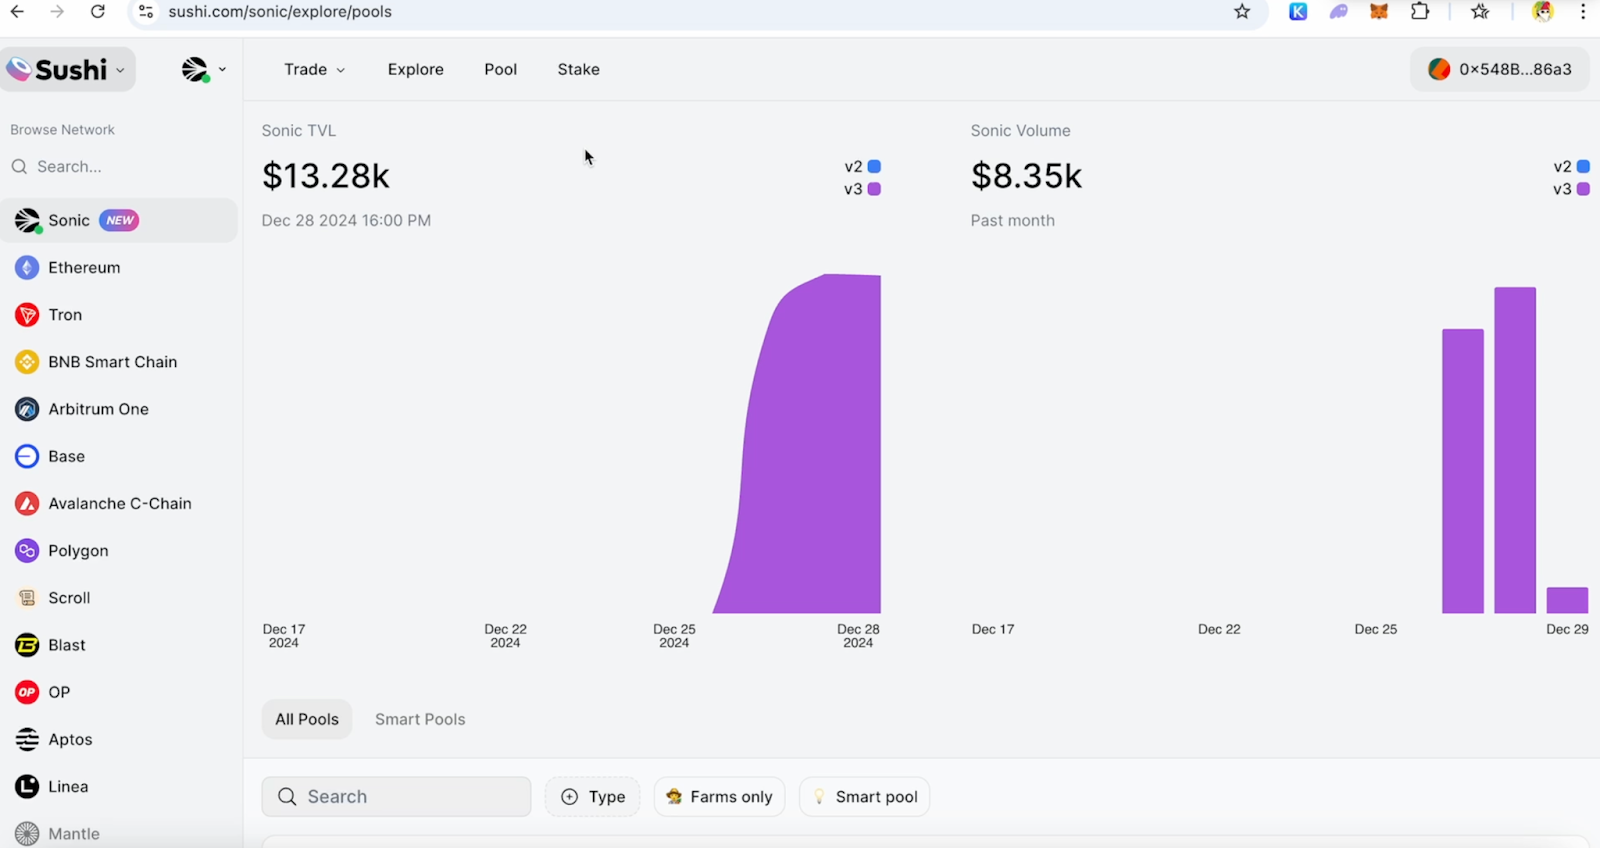

    Step 2: Connect Wallet and Change Network

    • Connect your Web3 wallet (e.g., MetaMask).
    • Switch the network to Sonic from the left-hand menu.

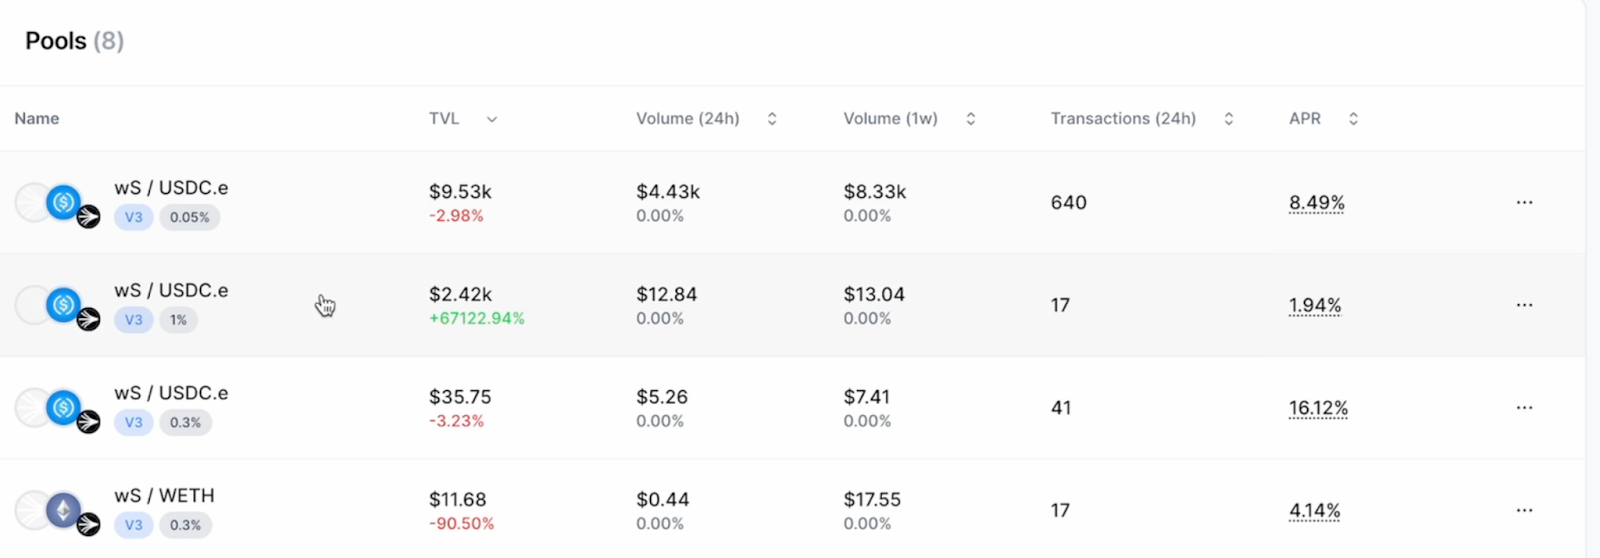
    Step 3: Select a Pool

    Browse available pools, such as wS/USDC.e, and click on the desired pool.

    Step 4: Select Price Range

    • After selecting a pool, click Create Position.
    • Define your price range:
      • Adjust the slider or manually input min and max prices.
      • Choose full-range liquidity if you prefer the classic v2 approach.
    Step 5: Provide Liquidity Amount

    • Enter the amount for one token. The other token amount will auto-populate based on the ratio.
    • Review liquidity details, including token ratios and capital efficiency.
    • Approve tokens by clicking Approve (Token) and confirming the transaction in your wallet.
    Step 6: Approve Tokens

    • Approve tokens by clicking Approve (Token) and confirming the transaction in your wallet.

    Step 7: Review & Confirm

    • Click Preview to review your inputs.

    Confirm the transaction by clicking Add Liquidity and approve it in your wallet.

    Step 8: Manage Position

    • Go to the My Position section under the Pools UI to monitor your liquidity.

    Adjust or remove liquidity as needed.

    Notes

    • Use gas tokens (S) for transactions on the Sonic network.
    • Fees and APRs vary by pool. Choose a pool that aligns with your investment goals.
    • Monitor your liquidity position regularly to maximize earnings.

    Important Links

    • Sushi Pools Interface: Sushi Pools
    • Sushi Swap Interface: Sushi Swap